Getting Started with Full Spectrum Slicing
This is the promise of the Full Spectrum modification of Snapmaker Orca by Radu (a.k.a. “ratdoux”), and it’s not just a party trick…

Editor's Note: June 1st is Snapmaker's 10th Anniversary! We've got a month packed with wonderful celebrations, and we're kicking it off by integrating Full Spectrum color mixing into Snapmaker Orca V2.3.3 Beta!
We suggest reading this whole post, but if you want to skip to the 'How To' Guide, you can head to Section 3.
Special thanks to Wombley for this guest blog!
1. Introduction
Hi, hello! Wombley here. :-)
What if I told you these were each 3D printed in one go using only four filaments per model?
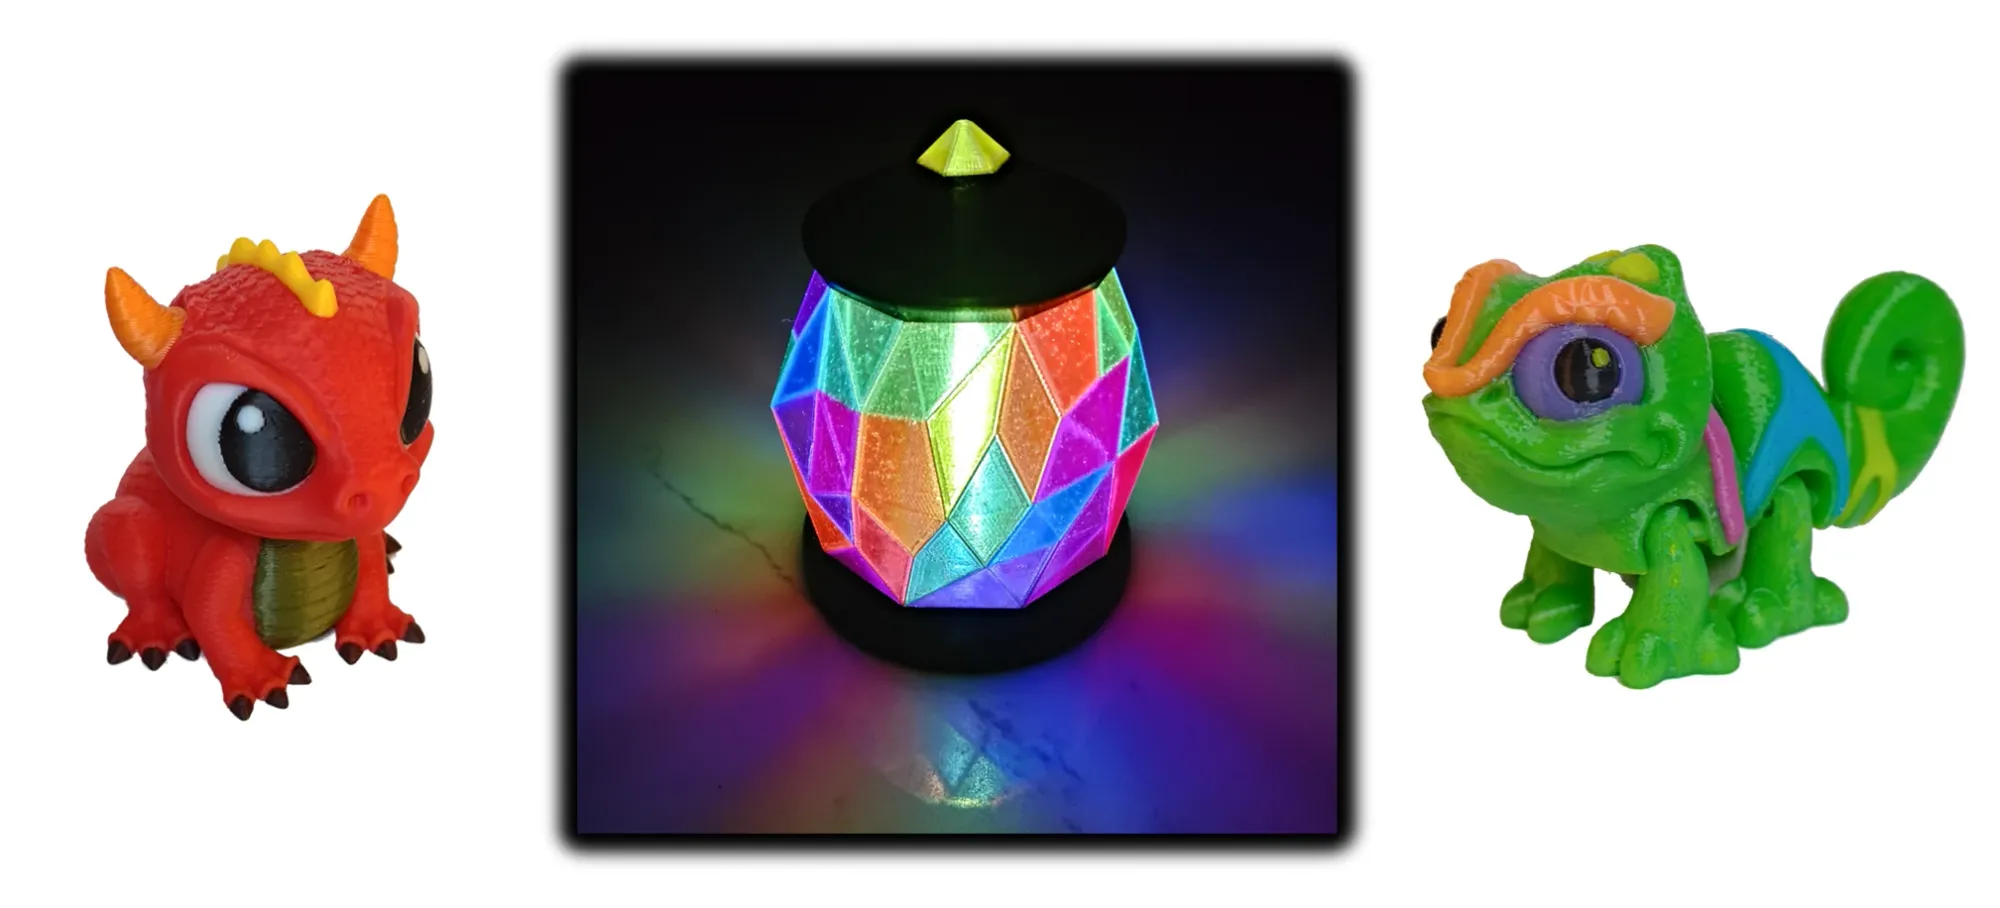
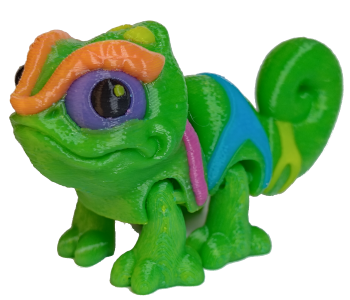
Yes, seven-color Adorable Baby Dragons (IK3D) and Chibi Panther Chameleons (Raki-Box), and a lantern with 12-colored facets, all printed with just four filaments on the Snapmaker U1. And with no significant increase in waste.
This is the promise of the Full Spectrum modification of Snapmaker Orca by Radu (a.k.a. “ratdoux”), and it’s not just a party trick. It’s based on a clever old illusion, smartly implemented, but only now made practical for everyone by the rise of a tool-changing printer accessible to the masses: The Snapmaker U1.
And with lead community developer Radu joining Snapmaker, Full Spectrum features are now available in the Snapmaker Orca v2.3.3 open beta!
It’s easy, too. If you know how to paint and slice your models, then for the most part, you already know how to use Full Spectrum.
In this article I’ll start by explaining the illusion behind slicing using Full Spectrum features, highlighting some caveats to bear in mind. It’s very cool, but not without its limits!
That understood, we’ll look at how Full Spectrum makes it easy paint and print your own models in a wide array of colors and look at some examples.
This article focuses on the most basic color mixing method available in Full Spectrum. If you read through to the end I’ll wrap it up with a useful test print you can start with, and collect all the suggestions for Full Spectrum success in one place.
2. How It Works
The not-so-secret magic behind Full Spectrum comes from the simple idea of color dithering or, perhaps more accurately, “halftoning.” It works by alternating colors in patterns smaller than the eye can perceive, which results in seeing a third, mixed color. There are examples of this all over your daily life, and they’re easy to miss unless we look closely.
The screen you’re probably reading this on is a great example! Though it shows images in up to millions of apparent colors, under a microscope it’s often made up of millions of only red, green, and blue (RGB) pixels packed closely together:
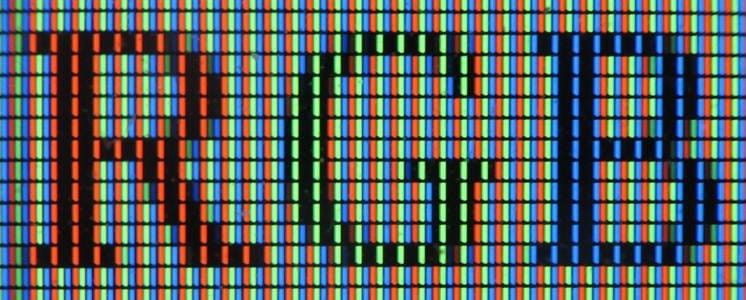
Viewed from a distance, you see RGB in color rather than a bunch of dots.
A screen is different from 3D printing, however, in that digital screens use additive color: Each pixel emits light so colors add together. Emitting additively is well suited to the use of RGB as primary colors for a very wide gamut.
A better analogy for halftoning in 3D printing would be printing this page on paper. Paper printers lay down tiny dots of typically cyan, magenta, yellow, (CMY) and black, onto white paper to similar effect. Different, microscopic dot patterns again yield various colors:
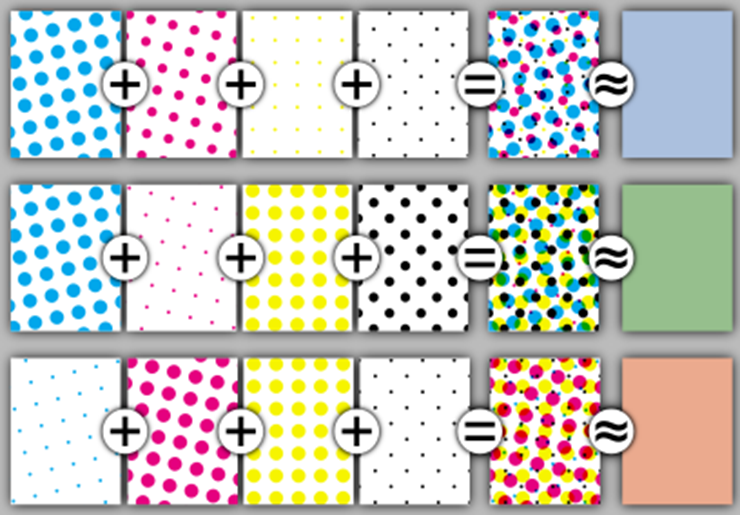
In the case of paper (and 3D) printing, colors are produced by different pigments absorbing light so they combine in subtraction. Given the absorbing, subtractive nature of dyes/pigments and if still only using three colors, CMY is better arranged to have the widest range of colors (rather than the RGB in light-emitting displays).
That doesn’t mean either set of colors is strictly the best for your 3D print, but we’ll come back to that later…
2.1. The Full Spectrum Illusion: Layer Dithering
How does Full Spectrum achieve a similar illusion on an FDM 3D printer? By alternating colors, layer by layer. Simple enough to do with a full tool changer like the Snapmaker U1! And made simpler with the addition of Full Spectrum slicing. How does it compare to our examples above?
As illustrated at least as far back as Tim Kuipers’ 2017 study on halftoning, if we lay down alternating colors (for example, blue and yellow) and make them thinner and thinner, we discover a similar effect to paper printers and LCD screens:
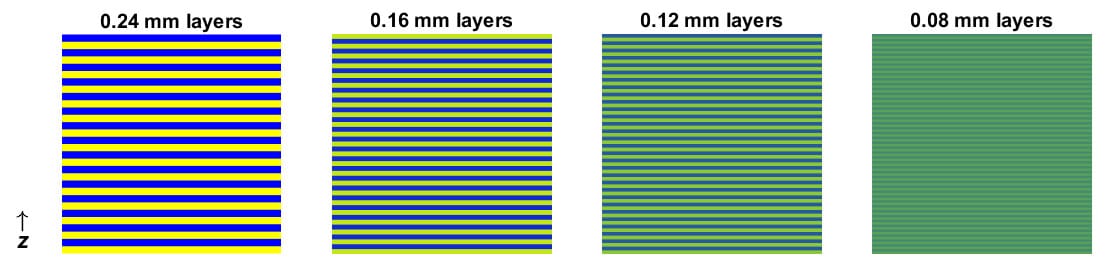
To the naked eye, the colors begin to blend together to make green, especially when viewed at a distance. This is the trick of Full Spectrum which lets you define virtual “Mixed Colors” by stacking different colored filaments together.
The keen observer will see two major things affect layered filaments to enhance the blending illusion: One is making the “color stack” so small we can’t see it, and the other is the possibility for apparent layer colors to look more like each other as the layers get thin. Let’s illustrate these two effects…
2.2. Color Stack Height
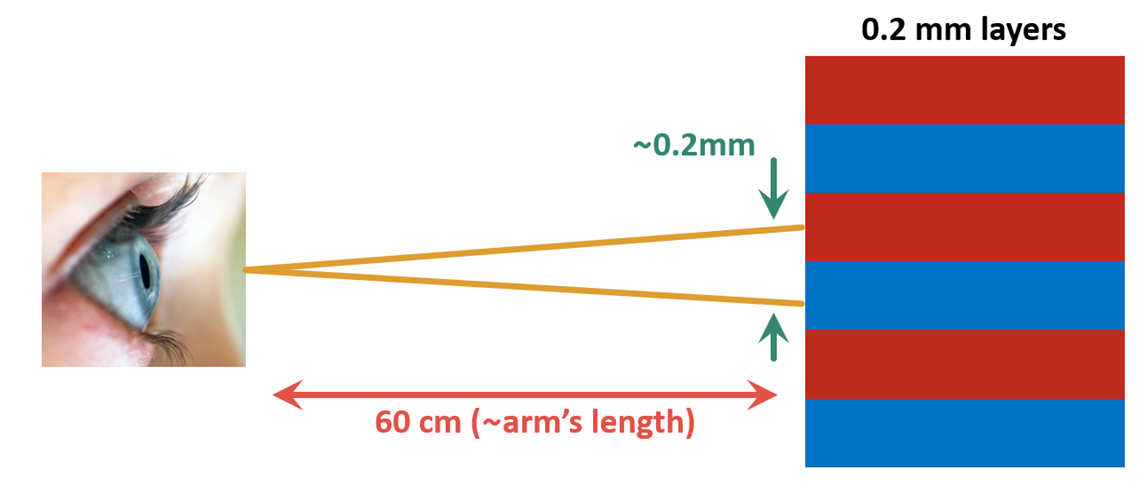
First, as the “color stack” gets thin in height, the spacing of colors becomes smaller than what the human eye can resolve at a distance. In this case, we see an average of the reflected colors.
How thin is “thin enough?” Well, a healthy human eye can resolve an angle of about 0.02°. (Actually, slightly less than that.) If we were viewing a 3D print at arm’s distance (about 60 cm), then we should be able to see things as small as 0.2 mm. If we printed something with alternating colors at 0.2 mm layer height, then it might look like this:
In this case, we should just be able to see the two alternating colors clearly. However, our 3D printer can do better than that! If we were to cut it down to an 0.1 mm layer height, then we have this:
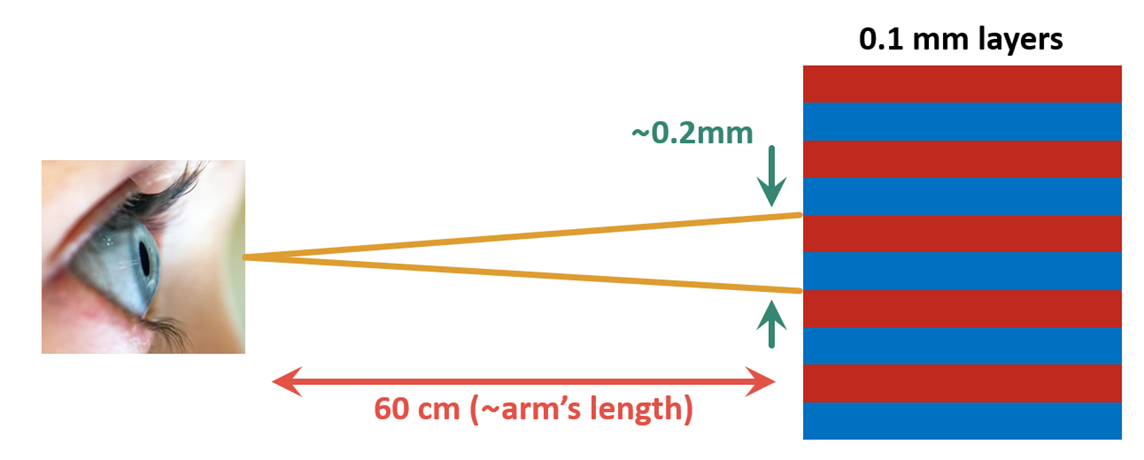
Now our two colors fit inside that 0.2 mm resolution, and would combine subtractively into a third apparent color.
This “smaller is better” part is intuitively obvious when compared to the examples of printed paper and LCD pixels above: To truly hide our color blending at arms distance, we don’t want our stack of colors to much exceed about 0.2 mm in height.
2.3. Filament Translucency
Second, if our filament is partly translucent then the thinner the layers are, the more the reflected colors by layer will tend towards their neighbors. This happens because if a filament doesn’t absorb too much light, the light spreads through the layers, being absorbed partly by one layer and partly by adjacent layers. The apparent colors reflected to the viewer shift towards each other, reducing the contrast between them. For the same blue and yellow mixture but with different translucency filaments, it might look like this up close:
To the human eye, this reduction in contrast further masks the “zebra stripes” we might otherwise see, as we compare the opaque lines (left) to what we may have with a more translucent filament (right).
I refer to this as the “HueForge effect,” as it’s precisely what’s used to produce stunning, pseudo-2D blended color prints using an FDM 3D printer with HueForge and similar image-coloring software tools. For HueForge, very thin translucent layers are stacked to make varying shades of colors viewed from above. But it also plays a role in Full Spectrum-style printing, even when viewing vertical walls from the side.
Practically speaking, this effect is more useful for hiding stripes when printing alternating colors on sloped surfaces. For example, the test print in Figure 6 uses red, yellow, and blue filaments in alternating pairs across a range of wedge angles. Using opaque filament (top print), striping is visible from multiple angles, getting worse at very shallow slopes:
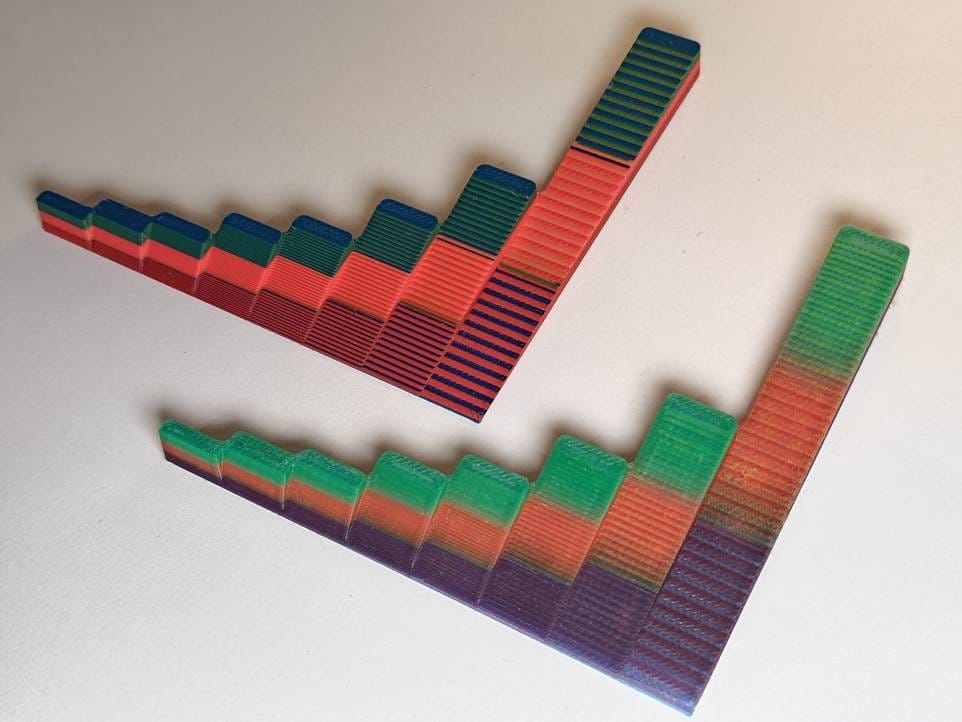
Very opaque filament (top print) is good for distinct color lines when desired but bad if you want colors to blend. For Full Spectrum-style printing, partly translucent filament (bottom print) can significantly enhance the color blending illusion, especially on shallow slopes.
2.4. Dithering Limitations vs. the Strength of the U1
Before we get to slicing, let’s consider the limitations with the most basic form of Full Spectrum-style color dithering as we understand so far:
- Needs filament changes
- Added time for thinner layers (less than usual 0.2 mm layers)
- Preference for specific filament to improve color blending
The most obvious drawback is why a full tool changer like the Snapmaker U1 is strongly recommended: We need to repeatedly change filaments layer by layer.
On a “traditional,” single-nozzle printer that changes filaments from a box, this would be extremely wasteful of both material and time due to the need for constant rewinds and purges between swaps.
On a tool changer, this is no more challenging than any print that’s already multiple colors per layer. While a single-nozzle printer might take days for a multicolor with lots of color changes and spools of purged filament, the U1 swaps colors in seconds after a quick wipe on the tower.
That’s still true when dithering, and probably why you got a tool changer, yeah? :-)
Second, prints will take longer printing thinner layers because there’s just more layers to get through. On the bright side, you then benefit from higher print quality. And the result is still much faster than a single-nozzle printer, and still similar to or faster than some other printers that directly print more than four colors.
Lastly, the preference for partly translucent filaments to help smooth out the color blending. This can be partly worked around by sticking to thin layers and very short (50/50) color stacks. But it does still do better with the right filaments to get the most out of Full Spectrum.
Alright, enough of the theory for now! Time to make stuff.
3. How to Use Full Spectrum
Let’s see just how easy it is to add your own blended colors to a slicing job using Full Spectrum.
While writing this, it was announced lead community developer Radu has been hired by Snapmaker to make these features an integrated part of the official Snapmaker Orca! So this article is based on Snapmaker Orca (2.3.3) open beta with Full Spectrum.
Download your copy here from the nightly builds over at Snapmaker's github page.
3.1. Filament Management (Mixing Options)
Once you start up Snapmaker Orca it looks much like the original “Snorca,” with the filament area featuring something new…

Below the usual filament selection there’s now an added “Mixed Filaments” section!
Note: If needed, you can collapse the Filament Management region by clicking on the title “Filament Management” text to liberate screen space.
This is where you can define blends of filaments in various ways. By default, the slicer will automatically generate all combinations of 50/50 blends for your currently active filaments.
Note: The auto-generated mixed colors feature can be disabled in the slicer main menu Preferences.
Also note that just adding 50/50 blends already boosts us from 4 color options to 10. Nice! But there’s more.
Buttons here work similar to the normal Filament menus:
- To add a mix, click the +[Spool] icon in the Color Mixing title bar.
- To remove your last mix, click the -[Spool] icon in the Color Mixing title bar.
- To edit a mix, click the text of the color mix next to the desired color, or click the (...) icon and choose Edit.
Start by adding your own mix: Click the +[Spool] icon in the Color Mixing title bar to see the options/tabs for defining one. Let's see how different tabs let you pick your favorite colors, then show how we use those for painting models.
1. Ratio Mix
The Ratio Mix tab lets you choose a 2 to 3 color blend from a gradient slider.
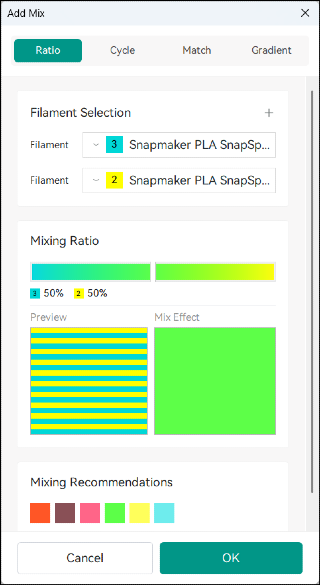
Filament Selection drop downs let you choose which two, physical filaments you'd like to mix.
Mixing Ratio slider lets you select a desired, blended color mixing ratio from the displayed gradient. Here shown with a 50%/50% blend of cyan to yellow.
Press the "+" button at the top of Filament Selection to add a third color to the mix.
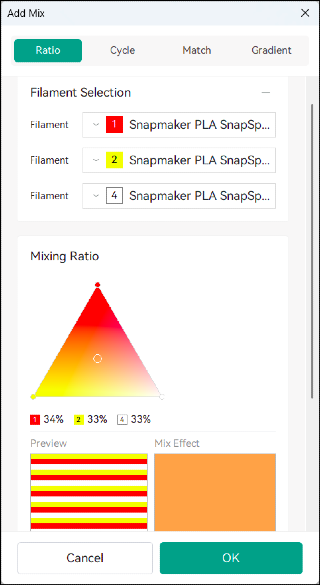
A Gradient Triangle is shown letting you click to select a mix made by blending the 3 chosen filaments. (Press "-" to return to blending only 2 colors.)
Preview shows this blend of 34%/33%/33% will be created with a repeating pattern of 1 layer of red, 1 layer of yellow, and 1 layer of white.
Mix Effect shows an estimate of the combined color, assuming optimum blending. This is only an estimate and may vary depending on print settings and filament used.
Mixing Recommendations for a 2-color Ratio shows all 2-layer blends you can make with any available pair of filaments (50%/50%).
Mixing Recommendations for 3-color Ratio (scroll down) shows all available color combinations involving 3-4 layers of color you can make with any available set of 3 filaments.
Recommended colors may produce the best results as it’s best to keep the “color stack” short to keep color mixing invisible.
2. Cycle Mix
The Cycle tab lets you directly type any repeating pattern of colors you want to create a mixed color or color pattern. This one is my personal favorite!
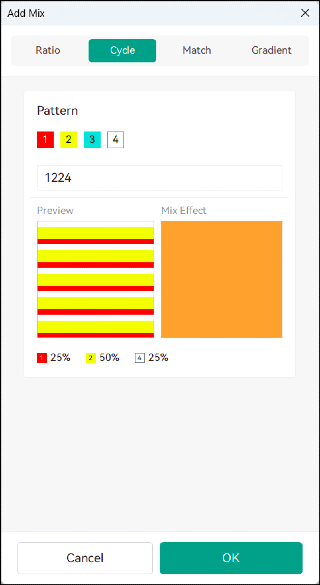
In the Pattern text box type whatever you like for direct control of the layer sequence. Here I’ve entered “1224” which, for the main Filaments shown, would be “Red, Yellow, Yellow, White.”
Note: If you prefer to use your mouse, you can instead click on the Filament numbers 1, 2, 3, 4 in the submenu to add that number to the end of the pattern.
As shown in the Preview, the pattern repeats itself when the end is reached. The resulting mixing percentage of each filament is also displayed below.
Note: If your pattern is longer than 20 filaments/characters, not all will be displayed in the limited Preview. Your actual printed color stack will still follow what's in the text box and repeat when the end is reached.
Mix Effect shows an estimate of the combined color, assuming optimum blending. This is only an estimate and may vary depending on print settings and filament used.
3. Match Mix
Have a specific color in mind? The Match tab tries to find your color mix for you!
Pick or enter a color and let the slicer suggest which filaments and how to mix them to get as close as possible.
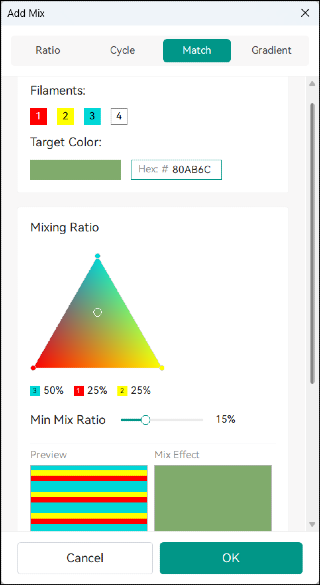
Target Color is chosen by clicking on the target color to use a color picker, or by directly entering the 6-digit RGB hex color code. The slicer will search all blends of 2 to 3 main filament colors.
Mixing Ratio behaves like the Ratio tab above after the nearest blend is found, in case you'd like to fine tune the calculated color. The gradient chooser will be a slider if a 2-color mix was found, and a triangle if a 3-color mix was found.
Mixing Recommendations list seen below by scrolling down shows (almost...) all available color combinations of up to 4 layers of color. Recommended colors may produce the best results as it’s best to keep the “color stack” short to keep color mixing invisible.
Min Mix Ratio is important: This feature lets you limit the smallest percentage any single color is allowed to be. This is to avoid very sparse mixtures or extremely thin layers.
Blends with a color at less than Min Mix Ratio are avoided. Colors found outside this limit are pushed to the nearest one in the allowed range. The resulting Mixing Ratio gradient/triangle selectors are also limited by the Min Mix Ratio.
The default Min Mix Ratio is 15% and can be changed using the slider.
If the color match fails you may see a warning at the top of the screen:
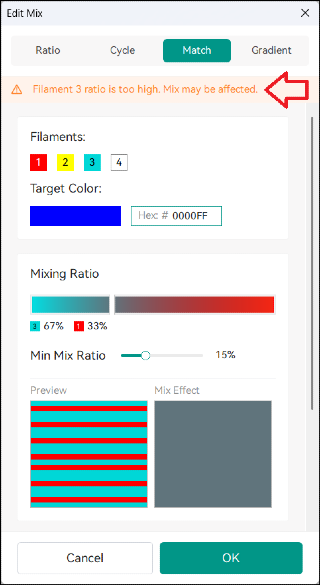
There are two reasons you may see this warning or fail to get a match:
- The exact color wasn't found using the available Filaments. You may need different actual Filament colors to start from.
- A match was found, but one or more filaments was at a ratio lower than the Min Mix Ratio (see above) and may have been rounded up.
In this example, both are true!
4. Gradient Mix (Experimental)
The Gradient tab allows you to, you guessed it, create a smooth gradient blend from one of your Filament colors to another.
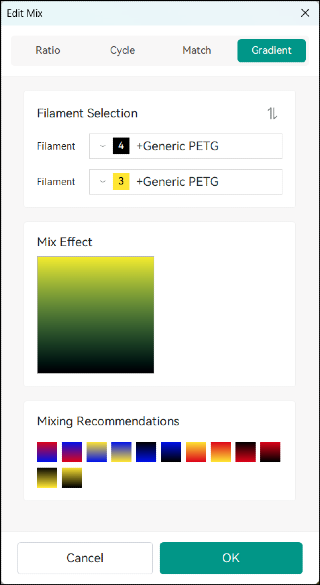
To choose a gradient, pick two colors in your Filament Selection. Colors work from the bottom up.
Mixing Recommendations shows all available gradient pairs for your set of selected Filaments for direct selection.
Mix Effect previews the gradient effect. This example is correct: Black and yellow make an olive green when blended!
Note: Gradient is Experimental as of v2.3.3 beta.
For Gradients to slice properly, you must enable Subdivide Mix Layer as well as Full domain for it to sweep the entire painted area. These are found in Process settings at the bottom of the Multimaterial tab under "Color Mixing (Experimental)."
Why is it experimental? Let's see what happens when we slice a small, 5 mm cube at 0.2 mm layer height with our black to yellow gradient with these settings enabled:
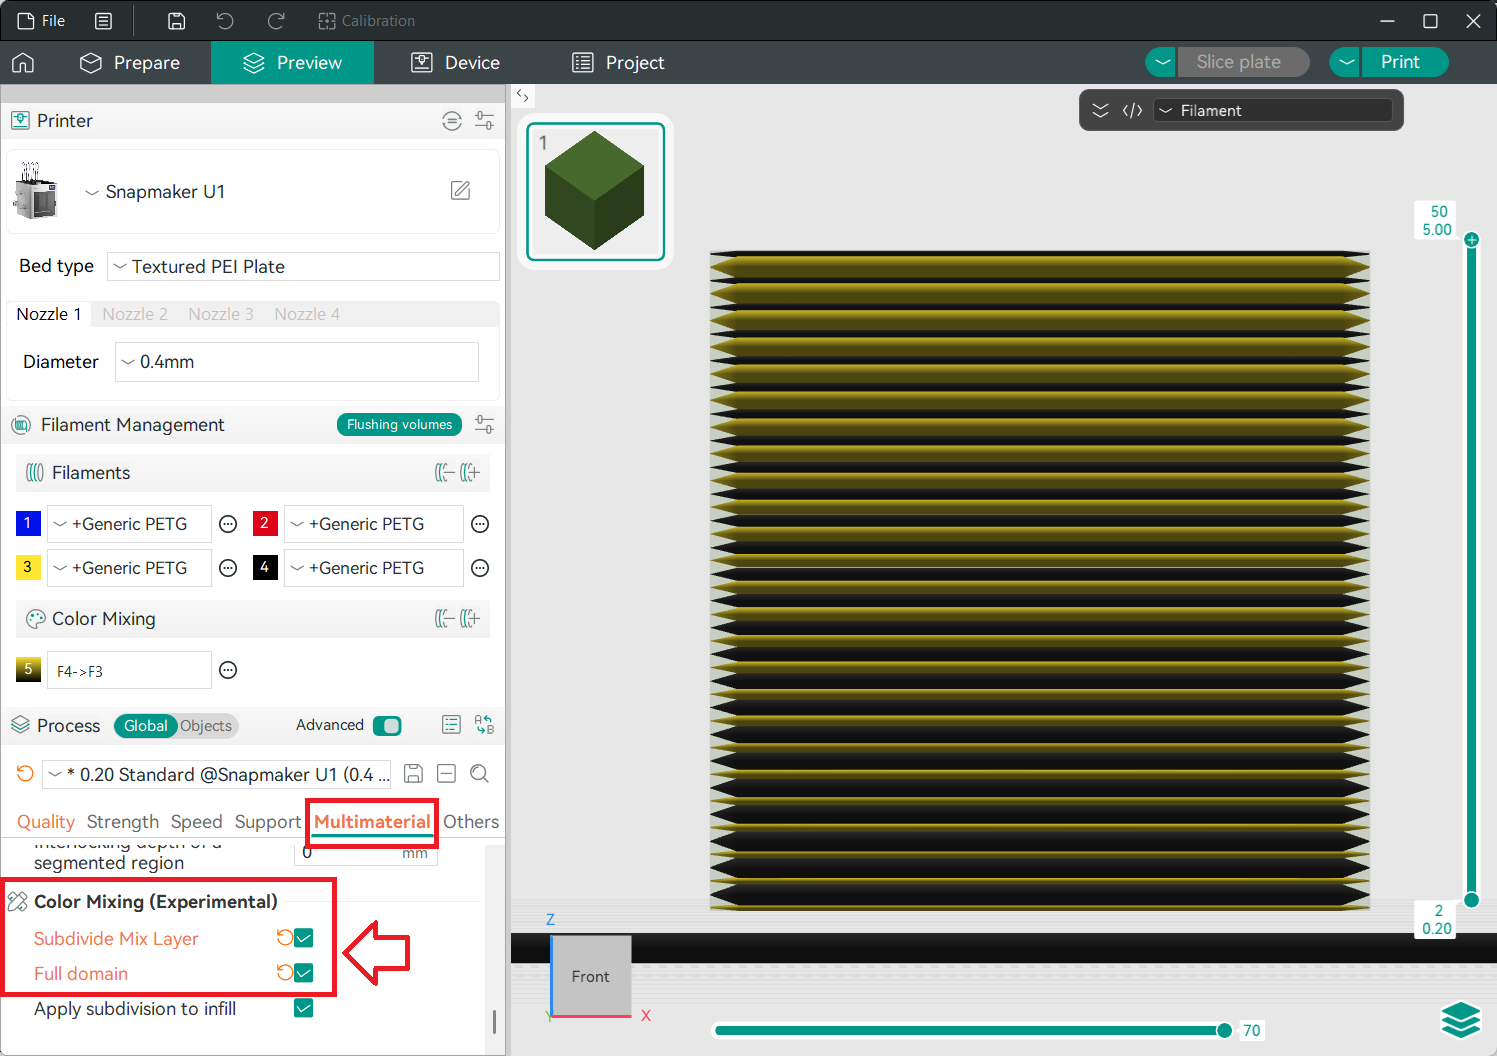
Looking closely at the sliced cube, towards the bottom there are thin yellow layers with thick black layers. As it builds to the top these are thick yellow layers combining with thin black layers.
Subdivide Mix Layer splits each macroscopic layer (in this example, 0.2 mm thick) into thinner layers to create a blend. The ratio/height of colors within each layer is gradually changed to produce an almost invisible gradient effect across the thicker layers. In fact...
Note: Gradient (and Subdivide Mix Layers) is better done with a slightly thicker Layer Height like 0.2 mm for best results.
We need to give each layer enough thickness to split into smaller sub-layers. For an 0.4 mm nozzle, a primary layer thickness of 0.28 mm down to no smaller than 0.16 mm is best for Gradient.
Note: Gradient-painted regions still only preview as one color in the Prepare tab in Snapmaker Orca v2.3.3 beta before slicing. You can confirm in the sliced Preview tab before printing that gradient regions slice as shown in Figure 14 by viewing sub-layers from a view directly perpendicular to the surface (e.g., Front or Right view).
5. About Subdivide Mix Layers (Experimental)
The main focus of this article is basic Snapmaker Orca Full Spectrum methods. The kind where patterns of color are stacked at a fixed layer height.
I tipped my hand to show how Gradient works. But Subdivide Mix Layers (formerly "Local Z") is a potentially powerful solution Radu has been optimizing since the earliest community fork. When used with regular mixes, it can achieve Full Spectrum-style printing at even greater color depth with minimum penalty to print time.
Stay tuned for more on this advanced feature as it continues to develop, or experiment today if you're bold!
3.2. Use Your Mixed Filament
At this point, if you already know how to assign colors in a modern slicer, then the learning is done! Your Mixed Filaments will now appear as added filament options anywhere in the slicer that involves color/filament assignment. Color and slice your model as you normally would.
1. Paint Your Model
For example, in the Object Browser or 3D view, right clicking on a part and selecting Change Filament will show the complete list of my 4 primary Filaments, as well as the 3 Mixed Filament colors I’ve created, allowing me to assign colors directly to a part:
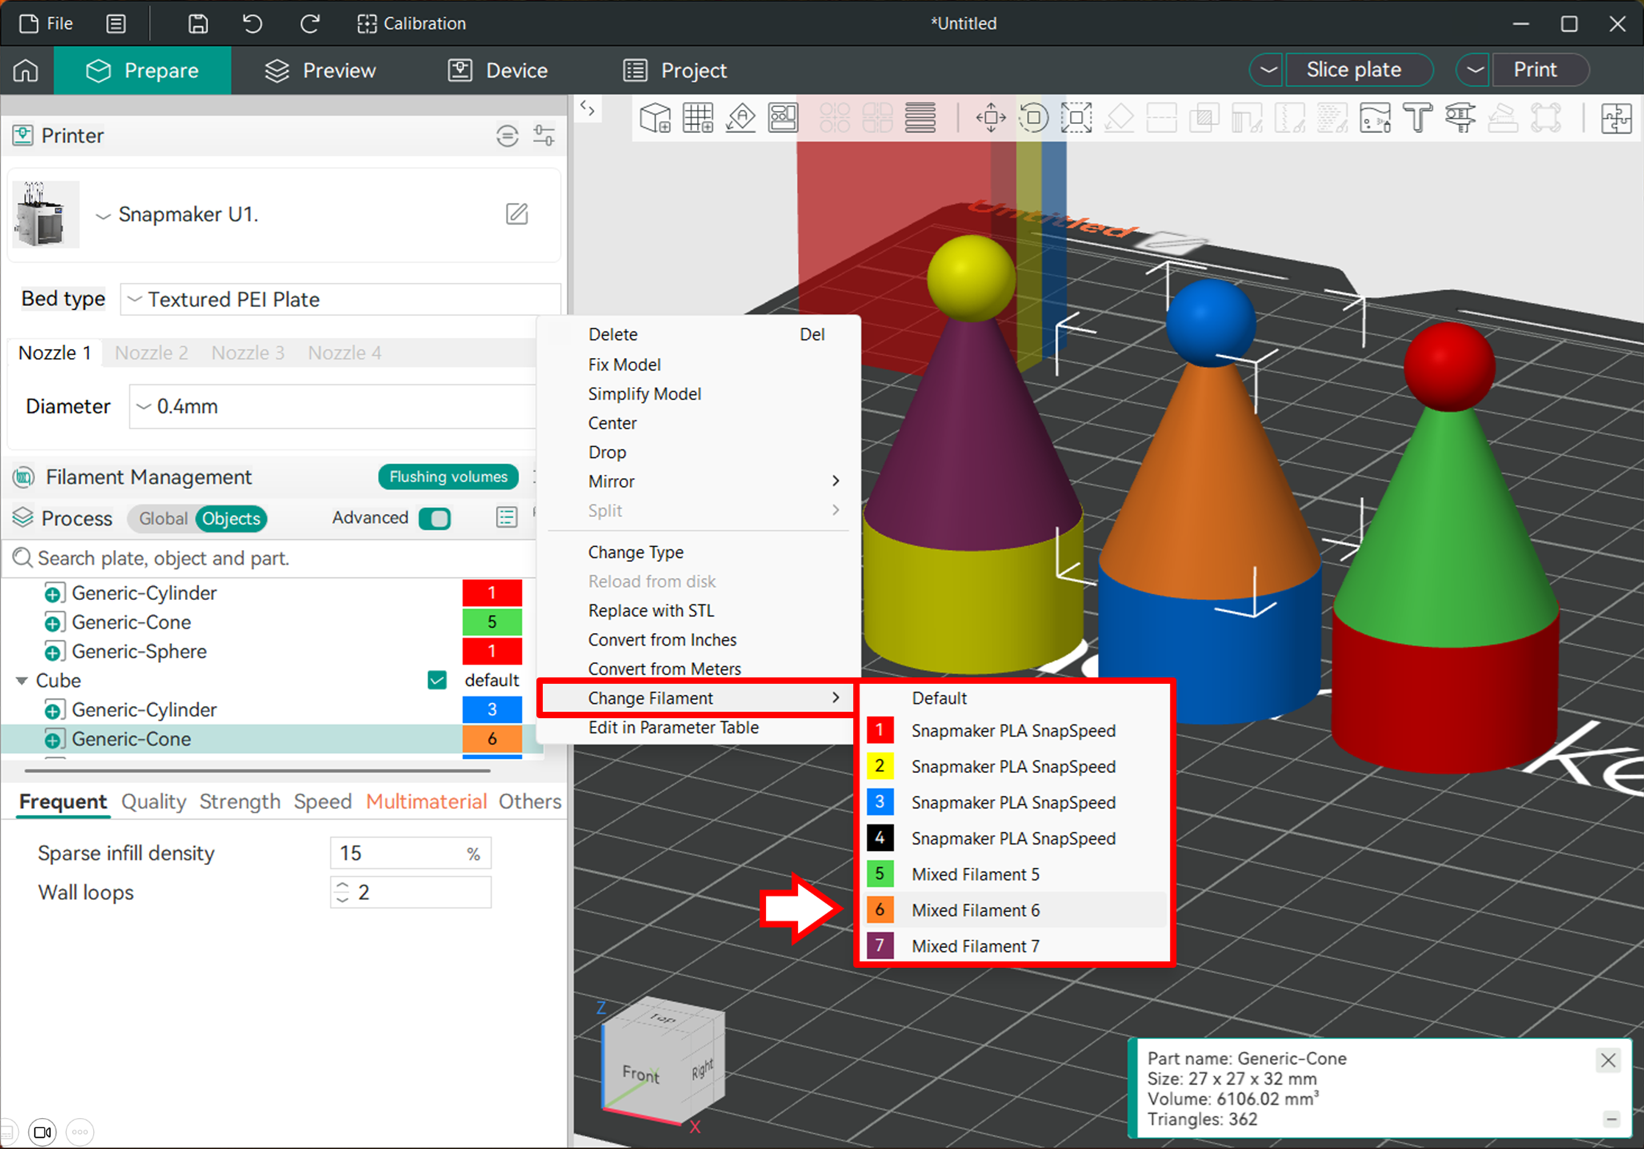
Likewise, entering the painting menu, we now find additional colors in our palette:
2. Slice Your Model
It’s time to see it work! Let’s try a very simple example.
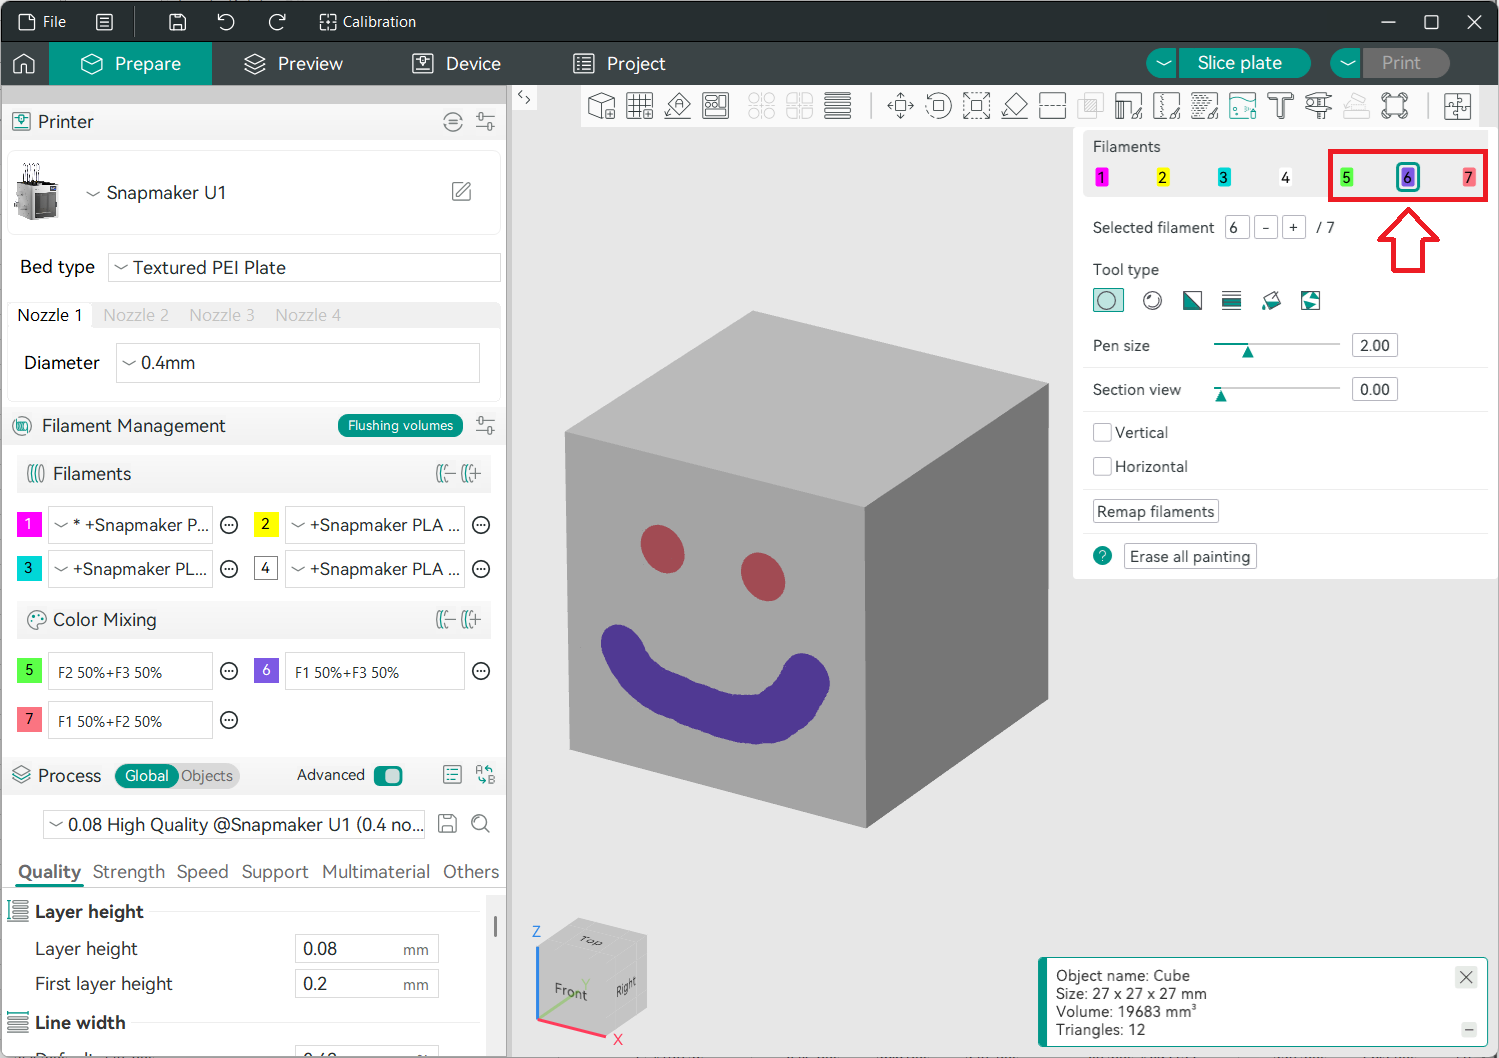
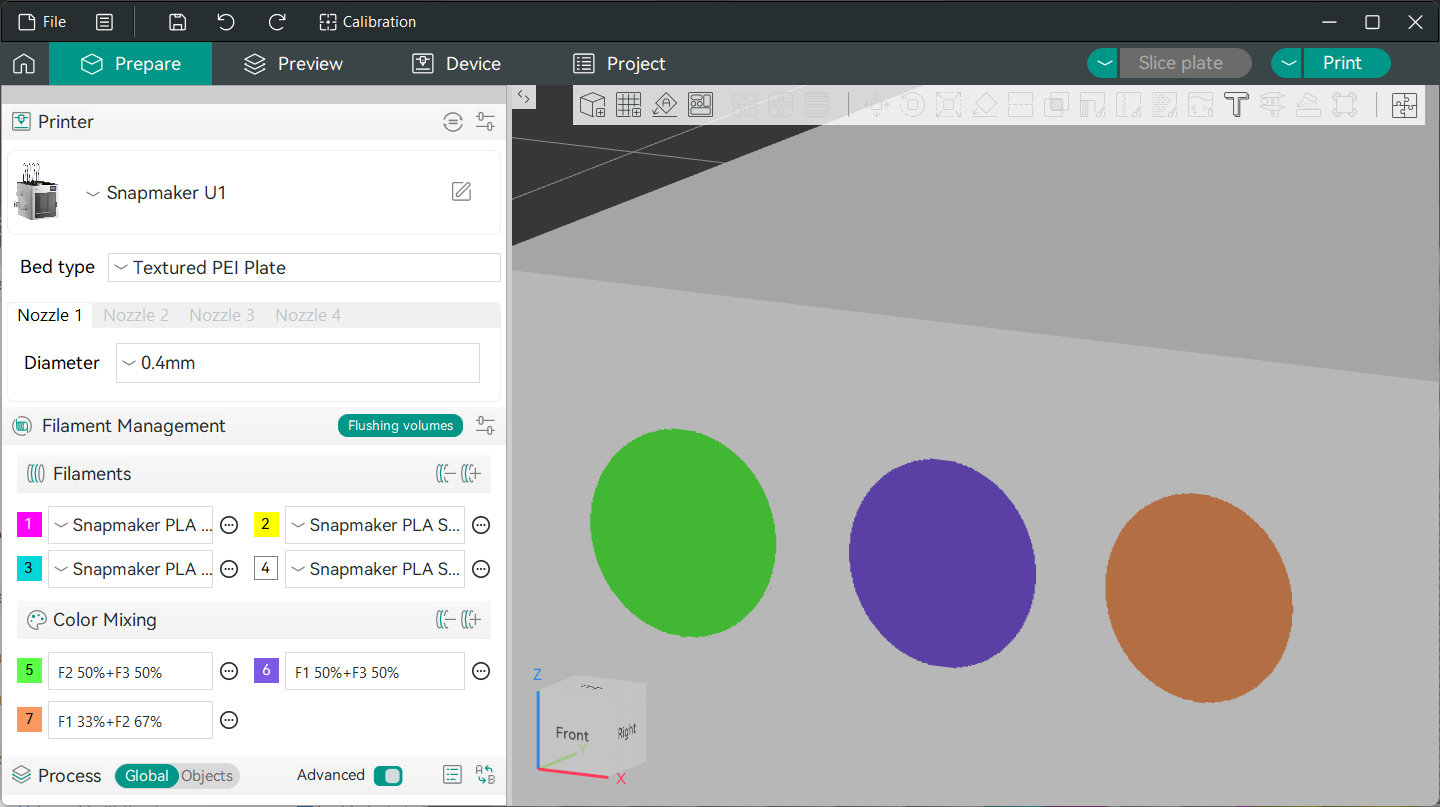
I’ve made three mixed filaments. The first two are simple 50/50 blends of cyan and yellow to make green (Mixed Filament 5), and cyan and magenta to make lilac (Mixed Filament 6).
Mixed Filament 7 is the pattern “122” to give us one magenta (Filament 2) for every two yellows (Filament 3), creating a lighter orange color. I’ve painted a few dots to see what happens:
All you need to do is click Slice Plate to see Full Spectrum at work:
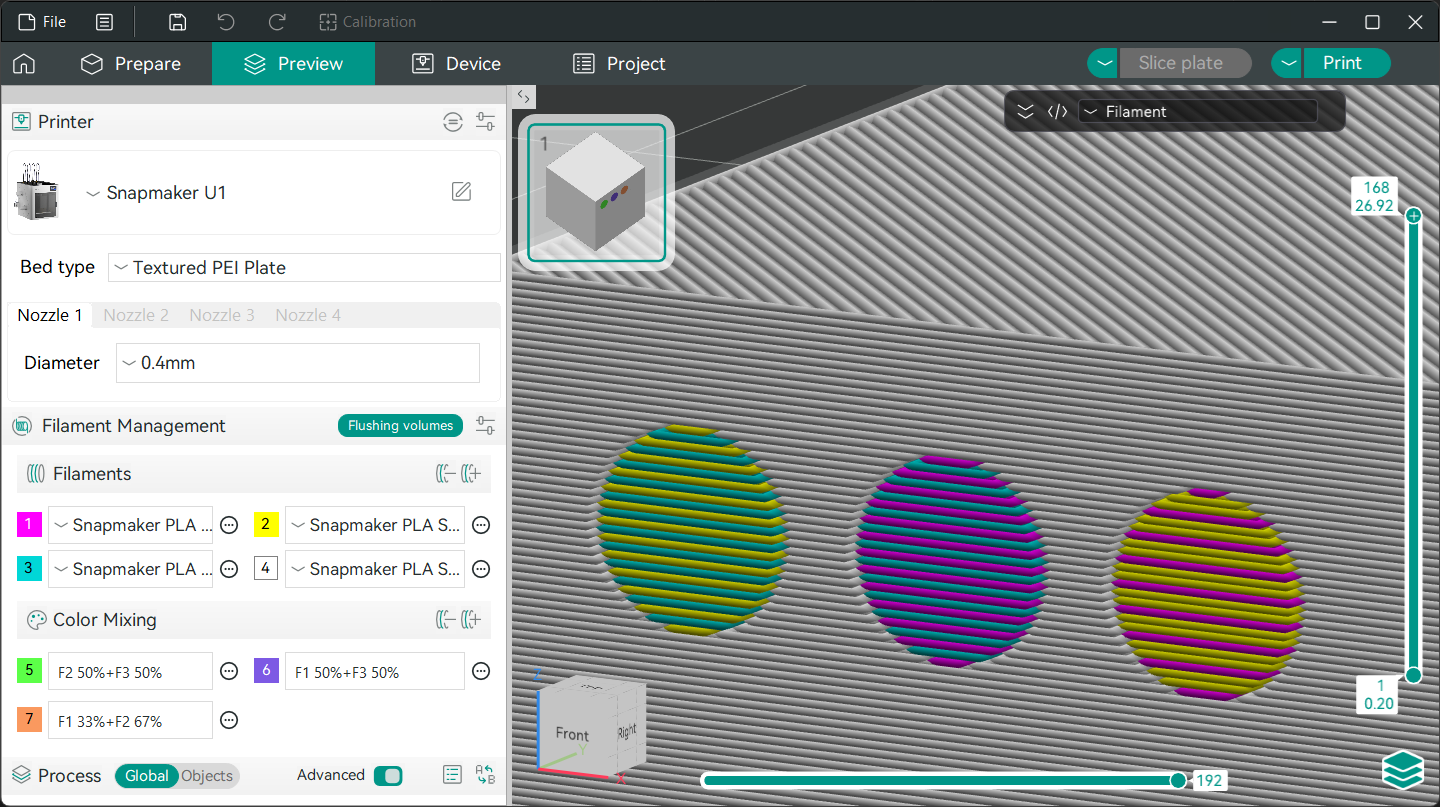
Looking closely at the sliced dots, you can see the first two alternate 1-to-1 between the two colors as desired. Whereas the third dot has the requested one magenta for every two yellows, blending towards a slightly lighter, more yellow hue of orange.
3. Yeah, that's it!
In summary, slicing with Full Spectrum in Snapmaker Orca is as simple as:
- Make your “Color Mixes” to define additional, blended colors
- Paint your model as usual
- Slice your model as usual
From there you can send a print off as you normally would. The printer will automatically print, swap filaments, and prime (if enabled) as it always does to create the material-dithered patterns as previewed in your slicer. With the right choice of (thinner!) layer height, and maybe extra help by choosing the right filament, we go from just a few colors to a dozen or more.
4. Examples
With all the above making us experts, it’s time for real-world prints. Let’s have a look at a few you can try yourself!
Note: Due to incompatibility across slicers and printer-specific settings, I recommend Importing any non-Snapmaker Orca 3MF files rather than opening them. You should also re-select each primary Filament color after import.
4.1. Adorable Baby Dragon
Our first print is the popular Adorable Baby Dragon by IK3D, shown with permission. Easily recognizable if you have a U1, this model is available in the Snapmaker Model Library to U1 users. I highly recommend checking out IK3D's designs including a collection of other Baby Dragon models!
This one already looks handsome printed in 4 colors, but with color mixing we can add extra highlights. Model edges are well defined, so the dragon is easy to paint with the paint bucket tool and a moderately large smart fill angle.
Let's start with the U1-traditional red, yellow, black and white filaments as seen on the Snapmaker subreddit. Here we'll add dark red/burgundy claws (red + black), an olive green belly (yellow + black), and bright orange horns (yellow + red).
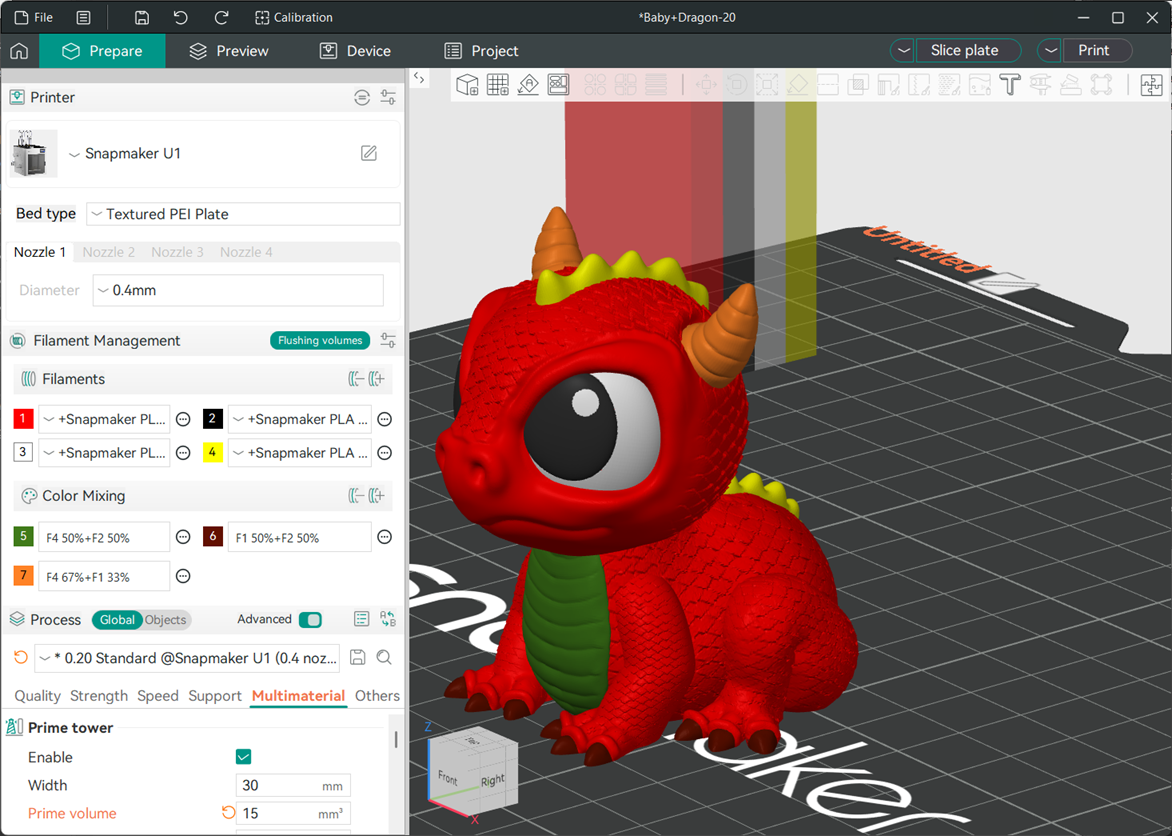
When we slice it we see Full Spectrum kicking in for the mixed colors made from basic red, yellow, and black filaments:
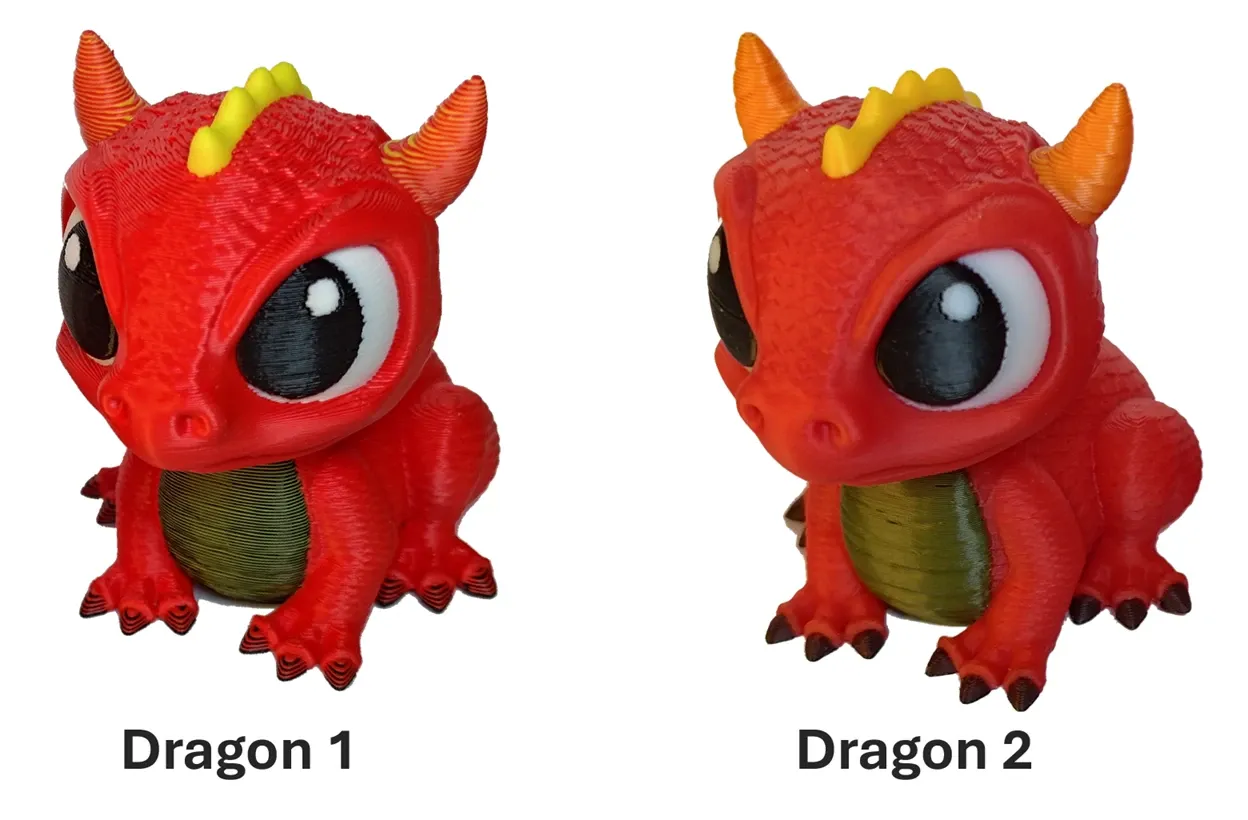
As explained in Section 2, two main things affect color blending most: layer height and filament translucency. So for this print, I tried two different dragons.
Dragon 1: Opaque filaments, 0.2 mm layer height (PLA)
Dragon 2: Partly translucent filaments, 0.1 mm layer height (PLA)
Note: It isn’t the material (PLA, PETG, etc.) that matters for color blending, only the color and opacity of the materials.
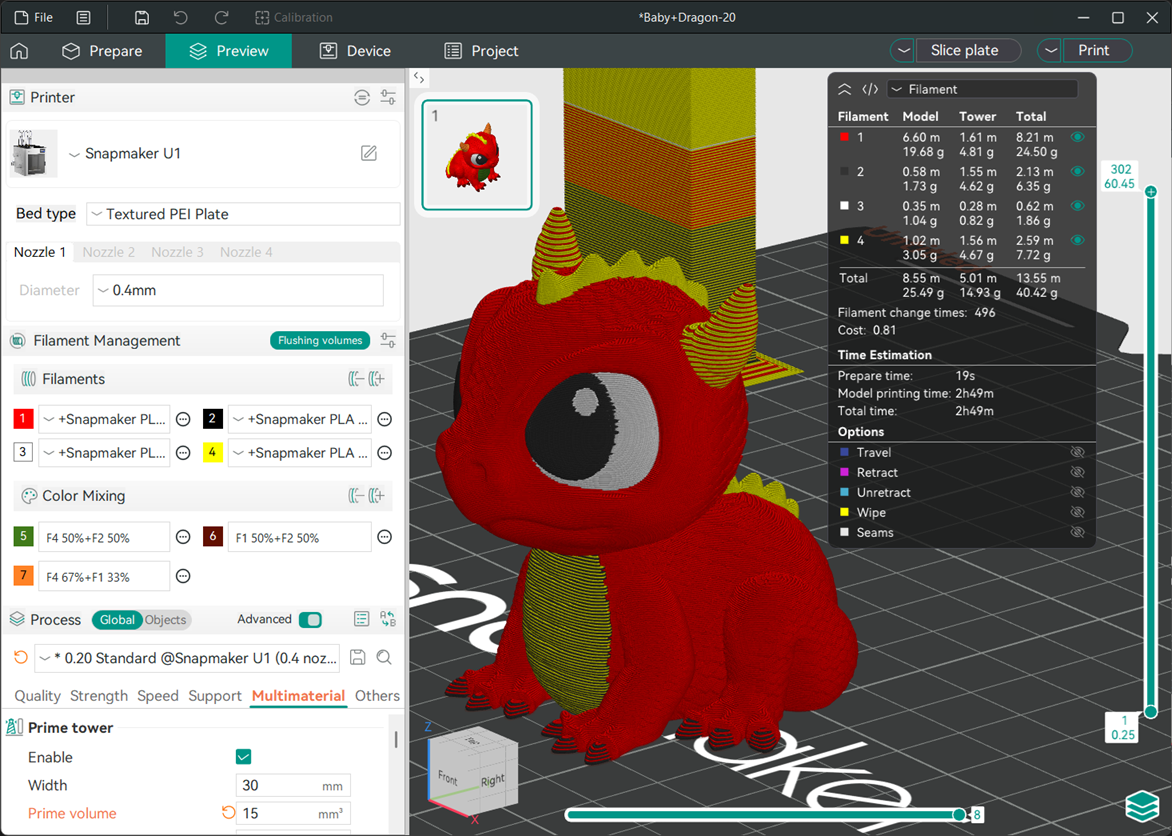
Using the 0.2 mm Standard profile with a modified 15 mm3 prime volume (above), this little guy prints in 2.83 hours. Using the 0.08 mm Extra Fine profile with 0.1 mm layer height and 12 mm3 prime volume, this naturally goes up to 6.75 hours. Still, not bad for a more finely detailed, seven-color print!
We definitely see differences in blending as we look more closely:
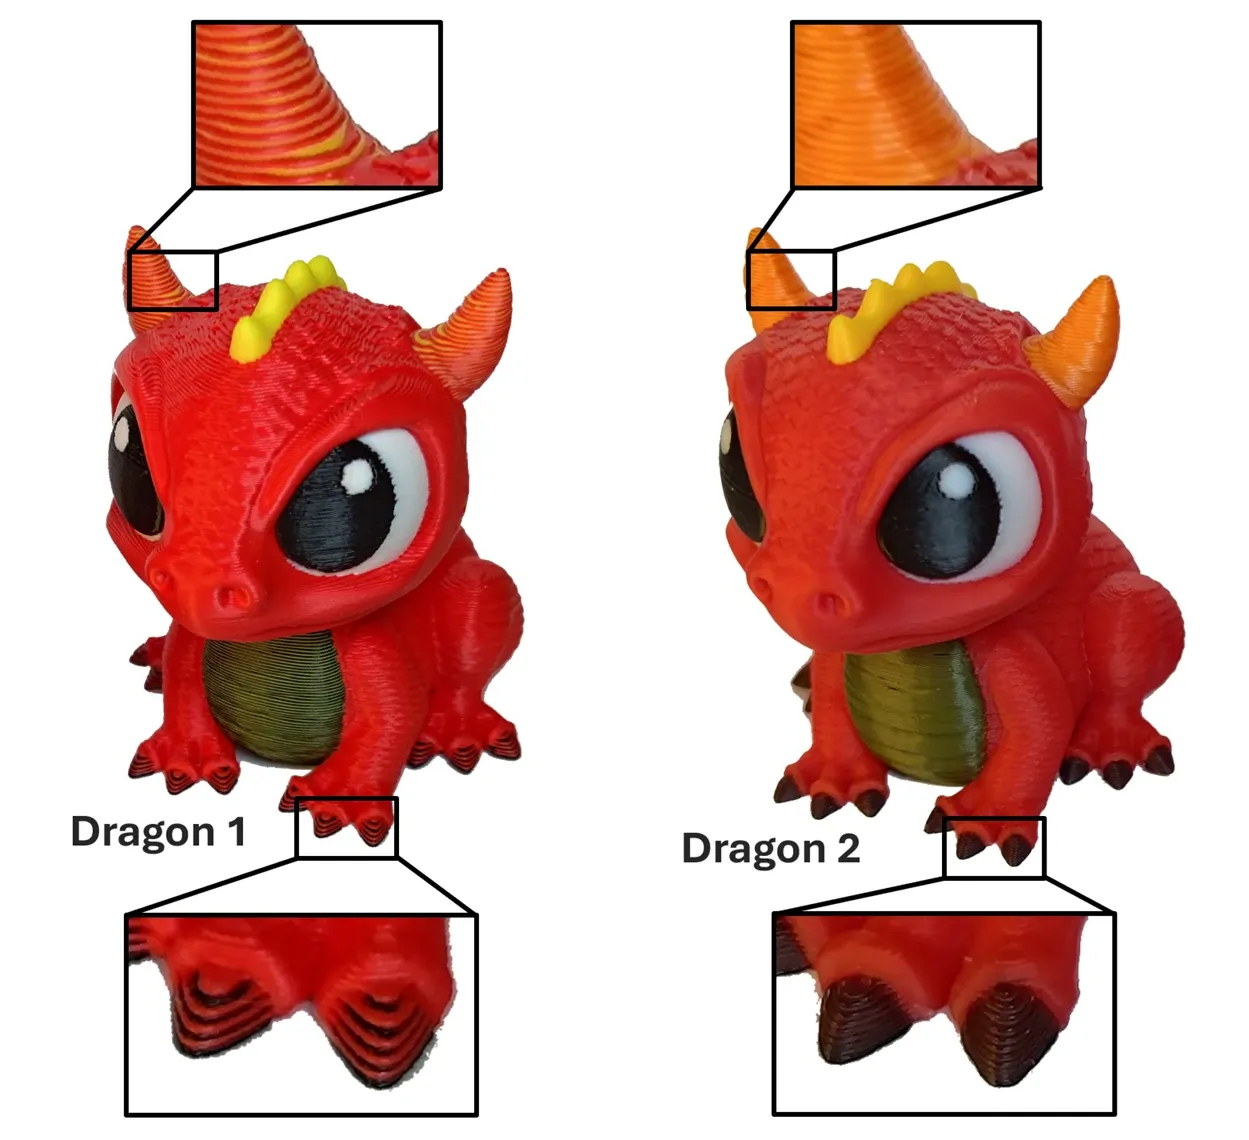
The most pronounced difference is on the top of the dark burgundy claws (bottom). With thicker, more opaque layers, the red and black stripes are very visible but vanish when we go to thinner layers and translucent filament.
Zooming in on the more vertical, orange horns of our dragons, there was one other print setting difference: A 1:1 blend of red and yellow (two alternating layers) for Dragon 1 and 1:2, red to yellow, for Dragon 2 (three alternating layers) to brighten up the orange.
Despite the “taller color stack,” the red is still less visible against the yellow in the orange for Dragon 2, vanishing at a distance. Very nice! Just going to the thinner, ~0.1 mm layers helps. More translucent filament boosts the illusion further.
4.2. Chibi Panther Chameleon (CMY)
Color theorists out there are raging at the colors we started off with though, so let’s have a look at cyan, magenta, and yellow (CMY) filaments for a wide range of color. It'll be a good example for one of the tips below...
And that's the Chibi Panther Chameleon by Raki-Box, shown with permission. Once again, this model is available in the Snapmaker Model Library to U1 users, but you really have to explore Raki-Box's Linktree for more incredibly detailed models in the wild!
This model is also easy to paint. Some parts are broken into separate bodies and can be directly assigned a material/color. All sub-pieces of the model are separated, so using the paint bucket tool with a large, 90 degree smart fill angle easily lets you re-color single stripes of the body.
These were done in blends of CMY to add orange, purple, and a fully green body using two different sets of PLA filaments at 0.1 mm layer height. At first glance from the side, these both look pretty good.
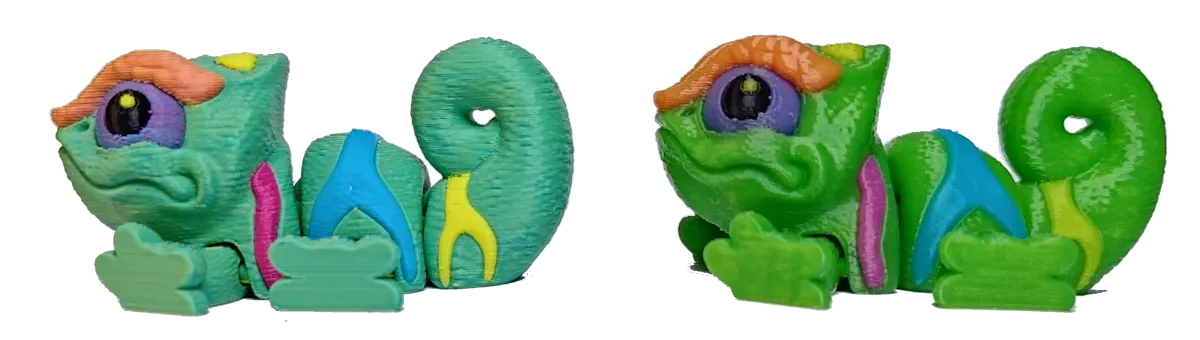
We definitely get a more solidly matte appearance going with opaque filament. As we stand up our chameleons though...
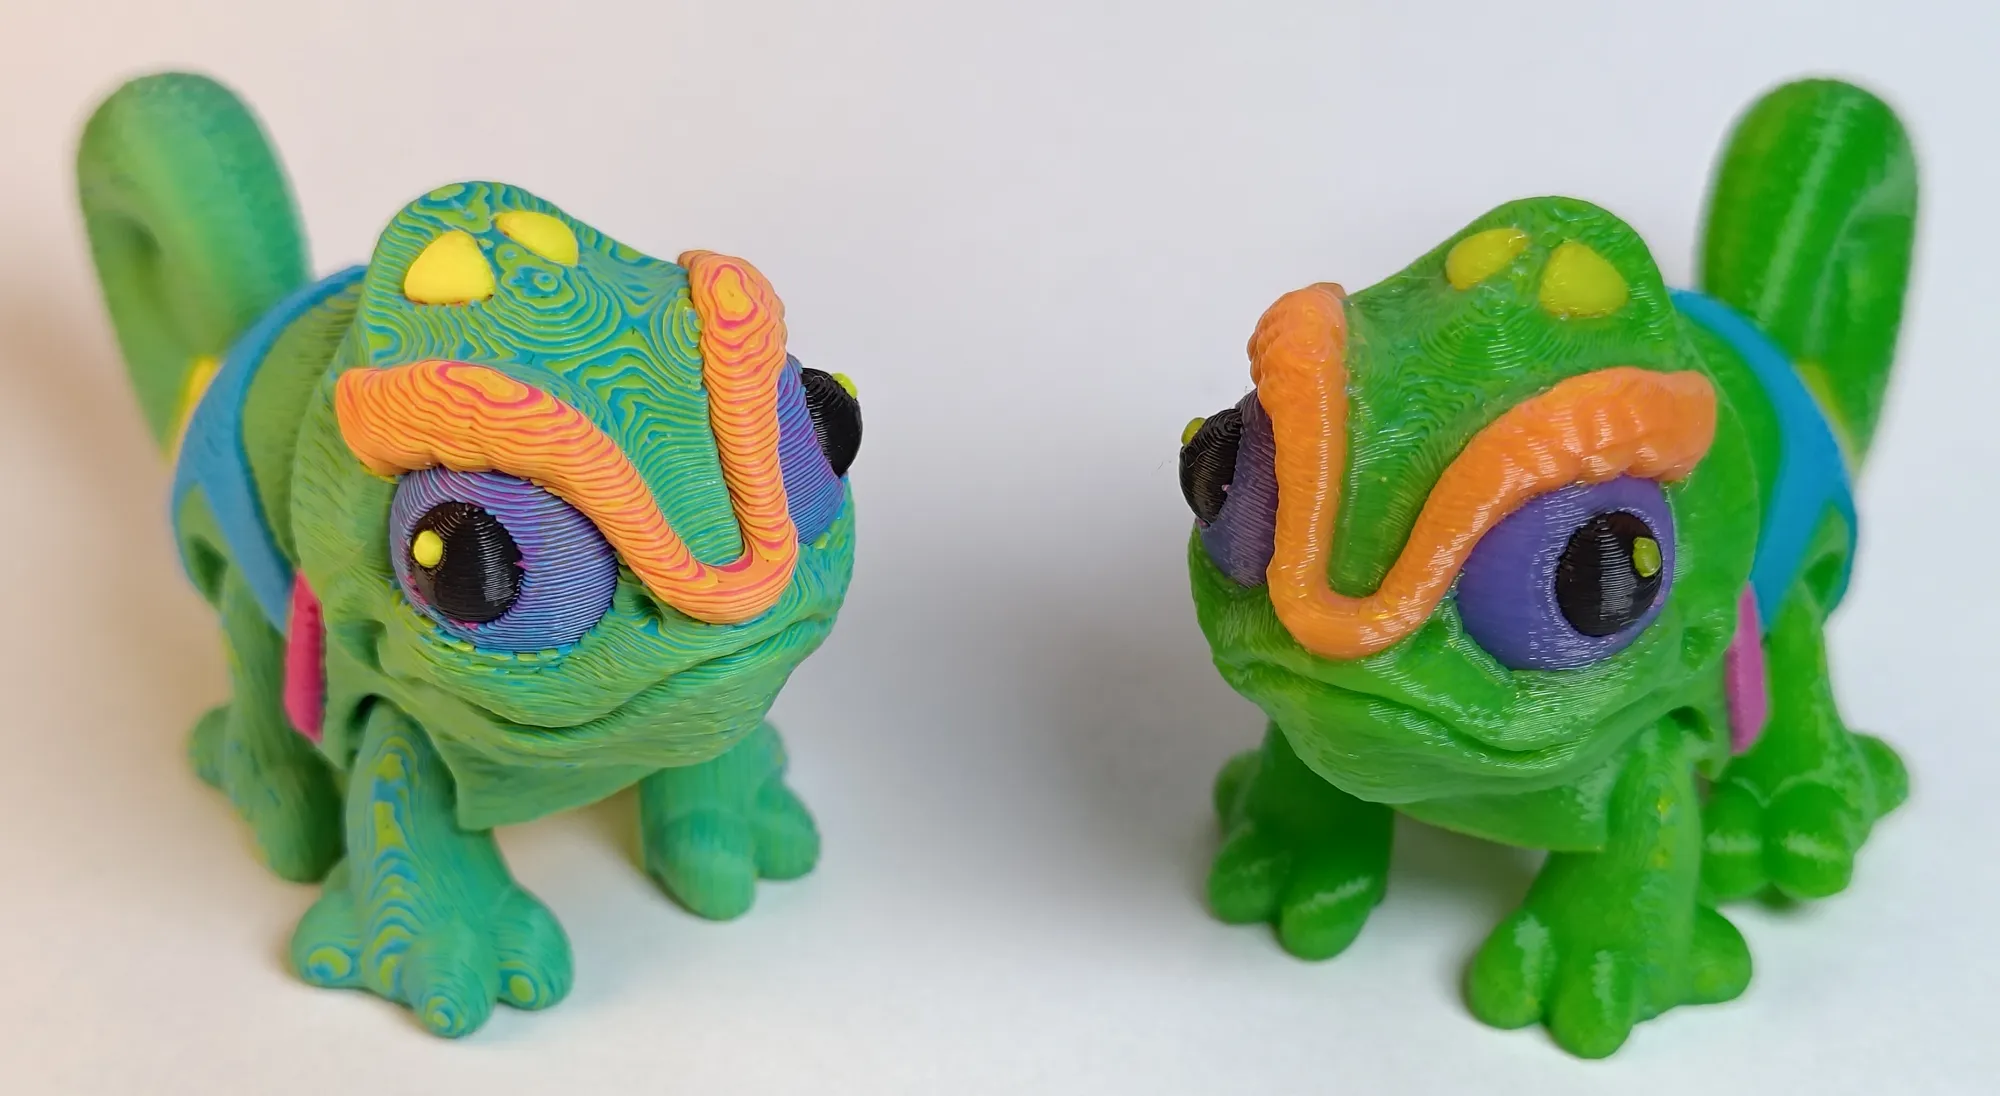
Viewed from above, we see that even at 0.1 mm layer height, the solidly opaque filament (left) has a somewhat more scaly aesthetic. Meanwhile the colors of the more translucent filament (right) once again blend more naturally together.
The filaments on the left were an off-the-shelf “CMYK kit” from a leading filament manufacturer while the ones on the right are specifically the Polymaker Panchroma Translucent CMY filaments.
As mentioned in the tips below, if you're interested in better visual blending with CMY filament, I do not recommend randomly buying CMYK kits. Most do not advertise translucency and typically prove to be very opaque.
Although in this case the scaly, contoured color texture kind of works for our reptilian rainbow friend. 🤔
4.3. Desk Lantern (RYB)
If partly translucent filament blends well, we should have no problem with nearly transparent filament either, right? And that gave me an idea: Why not go for that stained glass look?
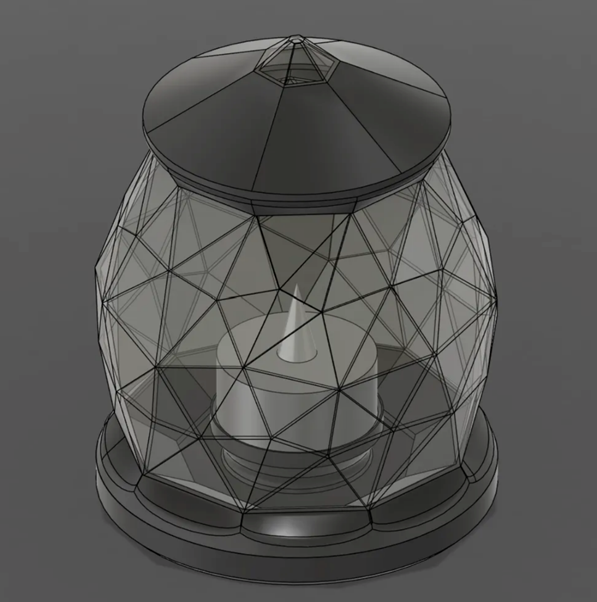
So I sketched up this simple electric tea light desk lantern in Autodesk Fusion, knowing Full Spectrum would make it a breeze to paint the individual, 1.2 mm-thin facets in the slicer.
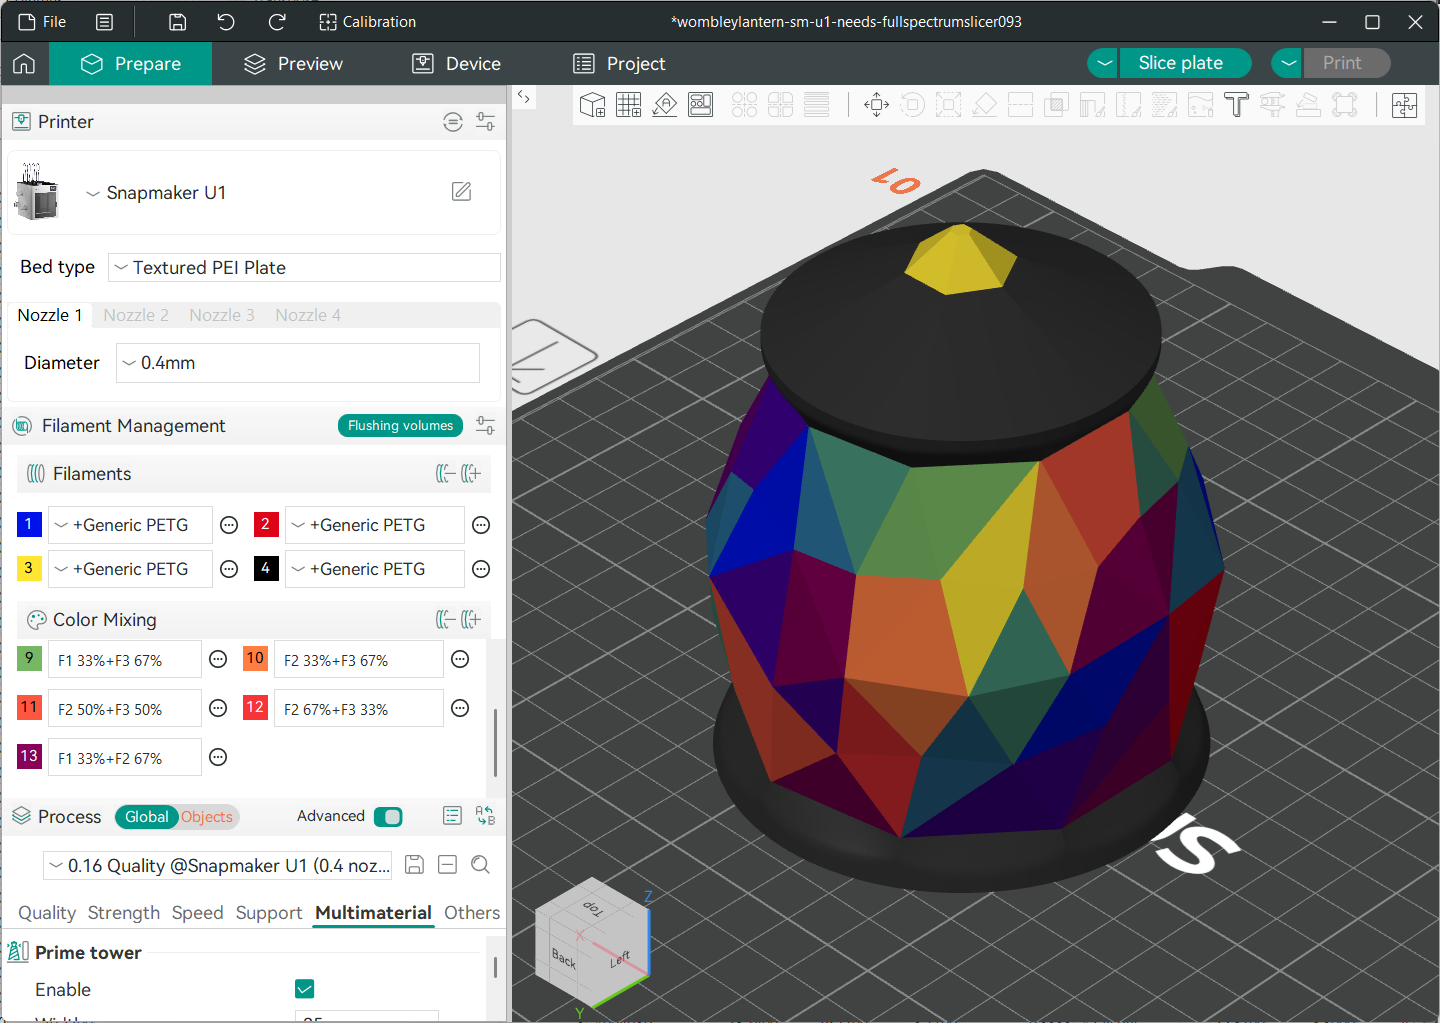
Painting was done in a total of 12 different colored facets (3 primary + 9 mixed) along with black for the base. Using red, yellow, and blue (RYB) from a transparent PETG filament sampler set I found, it turns out great!
For me the main body of this prints in about 9 hours at 0.16 mm layer height on the Snapmaker U1 with only ~22 g of waste for the prime tower. In 12 colors plus black!
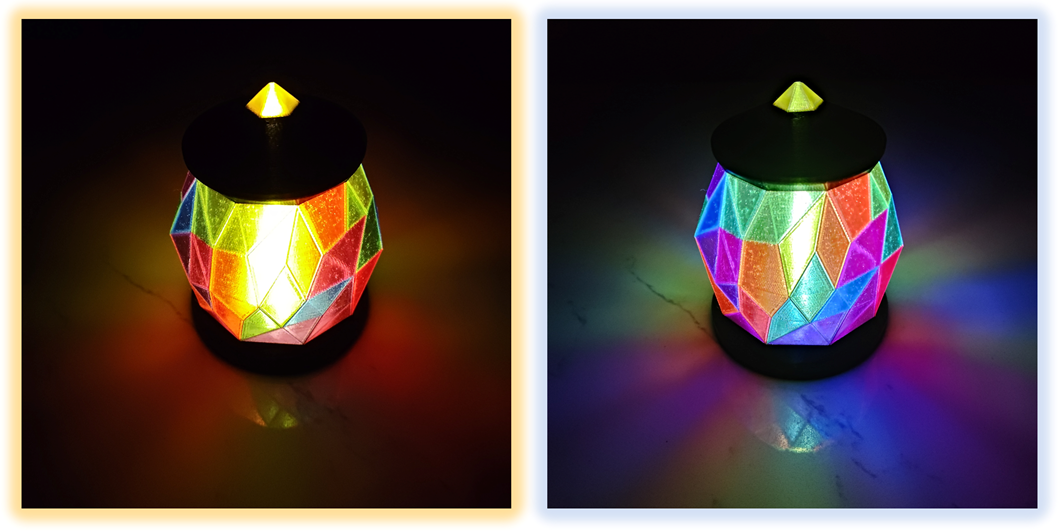
This, I think, is very cool. No longer must we print flat, 2D lantern panels that need assembly. A truly multi-color and fully 3D lantern is just one print away.
If you’re interested in trying this one, there’s video showing more details at this timestamp, with the Snapmaker Orca 3MF file available on Printables along with STLs to try with other systems.
5. Color Test Palettes (Print this first!)
By far the most useful Full Spectrum print are test palettes. Even if you haven’t read a word of this article, the test palette is absolutely the place to start.
These prints let you quickly play around to see how your choice of settings and filament blend without committing to a big, multi-hour print. Beauty is in the eye of the beholder, after all, and this is yours now!
After many (many…) dozens of test prints across a wide range of filaments and colors between myself and community member Hunter Cook (@jusdisgi), I personally suggest the humble Full Spectrum Speed Palettes.
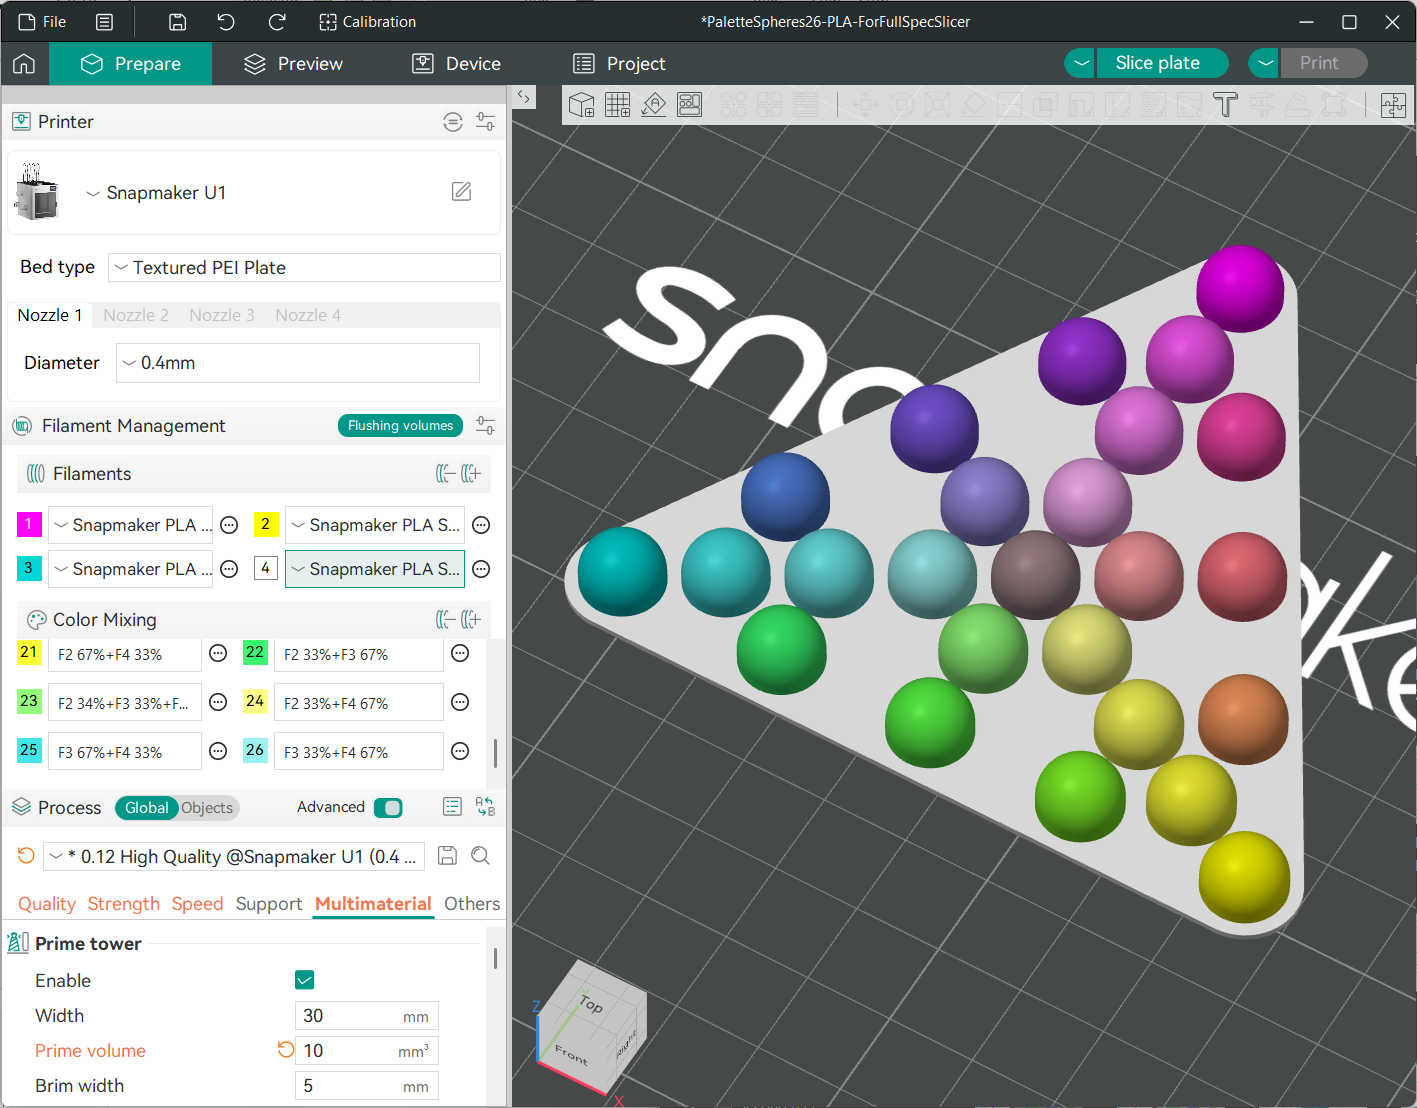
These are designed with the suggestions from Section 2 in mind: Layers need to be thin with only a few layers per "color stack."
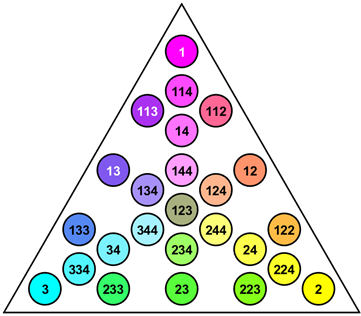
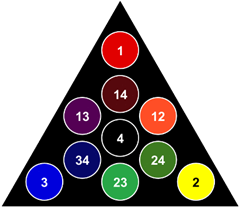
So the 26-color speed palette includes all combinations/patterns of 4 colors that are 3 layers thick. If aiming for thicker layers or using more opaque filament, the 10-color speed palette uses only combinations 2 layers thick.
They’re also designed to print fast using minimal material by printing flat for most efficient use of tool changes and the prime tower (if needed). The 26-color palette at 0.08 mm fine detail will do in under 2 hours on the U1, with the smaller one taking as little as 30 minutes with coarse layers.
If you instead want an aggressive palette that goes deeper with color stacking, I of course have to recommend Hunter’s world-famous, 38-color PeggyPalette Mini Full Spectrum Tester on Maker World which we'll see in an example below.
They reveal a lot! Here are some things to look for...
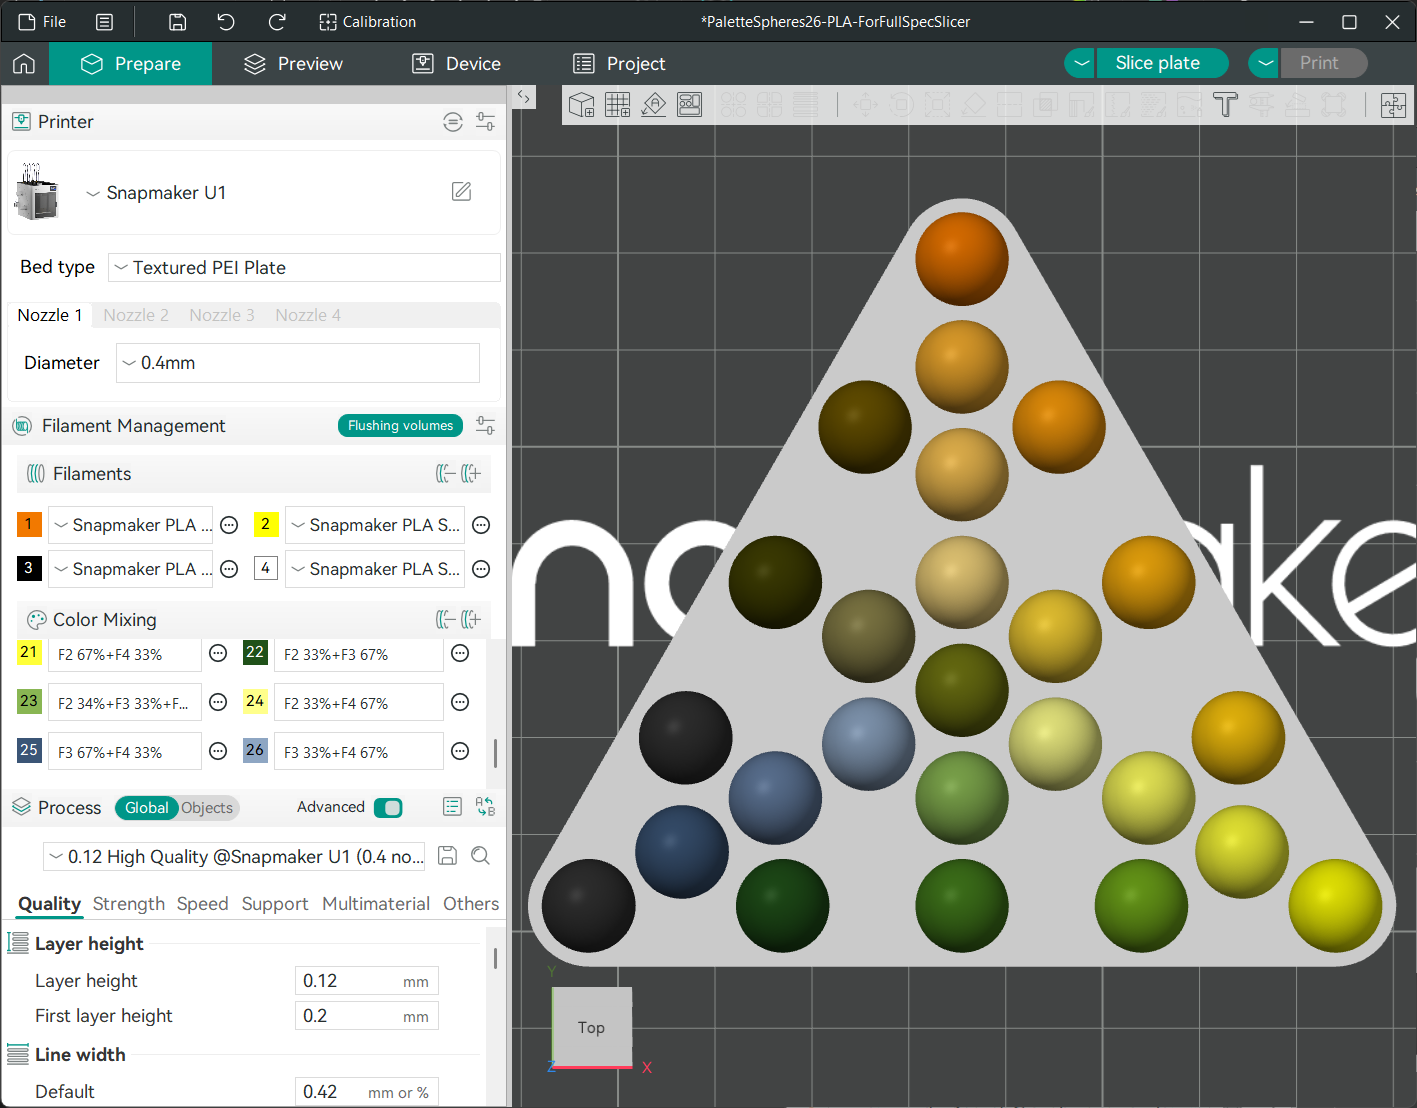
5.1. Set and Preview Your Color Mix
By loading up one of these palettes and setting the colors of the four filaments you’re thinking about printing, you can see what easily accessible blends of colors you have with them at a glance. Before you print!
For example, why stay bound to CMY or RYB? With burnt orange, yellow, black, and white, you get this palette with shades that might work well for an earthy, autumn-themed print:
5.2. Check Vertical Blending
The pegs of the palette have a short section of vertical walls at their base. By viewing the pegs from the side, you can check how well your choice of filament and layer height masks the color dithering, if that’s the look you’re going for.
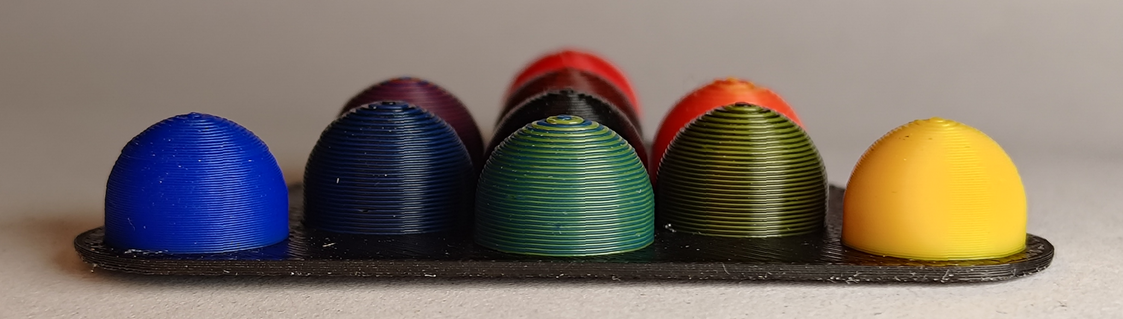
In this example, using RYB with black at 0.12 mm layer height and semi-opaque filaments, we spot high-contrast blends of yellow with black or blue appear slightly stripey if viewed up close. If we have no more translucent options (black is a tough one, almost always quite opaque), stepping down to 0.08 mm layer height may help.
5.3. Check Top Slopes
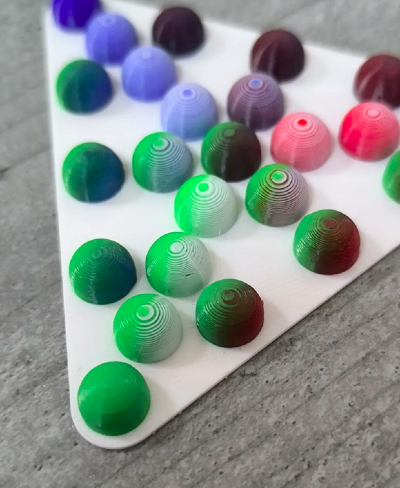
The spherical tops help identify at roughly what angle a certain filament mix starts to appear, easily seen by viewing from above.
For this one, we have a look at a great example shared courtesy of Terri from the Snapmaker U1 Official Group as part of her own personal filament testing. She used a remix of Hunter’s 38-color PeggyPalette Mini to compare Polymaker Panchroma Translucent CMY to a different, more opaque off-the-shelf CMYK kit:
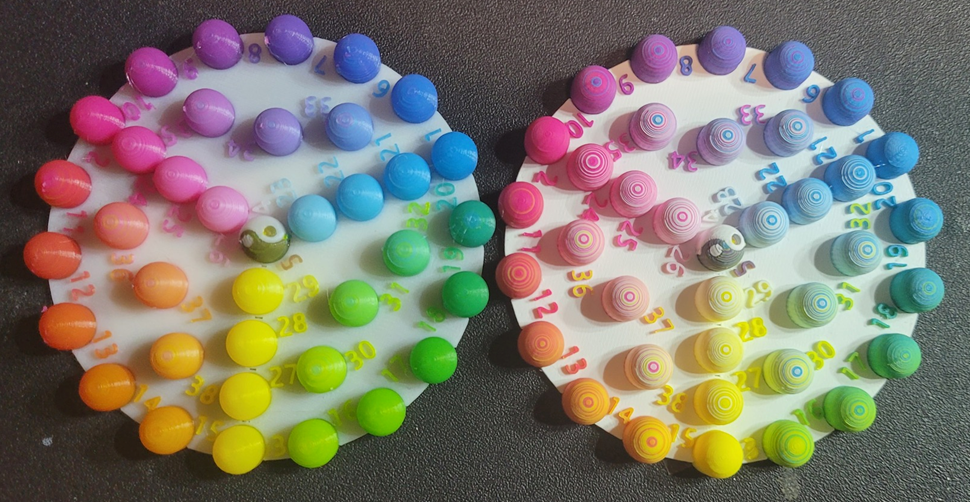
Both were printed at an extra fine 0.08 mm layer height, so it's hard to go thinner. The opaque, almost “chalky” looking set on the right shows significant stripes on the top slopes. By going to the Polymaker Panchroma Translucent filament, the print on the left blends much better across practically all color mixes.
If you see stripes on the tops of the domes, the usual advice is, again:
- Consider thinner layer heights or use only shorter "color stacks"
- Seek more translucent filament if needed
- Be mindful of how shallow a top angle you try to approach on final prints
It might be some small, inward inward from the vertical is okay, but the very shallow top of a sphere is just too much to hide.
5.4. Check Tool Alignment
Full Spectrum printing with a tool changer relies on excellent relative positioning of the different colors horizontally. As seen in this make by Nigel on Printables, and by others as well:
The green is clearly shifted relative to the other colors in the palette, leading to asymmetric coloring.
If you see this, the fix is easy enough: You’re just due for an automatic XY offset calibration from your printer’s maintenance menu. For me this calibration holds up a few months at a time, but I also saw it in my first Full Spectrum palette.
5.5. Test the Rainbow
We get a lot from these tests! I’ve printed at least 50 at this point and seen that and more from others in the community. It’s a fun way to experiment without committing a lot of time or filament. Throw whatever you’ve got handy at it and see what you can make!
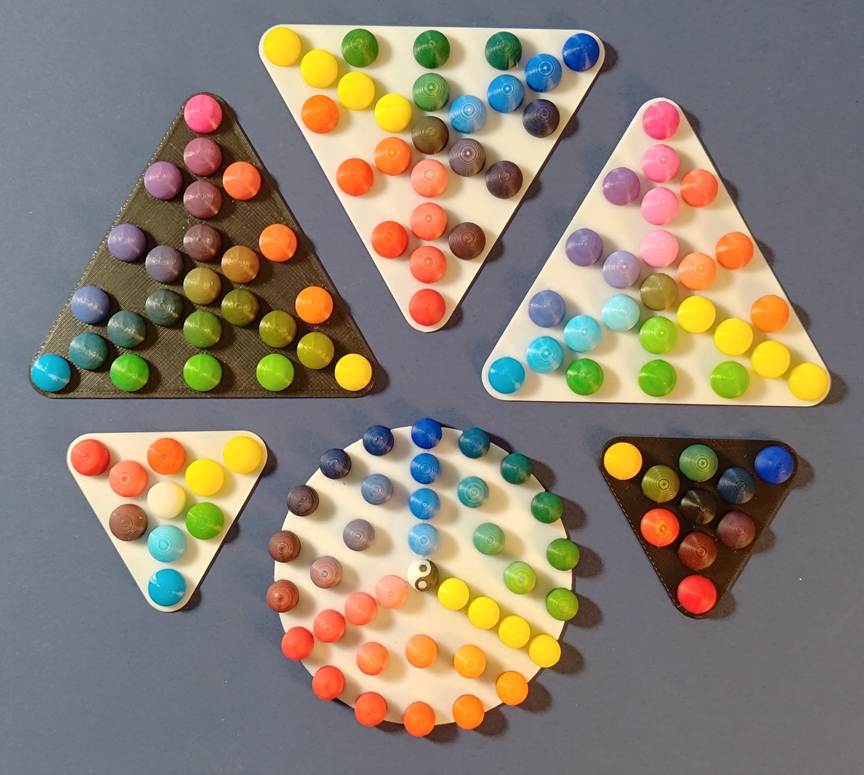
I like the red, yellow, cyan, and white in the lower left. Those are all semi-translucent filaments and they easily print red, orange, yellow, green, indigo, and violet even at 0.16 mm layer heights for quick printing.
6. About Translucency
Throughout this article I’ve referred to “opaque” and “translucent” and even “transparent.” Those words can have subjective meaning. For example, where do we draw the line between translucent (it lets some light through) and transparent (it lets almost all, tinted light through)?
To make this more objective, we borrow the metric of Transmission Distance (TD) popularized in 3D printing by HueForge. That's the thickness of material in millimeters that blocks 99% of light. Like optical depth, this is something that can be measured objectively.
In the context of Full Spectrum printing, I consider any material with TD ≤ ~1 to be “very opaque.” Filaments with TD of 2-3 are just “opaque” and might still work well in 50/50 color blends.
Filaments with TD 5-8 are “translucent.” These do transmit some light when printed in thin layers, but tend to go optically “stiff” as thick walls.
Then we have “transparent” with TD > 10. These bleed a lot of color even when printed as thick walls.
Again though, these are how me and some others in the Snapmaker community label them. It does not mean manufacturers or anyone else does.
How can you measure the TD? That can be as simple as printing a thin wedge to determine how many millimeters are needed to block a light. Alternatively, devices such as the TD1S by AJAX-3D, available from BIQU Equipment, can measure the TD using only an unprinted piece of filament! And if you have a HueForge license, not only can you make cool, textured, 2D color images into prints, but you can automatically catalog every filament you scan with a TD1S through its direct integration with HueForge.
(Full Spectrum, Snapmaker, and myself are not affiliated with HueForge. I share this only because it's useful and relevant to Full Spectrum-style printing and I think HueForge is cool.)
Unfortunately precise TD/translucency is not commonly advertised by almost any 3D filament manufacturer. To my knowledge as of this writing, only HueForge’s own Chrominal line and some blends of Polymaker filaments actually list TD.
For this reason and this reason alone, I’m personally reluctant to suggest any other filaments since you have no way to be sure you’ll get the same translucency I’m holding. Let’s talk about that in the tips below…
7. Tips Summary
Summarizing all the tips for (basic…) Full Spectrum printing in one place:
- It’s easy! Define your "mixed filaments." Then paint, slice, and print your model as you normally would. Just with more colors!
- Try a test palette first: It’s a low-cost way to see it yourself with your filament before committing to something full size.
- Thinner layers are better: For "basic" mixed colors 0.08 mm layers usually work well. You might get away with 0.12-0.16 mm, depending…
- Color stack should be short: A repeating color pattern of 5+ layers at 0.1 mm layer height is 0.5 mm+ thick and visible at arms length. Thin layers stacked only 2-3 thick will be less visible.
- Translucency helps: Partly translucent filament (TD ~5-8) can reduce contrast between adjacent layers, improving the illusion even for thicker layers. This is especially true for shallow slopes. Very opaque filament may barely hide stripes even on vertical walls.
- Finding “good” filament is tricky: Only a couple brands I’m aware of sell translucent (not transparent) filament with specific TD. Just because it’s a “CMYK filament set for lithophanes” does not mean it’s translucent. In fact, other than the Polymaker Panchroma Translucent, many CMYK sets are very opaque as of this writing. Check with the community including sites like 3dfilamentprofiles.com for spools that might work.
- Does your print still look funny? Have a look through the palette test print section to see if the answer lies there!
- There’s no “right” set of primary colors! Only what’s right for your print. In this most basic form, Full Spectrum color blending still has a fundamentally limited color depth.
- Yes, as it's subtractive color mixing, CMY with black and white may give the widest range of colors, but also the worst color precision per layer.
- Play around with what you’ve got! RYB gives 2-filament access to more natural orange, green, and deep purple. I personally like red, yellow, and indigo.
- Members of the Snapmaker community have gotten creative just working with what they have! Don’t let others be the boss of your filament.
- Why try to hide the dithering at all? This article focuses on hiding the dithering. But that’s an aesthetic choice. Maybe a visible, dithered gradient look could be cool! Maybe those visible top contour lines from opaque filaments could make for a wood grain effect.
Which leads us to the most important tip of all…
8. Have fun!
Ignore all my advice and be creative.
Again, with the rise of an accessible tool changer in the Snapmaker U1 and this gift of Full Spectrum, the impractical has become practical. Even in its most basic form, we make the leap from four colors to dozens without any added hardware or filament. I’ve spilled a lot of ink on how to invisibly blend colors, but I’m eager to see what the community does as this form of multi-color, multi-material printing grows.
Because we’ve only scratched the surface. There’s still more already hiding in Full Spectrum including an (experimental!) mode for much more precise color blending with reduced impact to print time, and more. I know Radu, Snapmaker, and the whole Full Spectrum and multi-tool, multi-color printing community are on fire working on new ideas right now. So…
Thank you to Snapmaker for inviting me to contribute this way-too-long first look at the new Snapmaker Orca beta. Hopefully as we all explore what's now possible, you find it helpful and make something wonderful to share with the world. 💜
—Wombley, Snapmaker U1 and J1s Community Member


