Fuzzy Skin 3D Printing: Best Settings and Creative Uses

FDM 3D printing is inherently defined by its layer lines. While many makers spend hours sanding and smoothing to make their parts look perfectly uniform, what if you could lean into the mechanical nature of FDM to create an entirely different, highly textured surface straight off the build plate?
That is exactly what the Fuzzy Skin setting does. It is not just a band-aid meant to cover up poor print quality; it is a creative tool that utilizes the printer's movements to generate rugged, functional, and visually striking textures. However, dialing in the perfect texture without ruining your print’s dimensional accuracy—or causing a nozzle crash—can feel like a guessing game.
Here is the definitive guide to understanding the mechanics of fuzzy skin, choosing the right settings with a calibration matrix, and using it to create everything from heavy-duty grips to fluffy, hair-like textures on flexible materials.
Key Takeaways
- What it is: Fuzzy skin is a slicer setting that intentionally jitters the 3D printer’s nozzle on the outer walls, creating a textured surface that permanently hides FDM layer lines.
- Best Uses: Ideal for adding tactile grip to tool handles, giving decorative models a matte or cast-stone finish, and styling flexible filaments (like TPU) to look like fur.
- The Core Settings: Thickness controls the depth and roughness of the texture, while Point Distance controls how tightly packed or spread out the bumps are.
- Protect Your Print: Always set the fuzzy skin application to "Contour" or "Outside Only" to ensure internal screw holes and mechanical joints remain smooth and dimensionally accurate.
- Stop Guessing: Print a physical fuzzy skin calibration matrix to test different settings so you can find your ideal texture without risking a nozzle crash or wasting hours of filament.
What is Fuzzy Skin in 3D Printing?
Fuzzy skin is a specific slicing parameter that tells your 3D printer's hot end to intentionally jitter—moving rapidly and randomly back and forth along the X and Y axes—while it extrudes the outermost perimeter of your model.
Instead of laying down a perfectly straight line of plastic, the nozzle lays down a controlled, oscillating pattern. The result is a uniformly textured surface that completely changes the look and feel of the raw plastic.
Common Use Cases
Because you can control the intensity of this jitter, fuzzy skin is incredibly versatile:
- Hiding Imperfections: It is excellent for concealing the natural artifacts of 3D printing, effortlessly masking layer lines, Z-seams, and mechanical ghosting.
- Tactile Grip: It provides excellent mechanical friction, making it great for functional items like tool handles, phone cases, or structural grips.
- Aesthetic Textures: It gives a rugged, organic, or cast-stone appearance to decorative prints, architectural models, and miniatures.
Core Fuzzy Skin Slicer Settings Explained
When you enable this feature in your slicer, you are usually presented with two primary variables that control the final look of the print. When viewing the control panel in a modern interface like Snapmaker Orca, you will notice these settings dictate the exact texture geometry.
Fuzzy Skin Thickness (Texture Depth)
This setting controls the magnitude of the nozzle's wobble. It dictates exactly how far outward (in millimeters) the nozzle is allowed to deviate from the model's original perimeter.
- High Thickness (e.g., 0.3 mm+): Creates a very rough, deep, and aggressive texture. Great for heavy-duty tool grips.
- Low Thickness (e.g., 0.1 mm): Creates a subtle, matte, sand-blasted finish. Perfect for display models or electronics enclosures.
Fuzzy Skin Point Distance (Texture Density)
This setting controls the frequency of the wobble. It dictates how far the nozzle travels along the wall before it changes direction to create a new "bump."
- Small Distance (e.g., 0.1 mm): Forces the nozzle to change direction constantly, creating a tight, dense, and fine texture.
- Large Distance (e.g., 0.4 mm+): Spaces the directional changes further apart, resulting in sparse, spread-out bumps.
The Fuzzy Skin Cheat Sheet: Texture Selection and Calibration
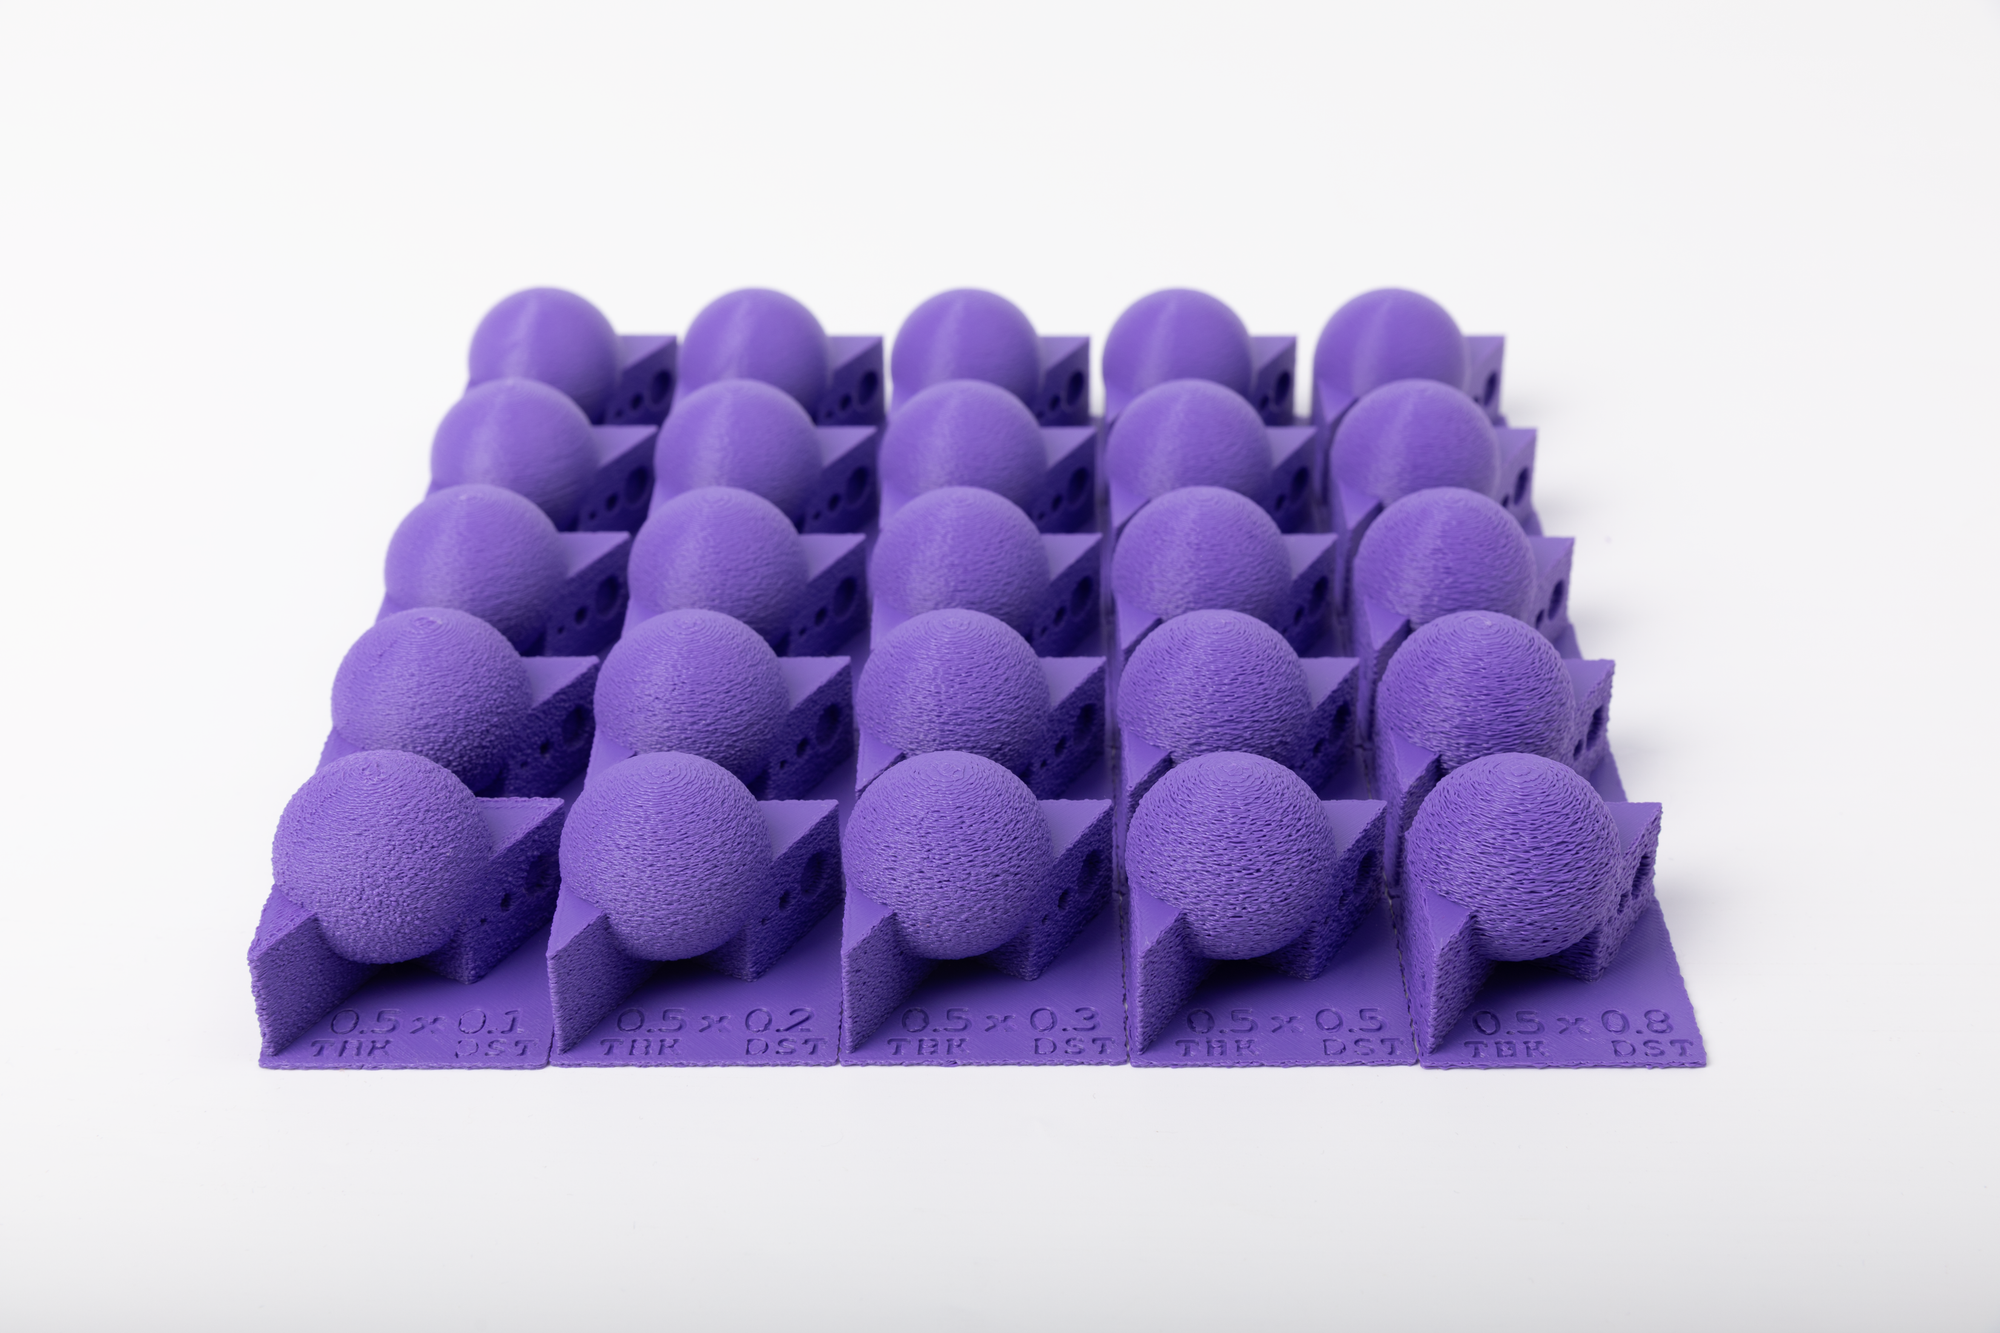
The biggest mistake beginners make is guessing their settings, hitting print, and realizing 10 hours later that the texture is far too aggressive or that the print has completely failed.
To stop guessing, you should print a visual calibration matrix.
Why You Must Calibrate
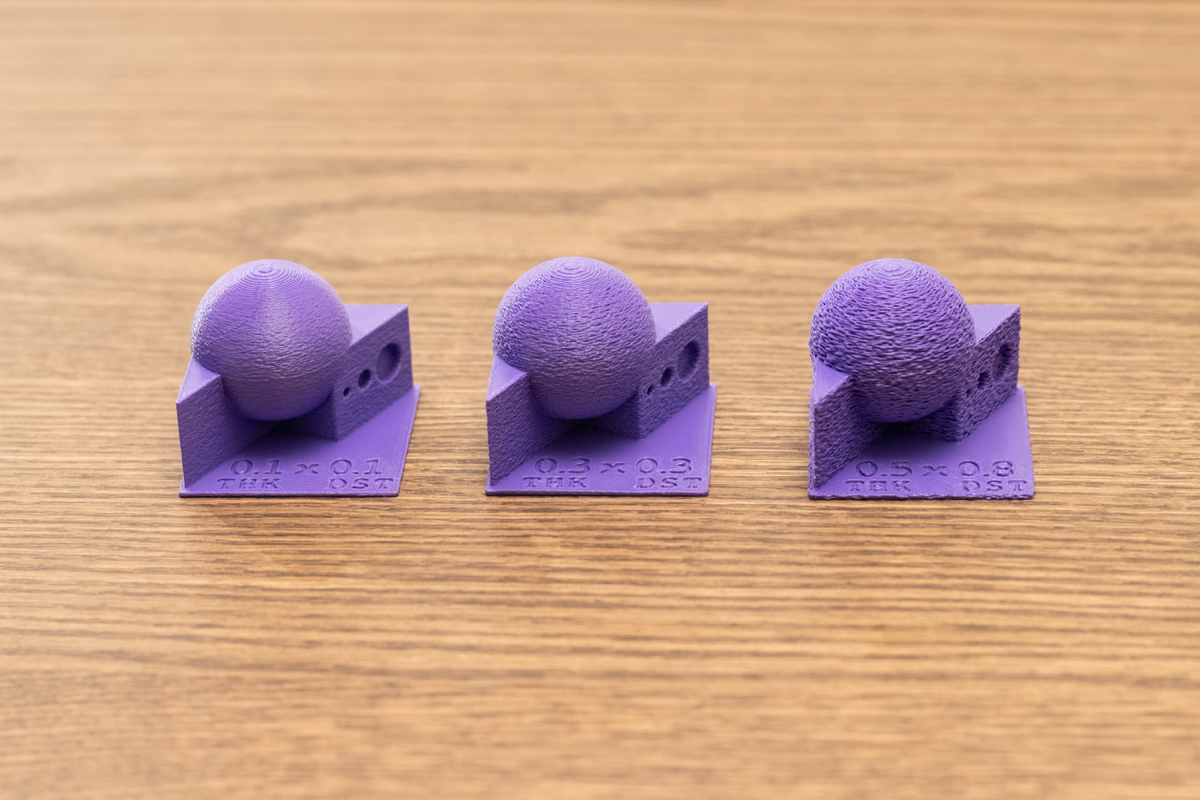
Beyond just picking a pretty texture, a comprehensive calibration print is a vital diagnostic tool. A well-designed test print challenges your printer by testing overhangs, round shapes, sharp angles, and indents all in one go.
This is critical because extreme fuzzy skin settings can easily expose hardware and cooling limits. For example, on fast printers, using extreme parameters (such as 0.1 mm x 0.5 mm) can cause the molten, uncooled plastic to contract in the XY direction and expand upwards. This creates hard, raised blobs on the surface. Eventually, the fast-moving nozzle will crash into these hardened blobs, shifting the printer's belts and causing the print to fail completely.
Printing a full array helps you pinpoint exactly where your specific machine's limits are. For most users looking for a reliable, safe baseline, starting with 0.1 mm Thickness and 0.1 mm Point Distance yields a clean, subtle matte finish without risking a nozzle crash.
Advanced Tips for the Best Fuzzy Skin Results
Applying fuzzy skin blindly to a whole model is a recipe for disaster if your part has mechanical features. Here is how to keep your prints accurate and your printer safe.
Protect Dimensional Accuracy with "Outside Only" Modifiers
If you apply fuzzy skin globally, the printer will jitter on the inside of screw holes, mechanical joints, and interlocking pegs. This will completely ruin your dimensional accuracy, making it impossible to assemble your parts.
Always ensure you set the fuzzy skin application to "Contour" or "Outside Only." This instructs the slicer to only apply the texture to the exterior shell of the model, leaving the internal geometry perfectly smooth and accurate. For advanced control, you can also use "Modifier Meshes" to apply the texture to very specific sections (like just the grip of a sword).
Optimize Print Speed and Acceleration to Prevent Ghosting
Because fuzzy skin forces the heavy toolhead to change direction violently and rapidly, it can introduce mechanical ringing or put excessive wear on your printer if your speeds are unchecked.
Dialing in your outer wall speeds to a controlled pace (such as 200 mm/s) while managing your acceleration ensures the jitter is executed cleanly. A well-tuned profile will give you a sharp texture without rattling your printer off the desk.
Creative Use Cases: How to 3D Print a Fluffy TPU Chick
Fuzzy skin isn't just for hard plastics and tool handles. When combined with flexible materials, the erratic extrusion can be manipulated into realistic, hair-like textures. Here is a complete guide on how to take advantage of this using a popular "Fuzzy Chick" model.
Step 1: Choosing the Right Materials
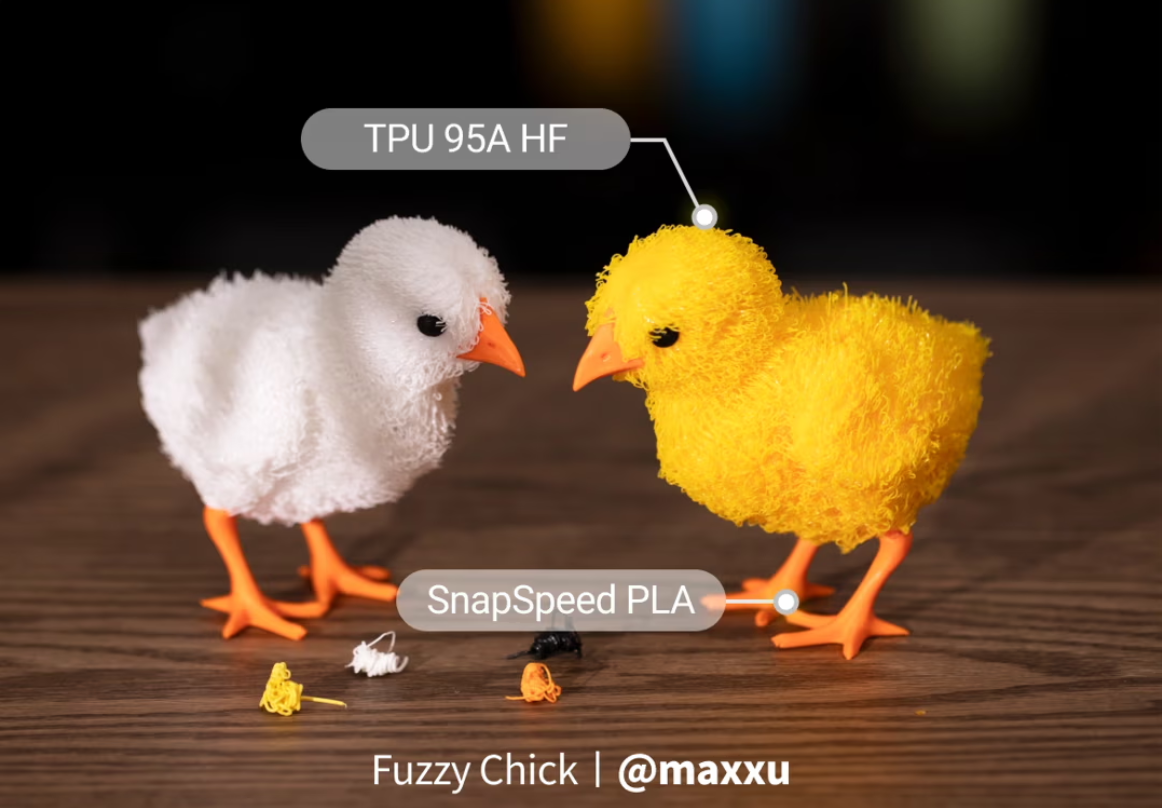
To get a "fluffy" effect rather than a hard plastic texture, you need a flexible filament. For this project, we are utilizing a popular model printed on the Snapmaker U1.
- The Body: Snapmaker TPU 95A HF (Yellow) allows the extruded strands to remain pliable.
- The Accents (Beak and Eyes): Snapmaker SnapSpeed PLA (Orange & Black) provides rigid, clean details.
Step 2: Slicing and Printing the Model
Because dialing in extreme fuzzy settings for TPU can be tricky, ecosystems with built-in profiles save a lot of time. This specific model is available directly in the Snapmaker App and Snapmaker Orca. By simply selecting it, the extreme thickness and distance settings required to push the TPU into "strands" are pre-loaded. Simply click, print, and wait the estimated 3 hours and 15 minutes.
Step 3: Trimming and Heat Styling
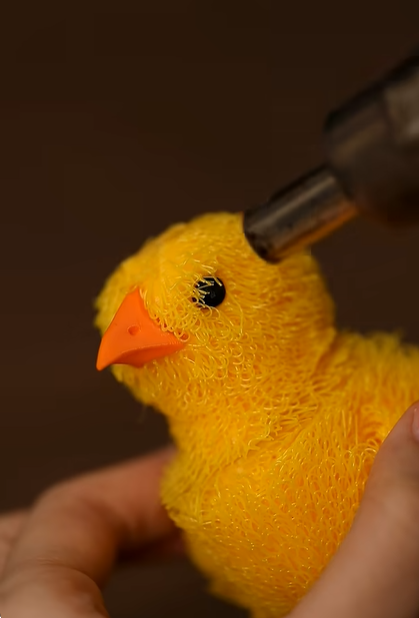
When the chick comes off the build plate, the TPU strands will be chaotic. Here is how you shape them:
- Trim the Excess: Grab a pair of sharp scissors and trim the wild, over-extruded strands to establish a uniform length, just like giving it a haircut.
- Heat Styling: Flexible filaments respond beautifully to low-intensity heat. Using a heat gun on a low setting, gently blow air over the model. The heat softens the TPU strands, allowing them to droop, curl, and mat together just like real fluff.
- Fluff and Finish: Use your fingers to shape the strands as they cool. The final result is a ridiculously cute, highly tactile model that looks like it came from a toy store, not a 3D printer.
Frequently Asked Questions About Fuzzy Skin
Does fuzzy skin take longer to print?
Yes. Because the printer's toolhead has to constantly change direction to create the jitter effect, it cannot reach its maximum straight-line speeds. Expect a moderate increase in total print time compared to printing standard smooth walls.
Should I use fuzzy skin?
You should use it if you want to add a grippy texture to tools, hide layer lines, or create unique aesthetic finishes (like matte stone or fur). You should avoid using it on mechanical gears, tight-tolerance joints, or any surface that requires precision sliding friction.
Why does my 3D print look fuzzy?
If you did not intentionally turn on the "Fuzzy Skin" setting in your slicer, a fuzzy-looking print is a symptom of a hardware issue. Unintentional fuzz is usually caused by moisture in the filament, a partial nozzle clog, or severe stringing caused by incorrect retraction settings. If your prints look accidentally textured, it is best to consult a 3D printing troubleshooting guide to recalibrate your machine.