The Ultimate 3D Printer Hotend Replacement Guide
Let’s face it: nothing strikes fear into the heart of a maker quite like waking up to find a massive, hardened lump of plastic completely engulfing your extruder. The dreaded "Blob of Death" is a rite of passage in the maker community.
Whether you’re dealing with a catastrophic leak, an unyielding clog, or you simply want to push your machine to print at blistering speeds, there comes a time when a simple cold pull just won't cut it. When your hardware degrades past the point of no return, executing a proper 3D printer hotend replacement becomes the only viable path forward.
But swapping a hotend isn't just about turning a few screws; it’s an exercise in thermodynamics, material science, and firmware calibration. Here is your ultimate guide to diagnosing hardware failure, choosing the right upgrades, and navigating the future of modular toolheads.
Why Your Hotend is Failing: The Science of Wear and Tear
Before you start ripping wires out of your machine, you need to confirm that the hotend is actually the culprit. The most common symptoms of a dying hotend include frequent, stubborn jams, violent clicking sounds coming from the extruder motor under pressure, and inconsistent layer adhesion.
The root cause usually boils down to the physical degradation of the materials. Traditional brass nozzles are excellent thermal conductors, but they are incredibly soft. If you run abrasive materials like carbon fiber or glow-in-the-dark filaments through a standard brass nozzle, the internal geometry can be chewed up and ruined in less than 50 hours of printing.
Upgrading your hardware materials solves this. Modern setups that utilize stainless steel nozzles are significantly more durable. Under normal daily printing conditions without heavy abrasives, a high-quality stainless steel nozzle can easily achieve a lifespan of around 2,000 hours before needing a replacement. Furthermore, if your system utilizes a PTFE-lined heatbreak, printing at temperatures above 240°C will quickly deform and degrade the tubing, causing internal friction and inevitable clogs.
The Core Upgrade Metric: Volumetric Flow
If your goal for a hotend replacement is to upgrade rather than just repair, you need to look past maximum temperature ratings and focus on the one metric that rules modern 3D printing: Volumetric Flow Rate.
With today's advanced kinematics pushing print heads at 500mm/s, the mechanical motion is no longer the bottleneck—melting the plastic is. If your hotend cannot melt filament fast enough, the extruder gear will grind the filament, resulting in severe under-extrusion.
The math behind this is simple fluid dynamics:
Volumetric Flow Rate (mm³/s) = Layer Height (mm) × Extrusion Width (mm) × Print Speed (mm/s)
If you want to print faster and with thicker layers, you need a hotend with an extended melt zone. While traditional stock hotends max out around 15 mm³/s, modern high-flow aftermarket upgrades extend the heater block and nozzle geometry to push upwards of 30 mm³/s or more, ensuring the plastic flows like butter even at extreme velocities.
The Paradigm Shift: Modular Multi-Toolheads and Quick-Swaps
For years, the industry standard for multi-color or multi-material printing involved using a single nozzle and a filament switching mechanism. This method is notoriously wasteful, forcing the printer to purge massive amounts of plastic into a "poop chute" or wipe tower just to transition from one color to another.
To solve this, the industry is currently experiencing a massive paradigm shift toward independent, modular multi-toolhead systems. By dedicating a completely independent hotend and extruder to each material, printers can swap toolheads on the fly, entirely eliminating cross-contamination and purging waste.
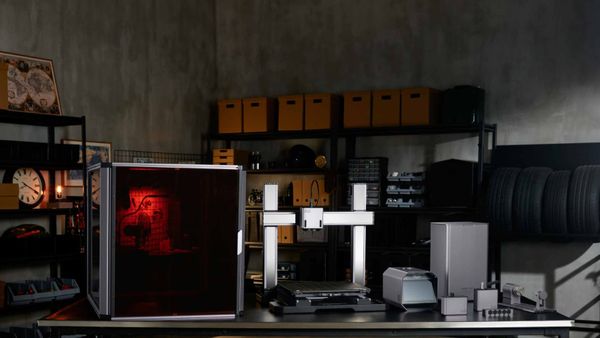
A prime example of this engineering evolution is the Snapmaker U1. Designed with a highly customized hotend architecture, the U1 is capable of reaching 300°C and delivering an impressive maximum flow rate of 32 mm³/s when printing ABS at 280°C.
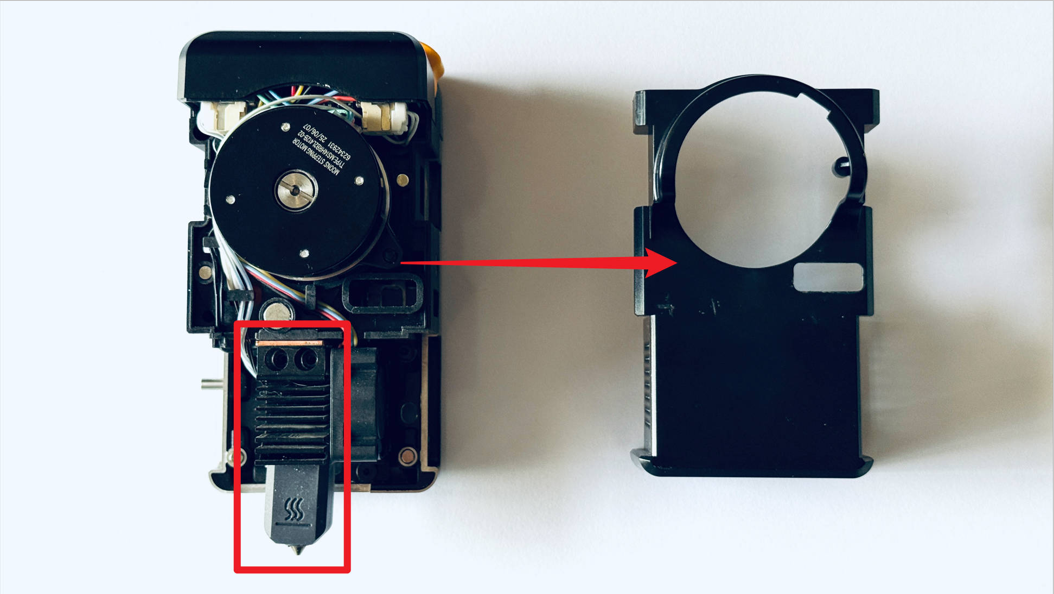
What makes systems like the U1 stand out is how they completely overhaul the traditionally painful 3D printer hotend replacement process. Instead of working around fragile, exposed thermistor wires while the block is heated to near-melting temperatures, the U1 utilizes a "SnapSwap" mechanism. Users can safely detach the entire toolhead from its magnetic swapper in a cold state by simply pressing an H2.0 hex key into a release slot until it clicks.
However, packing this much capability into a modular, quick-swap ecosystem does come with necessary engineering compromises. To keep the ultra-compact toolhead from suffering heat creep, the internal 2510-sized cooling fan spins at a blistering 19,000 RPM, which naturally generates a noticeable, high-frequency acoustic footprint. Additionally, while swapping the entire toolhead is foolproof, if you suffer a severe blob failure and need to manually replace the bare inner hotend core yourself, the process requires you to manually apply thermal grease to the components to ensure proper heat transfer. It is a slightly messy, geek-level task that reminds us that desktop manufacturing still demands a bit of hands-on grit.
Two Crucial Post-Swap Calibrations
Whether you are dropping in a standard replacement part or upgrading to a high-flow beast, your replacement is not complete until you calibrate the system. Skipping these steps guarantees a failed print.
1. PID Tuning (Algorithm Reset)
Your printer's motherboard relies on a precise algorithm (Proportional-Integral-Derivative) to keep temperatures stable. When you install a new hotend, its thermal mass changes. If you don't recalibrate this algorithm, your nozzle temperature will swing wildly, triggering thermal runaway errors.
To fix this, connect your printer to a terminal and run an auto-tune command. The required command depends on your machine's firmware. For older or traditional printers running Marlin, sending M303 E0 S225 C10 will tell the machine to cycle the primary heater 10 times at 225°C to learn its new thermal behavior. Once it spits out the new values, save them to the EEPROM (usually with the M500 command). However, modern high-speed printers like the Snapmaker U1 run on advanced Klipper firmware. For these Klipper-based systems, you will instead use the command PID_CALIBRATE HEATER=extruder TARGET=240 to automatically calibrate the new hotend's thermal profile.
2. Z-Offset Recalibration
No two nozzles are machined to the exact same microscopic length. After a swap, the physical distance between your auto-leveling probe and the tip of the nozzle has changed. If you hit "Print" right away, you will likely gouge a deep scratch straight into your expensive PEI build plate. Always reset your Z-offset by printing a flat, 0.22mm tall single-layer test square, adjusting the height live via your screen until the surface is perfectly smooth without ridges or gaps.
Preventative Maintenance for the Print Farm
Once your new hotend is dialed in, keeping it alive requires proactive maintenance. Treat your machine like industrial equipment:
- Cold Pulls: Regularly perform cold pulls with nylon or cleaning filament to yank out carbonized debris from the melt zone.
- Fan Care: Inspect and brush the dust off your hotend cooling fans; restricted airflow is the number one cause of heat creep.
- Motion System Checks: While you're working on the toolhead, take 60 seconds to ensure your V-slot wheels are clean and your belts have the proper tension.
A 3D printer hotend replacement doesn't have to be a nightmare. By understanding the thermal dynamics of your hardware, respecting the necessary calibration steps, and looking toward the future of quick-swap modular systems, you can spend less time turning wrenches and more time actually making things.