What Is Flow Rate in 3D Printing: Tips for Perfect Prints
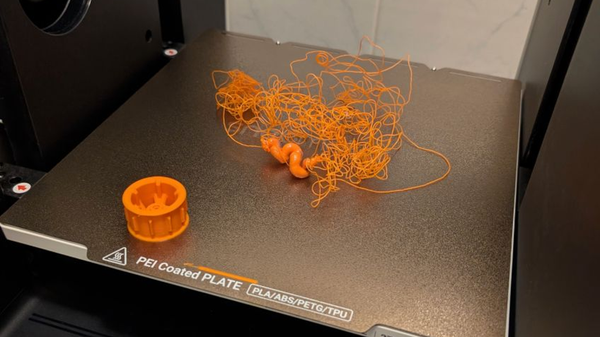
Facing the issue of holes and blobs in your 3D prints? Incorrect flow rate might be the root cause.
Many 3D print makers are facing the issues of over-extrusion or under-extrusion. Both can lead to ugly prints with mismatched layers. In this guide, we will walk you through the importance of flow rate and how to achieve optimized prints. This will help both beginner and pro users to maintain print quality with smooth extrusion.
What Is Flow Rate in 3D Printing?
3D printer flow rate or extrusion multiplier is the slicer setting used to define the volume of plastic to extrude through the nozzle. The default slicer setting in the software is set as a percentage by 100% or 1.0.
The flow rate in 3D printing will tell you how much plastic to extrude. It not only controls the volume of plastic extruded but also affects the print quality and dimensional accuracy. Over or under extrusion of the filament can influence the strength and layer adhesion.
Other factors like the type of filament, size of the nozzle, and printer settings can affect the flow rate. Therefore, adjustments are necessary to maintain consistency in 3D printing.
Why Is Flow Rate Important?
The flow rate is one important technical setting that can directly impact the quality of your 3D prints. Without the accurate flow rate, you can never achieve that perfect looking 3D prints.
Look at the following factors that are affected by the flow rate.
- Print Quality: Too many bad flow rates will produce undesirable prints with holes and uneven layers. Under-extrusion would result in weak layers while over-extrusion can result in stringing or blobs.
- Structural Integrity: When the flow rate is not calibrated, it can weaken the layer adhesion and durability of prints.
- Detail Accuracy: For makers who print complicated designs, poor flow rate can affect the accuracy. Accuracy is also important when printing small parts with details.
Printing issues like the layer shifts or warping are the main hurdles for many 3D printers. Overcome such problems by using precise calibration tools in your machines.
Even many 3D print enthusiasts use versatile printers like Snapmaker’s 3-in-1 models to achieve smooth laser-engraved or CNC-carved details.
How to Adjust Flow Rate for Optimal Results
Getting an accurate 3D print without gaps or dots can be achieved by the optimal flow rate. The volumetric flow rate controls and measures the volume of filament extrusion per second (mm³/s). Calibrating your flow rate per filament can help refine the accuracy of your prints.
Adjusting Flow Rate in Slicer Software
Suppose you are using Snapmaker’s Luban for your setup. Start with the default rate of 100% and modify the slicer settings to normal layer height (0.2 mm) and speed. Test with the printing cubes.
You may need to adjust the flow rate for different printing conditions and filament characteristics. For example, if you are facing the issue of gaps or holes, then raise the flow rate by increasing it to 110%. If having blobs or warping, then decrease the flow rate.
Factors That Influence Flow Rate
Flow rate is directly impacted by the characteristics of the filament, the size of the nozzle, and the speed of the print.
- Filament Type: Various filaments possess varying densities. Such as PLA flows easily, TPU is elastic, PETG is sticky, polycarbonate is hard, and composites are abrasive. The more flexible the lesser flow rates.
- Nozzle Size: The size of the nozzle also affects the flow rate. Larger nozzles like above 0.8 mm may require increased flow rates.
- Print Speed: Printing speeds higher than normal also affect the printing consistency.
Step-by-Step Guide to Calibrating Flow Rate
Calibrating flow rate or extrusion multiplier is simple and less-time consuming. Here is how:
Step 1: Calculate the filament diameter
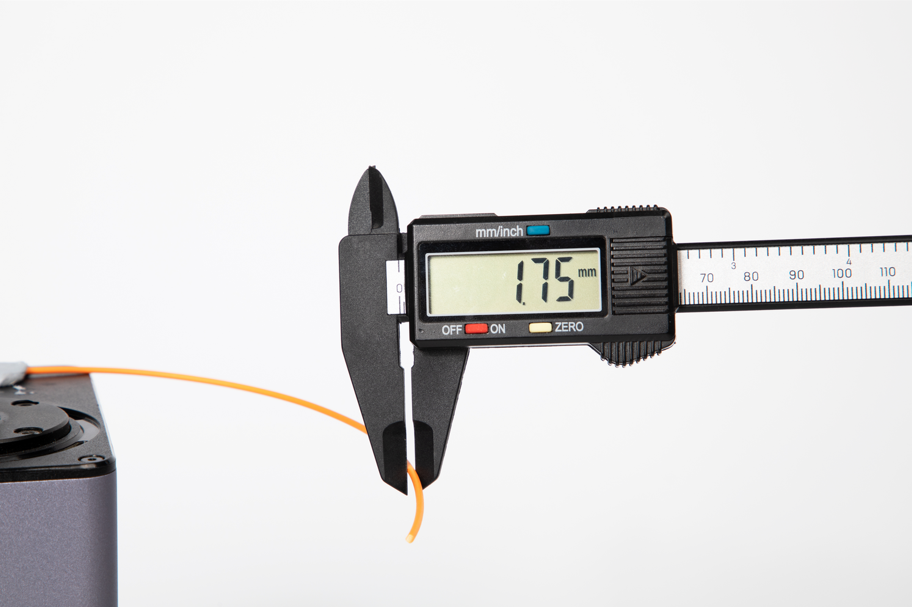
Select the nozzle (e.g., 0.4 mm nozzle = 0.4 mm line width), wall printing speed, and filament to be calibrated. The filament diameter is listed on the side of the spool, or use a digital caliper for accurate filament feeding.
Step 2: Print a single-walled test cube
Some users test with double or more walls, but we recommend running the test with a single wall. After the print has cooled down, measure the wall thickness using calipers. For a four-sided cube, take the average of four values.
Step 3: Compare the thickness to the expected value
Compare the measured thickness to the expected value (e.g., 0.4 mm for 0.4 mm nozzle). The formula if the measured thickness is less than the expected value:
New Flow Rate = (Expected Wall Thickness / Measured Wall Thickness) * Current Flow Rate
Step 4: Adjust the flow rate
In the slicer, enter the updated flow rate. Increase the flow rate above normal for under-extrusion or reduce for over-extrusion.
Step 5: Reprint the test
Now, run the test again and remeasure with the updated flow rate until the desired thickness is achieved. Match the measured value and the slicer value. Determine visually if the sample has achieved the smoothest finish.
A well-calibrated flow rate is important for a good, strength, and quality print. You are free to experiment with the flow rates depending on the filament materials and their flowing characteristics. Share your insights in 3D printing communities like Snapmaker’s Facebook Groups. Help others or learn further from the advanced users.
Advanced Tips for Flow Rate Optimization
Before wrapping up, we have advanced flow rate optimization tips for advanced 3D print makers.
- Make sure the filament is completely dry before calibrating so as to achieve consistent results.
- Clear any nozzle clogs or use a new nozzle if you notice unappealing print quality.
- Adjust the flow rate for multi-material prints, high-speed printing, or viscous filaments.
- Clean the extruder from dust or residue buildup before recalibrating.
- Experiment with flow rate in small increments (1-2%) for precise results.
- The first layer must adhere to the build plate, so it needs to be washed before.
Conclusion
Adjusting the flow rate is certainly important to achieve good 3D prints with a high-quality surface finish and dimensional accuracy. Take the time to figure out the best flow rates by running test prints. Remember that different filaments will have different flowing characteristics.
For more tips and techniques, join our Snapmaker community. Connect with the 3D print enthusiasts around the globe now!