5 Creative TPU 3D Print Ideas to Try on Your Snapmaker U1 (Beyond Phone Cases)
When we talk about FDM 3D printing materials, PLA is the reliable standard. But if you want to unlock functional parts, wearables, and shock-absorbing tools, TPU (Thermoplastic Polyurethane) is the game-changer.
Many users hesitate to try TPU because of its reputation for being "difficult"—clogged nozzles, stringing, and slow print speeds. However, with the Snapmaker U1, equipped with its 4-Toolhead Tool Changer system, executing a flawless, flexible 3d print is almost as straightforward as printing PLA.
Unlike standard multi-color printers that waste material by purging, the U1 simply swaps the entire toolhead in seconds. This means you can print soft, flexible materials without the risk of jamming during filament changes.
In this post, we’ve curated 5 unique TPU 3D print ideas that go beyond the typical phone case. From hybrid functional tools to high-fashion accessories, here is what’s possible when you master soft materials.
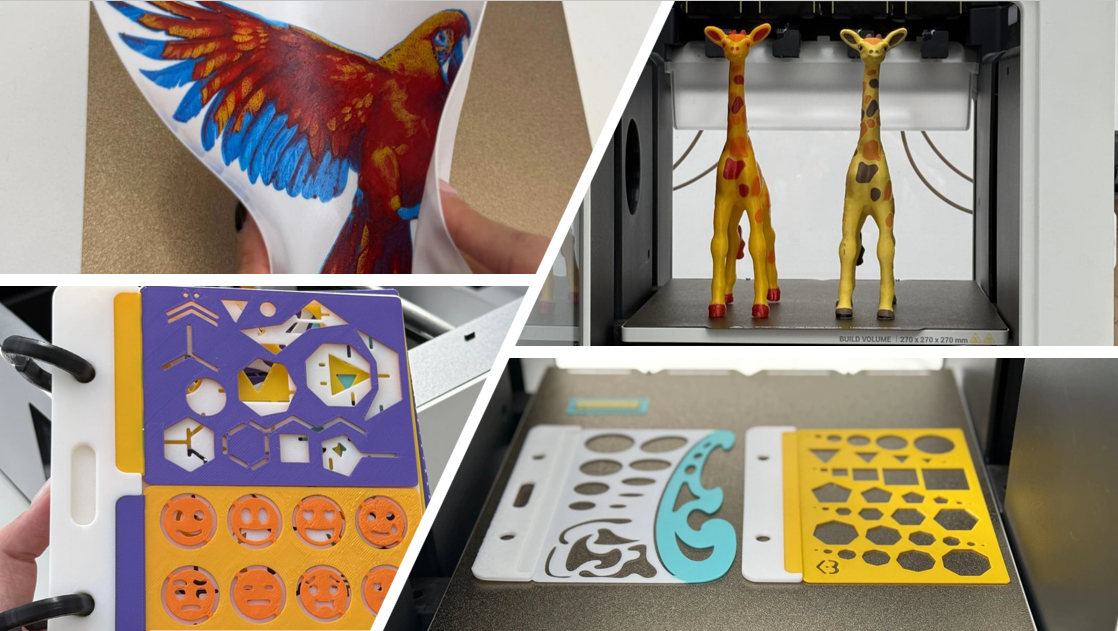
The Functional Hybrid: TPU & PLA Stencil Book Organizer
Project Level: Advanced (Multi-Material / High Speed)
Designer: 3D KIMBA (MakerWorld)
Most people think of 3D printing as "one part, one material." But the real magic happens when you combine properties. Our top pick for this list is a Stencil Book Organizer, designed to hold delicate drawing templates.
Why It’s Special
A pure PLA organizer would be too rigid and might scratch the stencils. A pure TPU organizer would be too floppy to stand upright.
By leveraging the Snapmaker U1's ability to manage four independent toolheads, we can assign specific materials to specific tasks within the same print job. The machine seamlessly switches between printing a rigid SnapSpeed PLA skeleton for structural integrity and a soft Snapmaker TPU layer for the slots and bumpers. This combination ensures the tools are securely held in a high-grip surface while the overall structure remains stable.
Snapmaker U1 Print Settings [Technical Deep Dive]
- Printer: Snapmaker U1
- Filament: Snapmaker TPU + SnapSpeed PLA (Total used: 46.79g)
- Hot End: 0.4 mm Hardened Steel
- Layer Height: 0.2 mm
- Toolhead Swaps: 92
- Acceleration: 10,000 mm/s²
- Print Speed:
- Infill: 270 mm/s
- Walls: 200 mm/s
- Travel: 500 mm/s
- Shells: 3 Bottom | 5 Top | 2 Walls
- Total Print Time: 8.47h
The U1 handled 92 toolhead swaps without a single jam, demonstrating that Tool Changer technology is superior to traditional MMU systems for TPU printing. There is no need to retract the flexible filament all the way back to the spool—the machine just parks one head and picks up the next.
The Multi-Color Evolution
One of the biggest misconceptions about TPU is that you are stuck with single-color blobs. Traditionally, switching colors with flexible filaments is a nightmare of oozing and stringing.
With the Snapmaker U1, achieving a clean multicolor TPU print is no longer a struggle. Its 4 independent toolheads allow you to print up to 4 different colors (or materials) without purging waste.
Articulated Giraffe (Multi-Color TPU)
Articulated "print-in-place" models are stress tests for bed adhesion and tolerance. Doing this in TPU adds another layer of complexity because flexible joints can easily fuse together.
We printed this giraffe using multiple colors of TPU. Because the U1 doesn't need to purge old filament to change colors, the layers are cleaner, and you save a significant amount of expensive TPU filament.
Gary De'Snake (Zootopia Inspired)
Similar to the giraffe, this snake model features a complex chain design. The U1’s direct drive toolheads handled the constant retractions between the snake's body segments without creating the "stringing spiderwebs" often seen in a typical flexible 3d print.
Flexible Art: TPU Hueforge
Project Level: Intermediate
Hueforge (Filament Painting) relies on thin layers of filament blending together to create depth and color interaction. While usually done in PLA, printing a Hueforge in TPU opens up a new application: Curved Surface Art.
Because the resulting "painting" is flexible, you can wrap this art piece around a mug, a lamp post, or even sew it onto clothing as a patch. It’s a fantastic way to utilize the Snapmaker U1’s precise layer height control (0.08mm or lower) to achieve smooth color blending.
High Fashion: The Spiky Bag
Project Level: Advanced (Long Duration)
Can you 3D print fashion? Absolutely. This Spiky Bag is a testament to the endurance of the Snapmaker U1.
- The Challenge: A print like this involves thousands of sharp points (spikes). Each spike requires the printer to stop extruding, retract, move, and restart. On a Bowden extruder, this is a nightmare.
- The Result: Thanks to the lightweight direct drive toolheads and vibration compensation, the spikes came out clean and sharp, creating a functional, wearable accessory that looks like high-end designer gear.
You aren't limited to just one material. As demonstrated by the 'Geometric Patchwork Bag' from designer @variableseams, you can leverage the printer's independent toolheads to combine TPU and PETG in a single job. This hybrid approach creates a stunning contrast between soft, flexible seams and rigid, glossy geometric facets—unlocking infinite color and material combinations that standard single-extruder printers simply cannot achieve.
Three Essential Tips for Success with TPU
Printing with TPU requires a slightly different mindset than PLA. Here is how to ensure success on your Snapmaker:
- Keep It Dry: TPU is hygroscopic (it loves water). Even if your spool is new, dry it for 4-6 hours (approx. 55°C) before printing. Wet TPU causes popping sounds and poor surface quality.
- Watch the Retraction: Unlike PLA, you cannot yank flexible filament back quickly. We recommend keeping the retraction distance low (around 0.8 - 2.0 mm for direct drive) to avoid stretching the filament inside the extruder.
- The First Layer Matters: Even if you print fast later (like our 200mm/s test above!), slow your initial layer down to 20-30 mm/s to ensure a rock-solid foundation.
Mastered these basics? For a complete breakdown of advanced settings, check out our comprehensive TPU Filament 3D Printing Guide: Temperature, Speed, and More.
Conclusion
From organizing your workspace with hybrid materials to creating wearable fashion, TPU is incredibly versatile. With the right machine, like the Snapmaker U1, the barrier to entry is lower than ever.
Ready to try these TPU 3D print ideas? Download the project files below and share your makes with us on the Snapmaker Forum!