Snapmaker U1 Top Cover User Test - Feedback & Next Steps
Hi Snapmaker Community,
About two months ago, we launched the public beta for the U1 Top Cover. Today, we're circling back to walk through every piece of feedback you shared with us. We also want to be upfront about what we learned along the way.
A quick note:
This is an updated version of the U1 Top Cover beta test report. Based on your feedback, we've corrected a few technical details that weren't quite accurate and added more complete content, including Snapmaker's internal test data and and test conditions, deeper technical explanations of several key questions, the improvements we've made for the production version, and follow-up feedback from our beta testers. Thank you to everyone in the community who helped us improve this report.
Why We Invited Real Users to Beta Test the Top Cover First
The Top Cover is critical for high-temperature material printing, air filtration, and noise reduction. Before mass production, we invited real users to try it out in their daily environments. Why? Because lab conditions can never fully replicate your workbench, your desk, or your garage. Your real-world feedback helped us uncover blind spots we would have missed and made the final product more reliable.
What We Tested, and What You Told Us
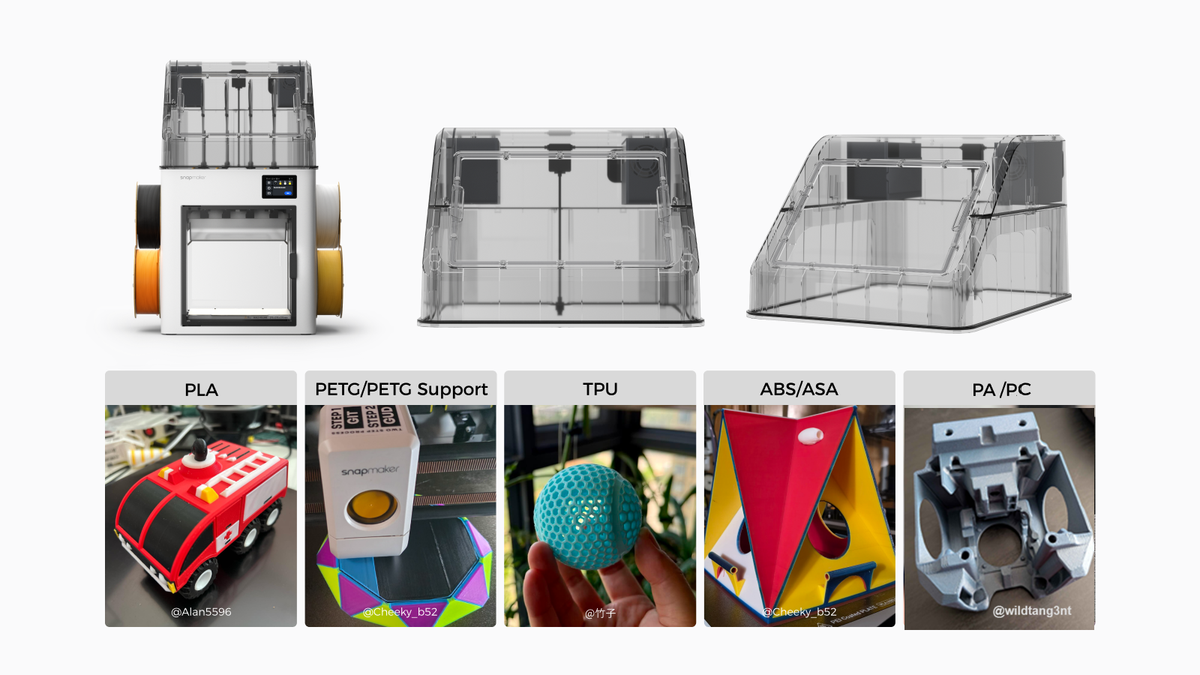
We invited 20 community members to run a full month of testing on the pre-production version of the Top Cover, across a range of materials and along six dimensions: Unboxing & Installation, High-temperature Chamber Performance, Low-temperature Cooling Efficiency, Air Filtration & Sealing, Noise Performance, and Durability & Physical Design.
Before you dive in, a couple of things to keep in mind:
- User test data comes from different measurement methods, instruments, and ambient conditions. Variation between results is normal, and readings may differ from Snapmaker's own data gathered under controlled conditions. We've noted the test conditions alongside the official figures we share.
- Testers used the pre-production version of the Top Cover. We've highlighted where the first mass-production units differ from the pre-production version at the relevant points below. For final product specifications, please refer to the official product page.
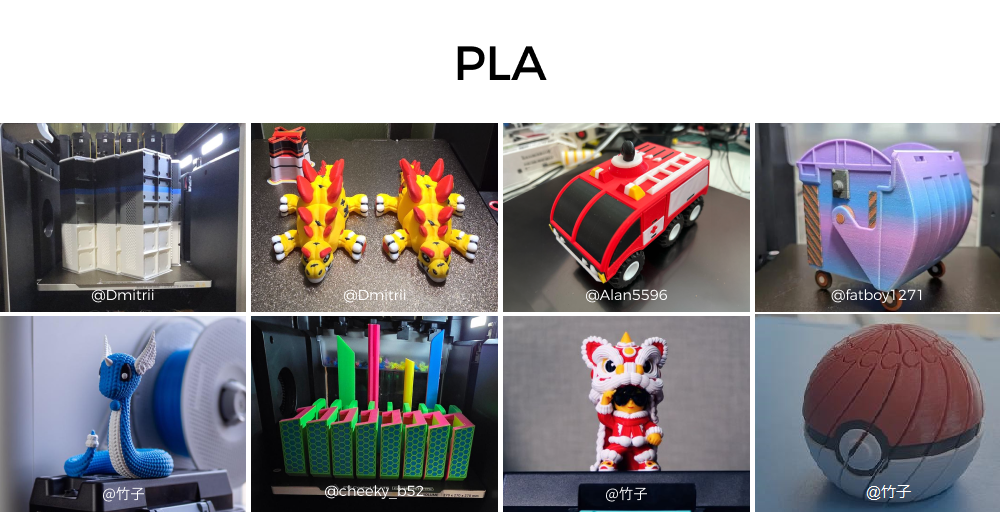
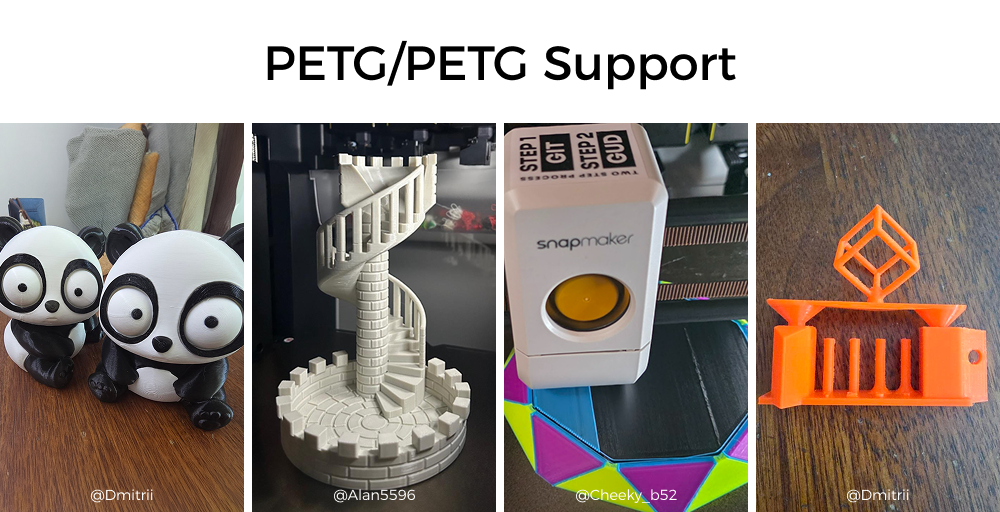
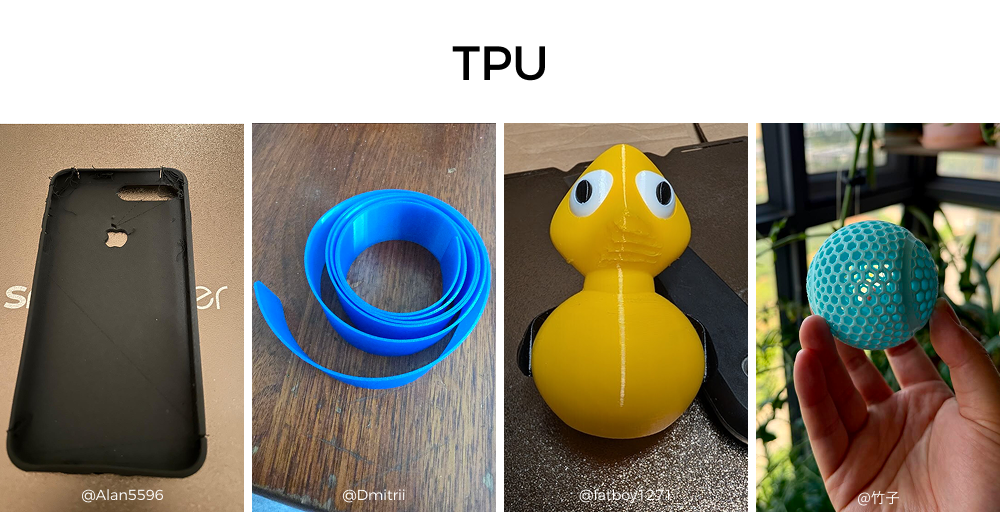
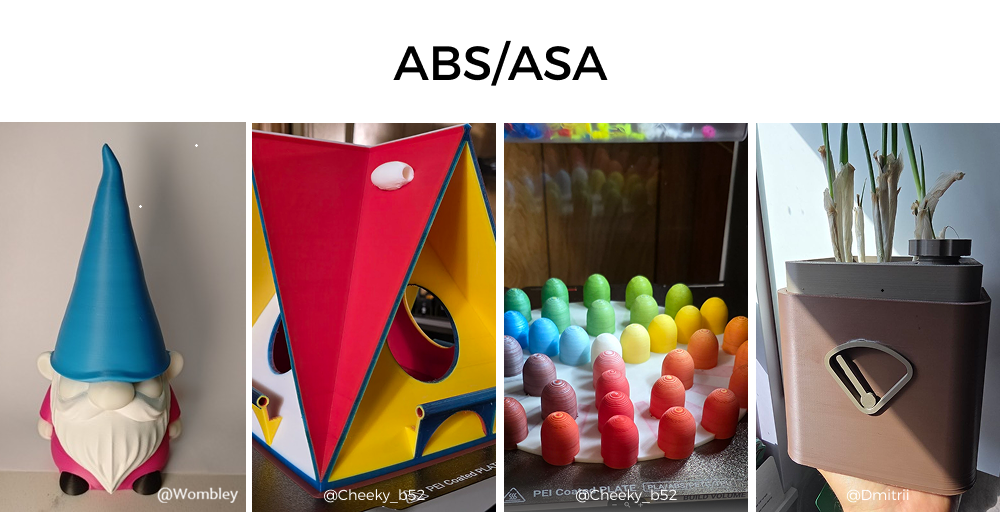
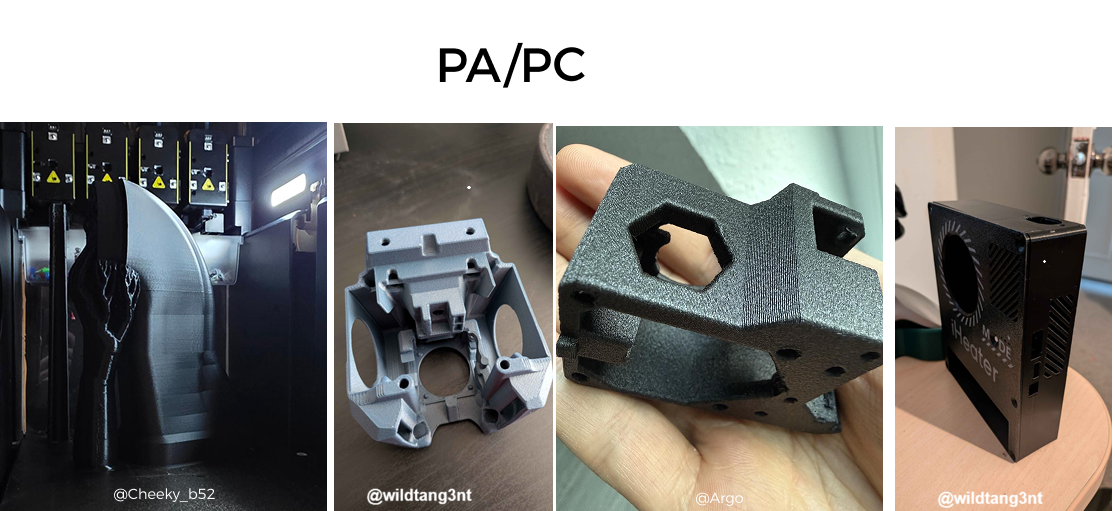
High- and Low-Temperature Filament Printing Performance
The Top Cover delivers reliable high-temperature engineering-filament printing while preserving the print quality and multi-color performance you'd expect with lower-temperature filaments.
@竹子: "After going through nearly a full kilo of ABS, I'm very happy with it, especially the last couple of days when the room temperature was on the cooler side."
@fatboy1271: "I just uploaded a video of me removing an ASA print from its ABS supports. Really pleased with how it came out."
@Wombley:"I've actually printed a LOT of PLA while I had the cover, doing more testing of Full Spectrum. At least a few thousand tool changes and none of them missed."
@LixNix: Tested various materials: PLA/PETG/TPU/ABS/ASA/PC/PA12/PA6-CF/PVA, all success (some larger and longer prints require uses glue for reliability).
@CheekyB: "23hrs of ASA printing. Came out absolutely perfect"
@Wild Tangent: "This one is PC. All came warp-free, 3+ hr prints at max temp hitting 62-63C"
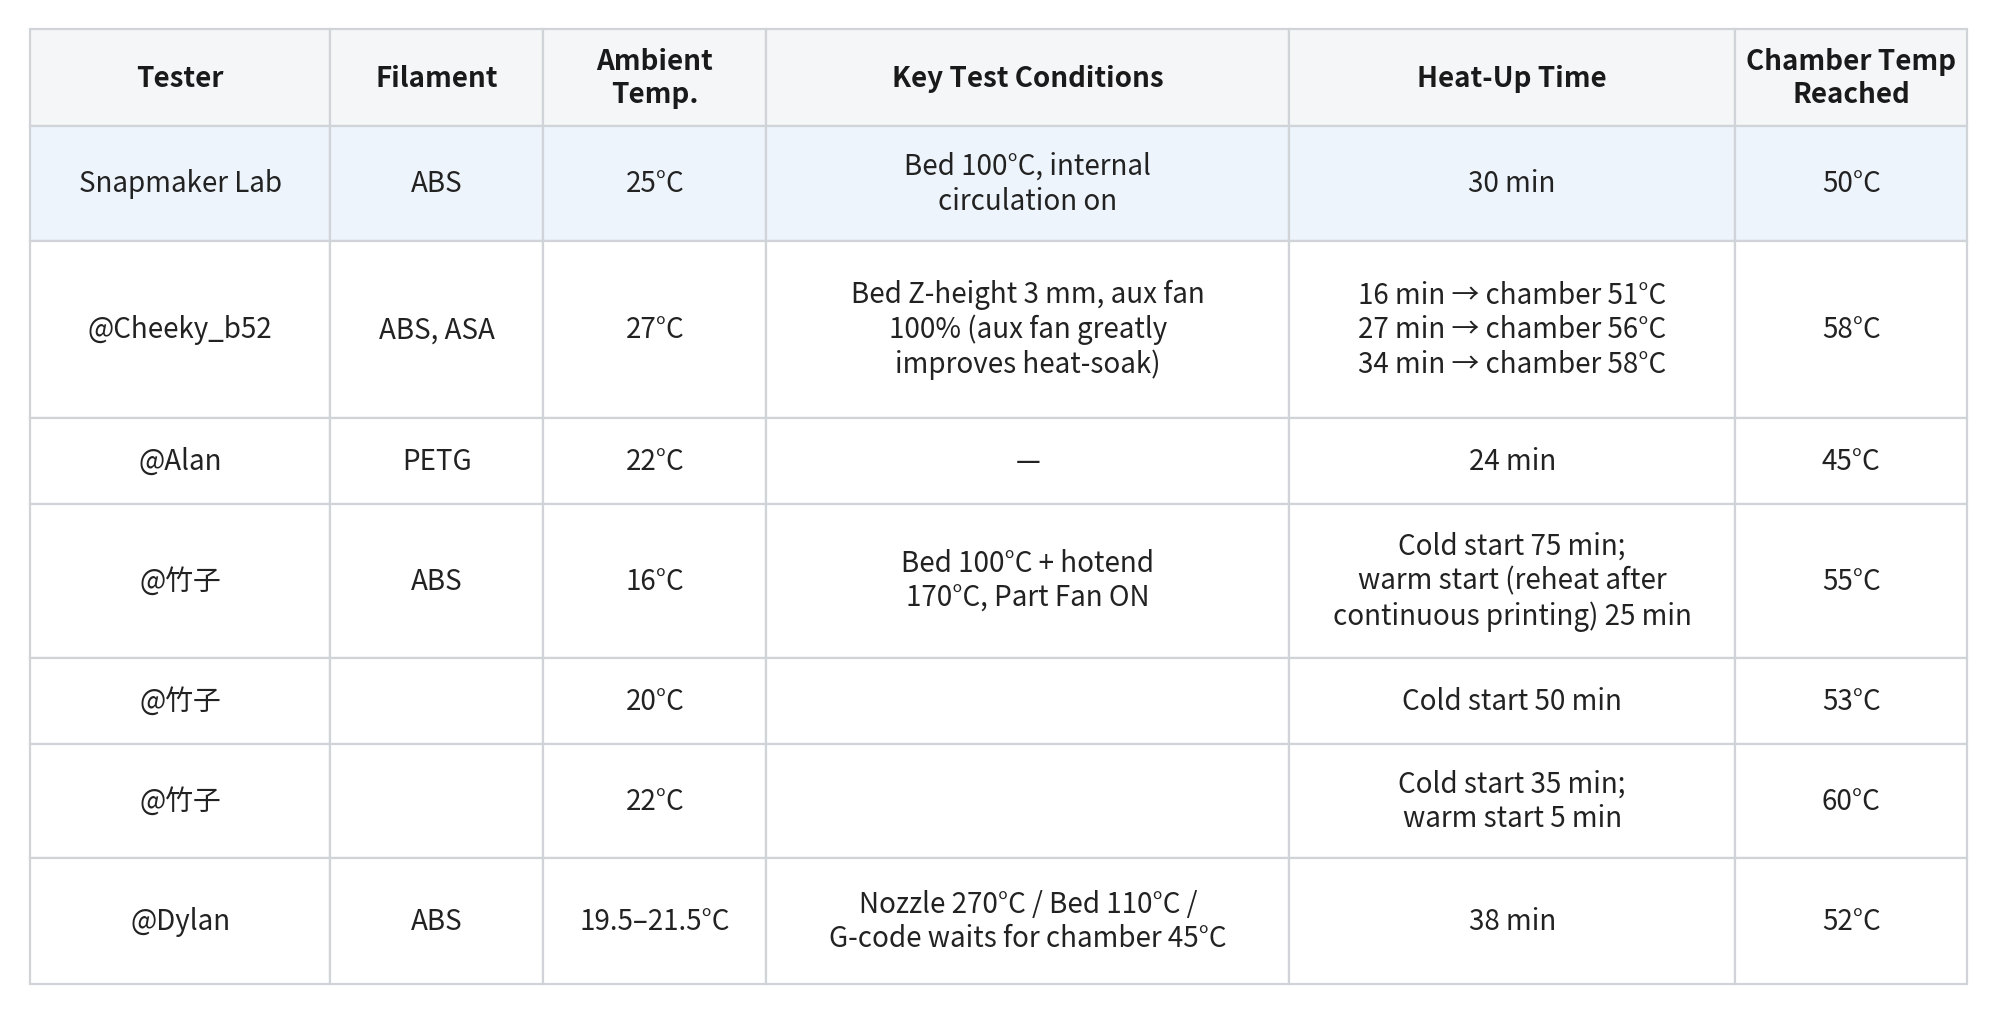
Chamber Heat-Up Performance
The U1 with Top Cover is a passively insulated, enclosed-chamber printer. It has no dedicated chamber heater. The chamber warms passively from radiant heat off the heated bed, with chamber temperature regulated passively through the adaptive internal/external circulation unit. Heat-up speed depends on ambient temperature, bed height, and your preheating approach.
Our internal benchmark: at 25°C ambient and a 100°C bed, with internal circulation running, the chamber reaches 50°C within 30 minutes.
At ambient temperatures of 20-27°C, testers measured cold-start heat-up to their target chamber temperature of 45-60°C (or to a stable plateau) at mostly 24-40 minutes, which is broadly in line with our lab benchmark.
We also found that at around 16°C and below, heat-up to 55°C stretches well beyond 50–75 minutes. This is exactly why a proper heat soak before printing high-temperature filaments matters so much in cooler environments.
Based on this feedback, we've built preheating improvements into both the firmware and the slicer. Already live: with U1 firmware V1.5.2 Beta or later and Snapmaker Orca V2.3.5, the printer runs an automatic ~3-minute preheat before printing ABS and other high-temp filaments when the Top Cover is installed. Coming next: we plan to ship a more complete preheat mode in a software update this September, for faster and more even chamber heat-up.
Separately, a few users mentioned using a heat-soak routine to get more uniform chamber temperatures and more accurate readings. We're testing heat-soak internally and evaluating whether to make it part of the slicer's default configuration.
Notes:
- User data comes from different instruments and different criteria (reaching a target chamber temp vs. reaching a stable plateau), so cross-comparison is for reference only. The official benchmark was measured under controlled lab conditions; actual results vary with environment and unit-to-unit differences.
- Additional data points (for reference): @Dmitrii reached a stable chamber temp in about 40 minutes printing ASA (about 50 minutes with air conditioning blowing directly on the printer); @Rüdiger reached stability in as little as 26 minutes, averaging 35-40; @LixNix, printing ABS/ASA at 22-24°C room temperature, found heat-up was as expected with the bed in its high position but took considerably longer with the bed at the bottom. Across 15 preheating trials, @Wombley found a "lower z value (higher bed position)" also heated faster, and maximum fan speed was not always better.
Air Filtration Performance
This section has three parts: how the filtration system works, what testers measured, and the improvements we've built into the first production run based on your feedback.
1. How the filtration system works
The Top Cover uses a dual-airflow design that switches automatically based on the filament:
- Internal circulation mode (printing ABS, ASA, PC, PA and other high-temp engineering materials, plus materials like PETG that benefit from a stable chamber temperature): the internal circulation fan continuously draws chamber air through a G3 pre-filter + activated-carbon composite filter + H12 HEPA, filtering odors and particulates while retaining chamber heat to hold the temperature high-temp printing needs. After a print finishes, filtration keeps running for 10 minutes to clear any residual fumes.
- External exhaust mode (printing PLA, TPU and other low-temp materials): the exhaust fan pulls in ambient air from the bottom of the machine and vents hot chamber air out through the louvers, so parts cool properly. This mode is built around cooling.
Note:
How the two modes switch: The system manages internal circulation and external exhaust automatically based on the filament, and they generally don't run at the same time by design, for safety.
Printing ABS and other high-temp materials (internal circulation): the exhaust is disabled by default. Running it would disrupt the chamber temperature and vent unfiltered air straight out, which carries real risk. If you've set up an exhaust duct and do need to vent, we'd suggest letting internal circulation run for a while after the print finishes to fully filter the chamber air first, then switching on the exhaust.
Printing PLA and other low-temp materials (external exhaust): the exhaust fan runs by default; you can also turn on the internal circulation fan manually if needed.
Top Cover user manual: Top Cover User Guides | Snapmaker Wiki
2. What testers measured
Particulate data: @Dmitrii Savin logged PM 0.3–10.0 µm across a full print using an AIR-1 air-quality sensor. Particulates rose briefly the moment printing started, then fell back quickly and settled near baseline as internal circulation kept filtering.
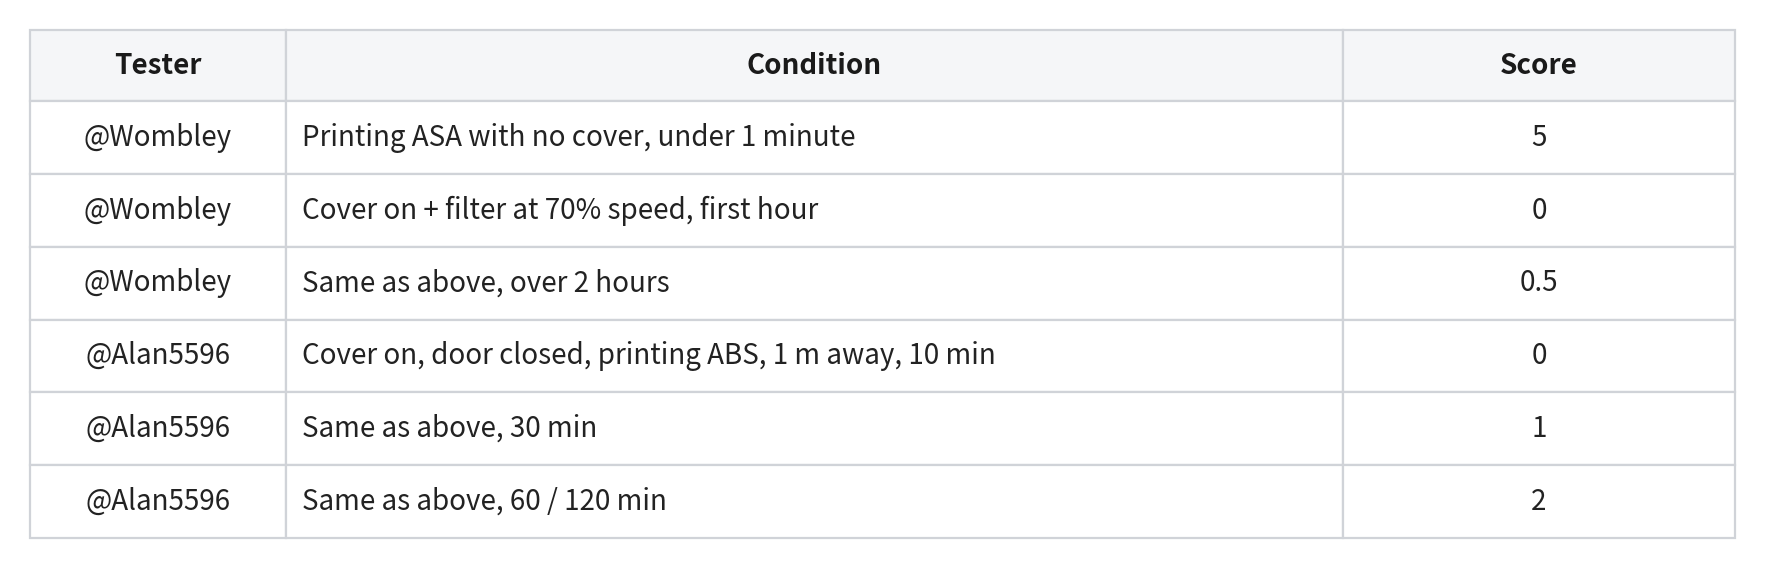
Quantified odor scores: two testers independently rated ABS/ASA printing odor on a 0-5 scale (0 = no smell, 5 = have-to-leave-the-room):
More from testers:
- @Marlowe: "When printing ASA, because internal circulation filtering runs the whole time, the smell outside the machine is clearly less than with other enclosed printers."
- @Cheeky_b52: Five straight days of ABS printing with no noticeable smell in an enclosed print room; the only detectable odor was very faint, within 1-2 feet of the seams/door/base, and the air purifier's PM2.5 reading never rose more than 2-4 ppm above baseline throughout.
- @fatboy1271: No noticeable smell outside the enclosure while printing ASA, but sticking his head inside the chamber for more than about a minute, he could smell it clearly, which is exactly the point: the fumes are being kept contained inside the recirculating filter loop.
Edge case: @Argo reported a distinct odor while printing ABS/PAHT-CF in a very small, closet-like room. That unit had custom modifications: heatsinks and two fans added on the main controller (one pointed to the CPU and one to the stepper drivers), plus a modified start g-code. Modifications like these can change the internal airflow, which may affect the sealed recirculation loop the filtration relies on; combined with a tiny, unventilated space, no filtration system can fully clear odor buildup during long high-temp prints.
3. Sealing improvements in the first production run, based on your feedback
Combining our internal seal testing with beta results, we confirmed the main gaps were at the front door and where the cover meets the enclosure. The first production run addresses this with three changes:
- The foam layer where the machine meets the base of the cover is now 5 mm thick, up from 3 mm.
- The front door seal optimization:
- The foam layer has been adjusted to 2mm and the PET reinforcement layer has been removed.
- The front-door seal design has been upgraded.
A note on U1 sealing by design: because of the demands of high-performance cooling and the mechanical structure, the U1 can't be 100% airtight. We've optimized sealing in the critical areas and held cosmetic gaps within tolerance. The final design maximizes performance while avoiding any unnecessary gaps.
On requests to support an exhaust hose: if you'd rather chamber air not vent directly into the room while printing low-temp filaments, you can add an exhaust hose to route it outdoors or to a third-party purifier. There's a port at the Top Cover's exhaust fan for this, and you can print the adapter model we provide (The Top Cover External Exhaust Port model is now available on the wiki).
Noise Performance
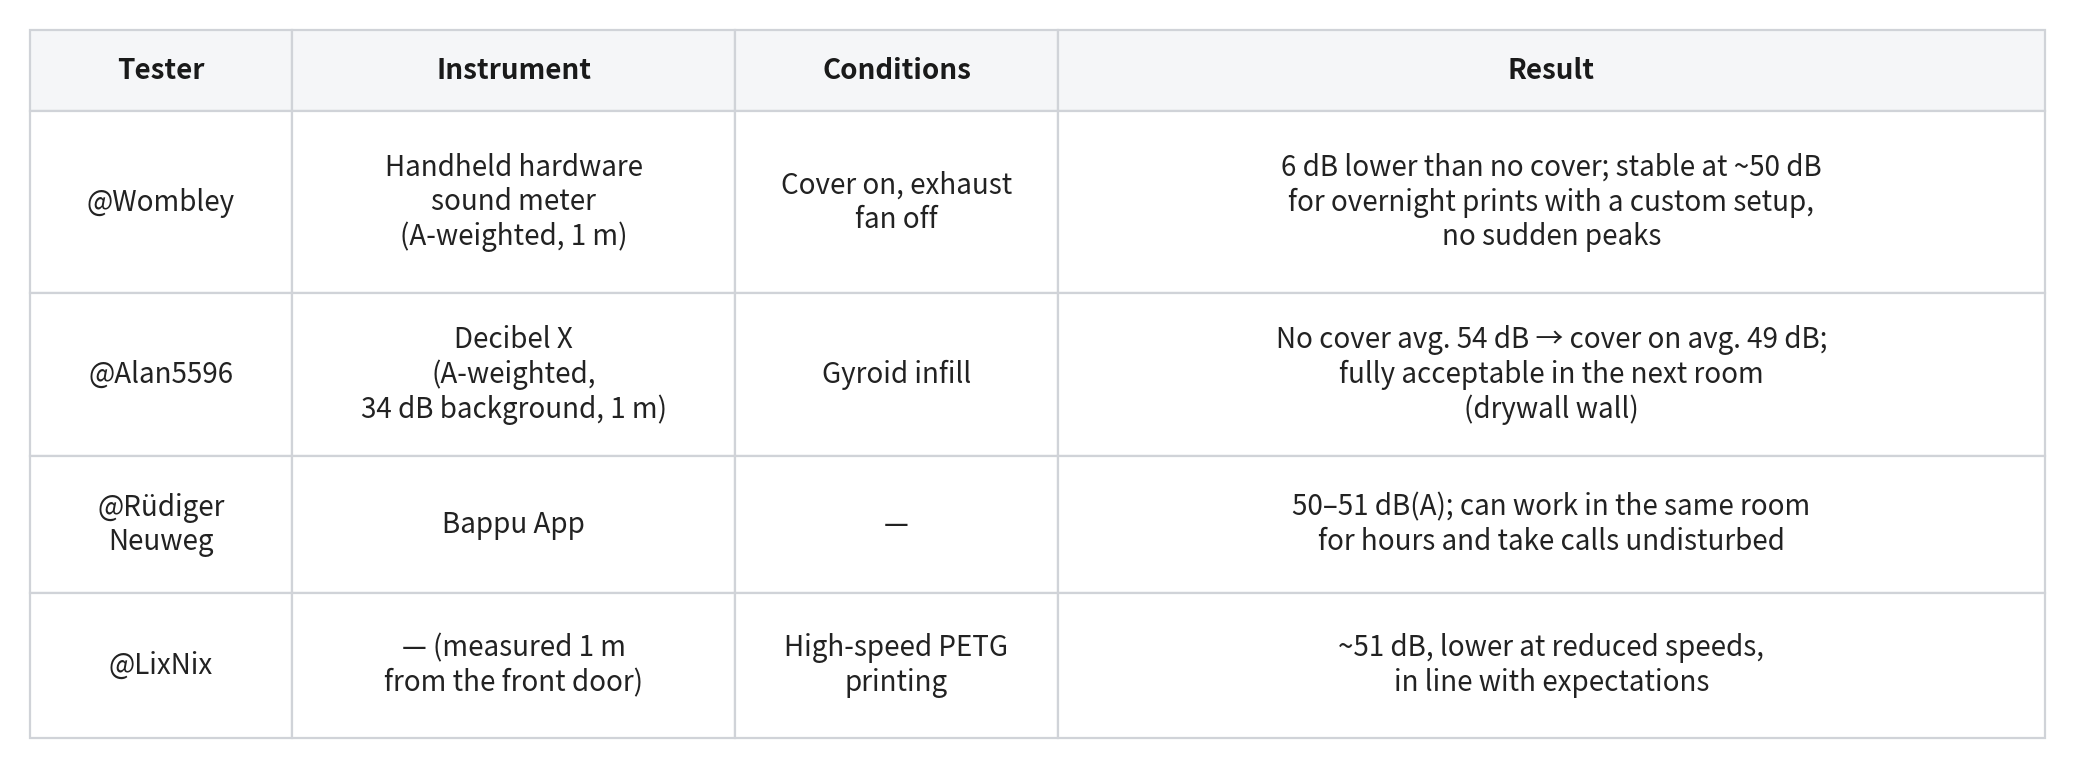
Official figure and test conditions: In the Snapmaker lab (low-background-noise environment), 1 meter from the front of the machine, with the internal circulation fan at 60%, measured operating noise is under 50 dB(A). Your background noise, instrument, and fan settings will all affect the reading, so please read the figures below alongside their conditions.
Scenario 1: Printing high-temp filaments (internal circulation) - where the Top Cover helps most
Most testers recorded 49-53 dB here, broadly matching our official figure:
Two further sets were measured under conditions that differ from the table above, so we've kept them out of the direct comparison and listed them in the footnote for reference.*
* Non-standard-condition records:
- @Dmitrii Savin used an uncalibrated phone app (Decibel X Pro & PhyPhox, 1 m) to run three back-to-back comparisons on the same machine: no cover → cover installed (unpowered) → printing PETG with the filter fan at 75%. Readings dropped steadily across the three (recorded as 62 → 55.4 → 53.2 dB; uncalibrated, trend only).
- @SimonZhi measured a peak of no more than 53 dB with the fan running, using a phone app just 30 cm from the machine, closer than the standard 1 m.
Scenario 2: When the exhaust fan is running (printing PLA and other low-temp filaments)
The exhaust fan is noticeably louder than the internal circulation fan, so in this scenario the Top Cover's noise benefit is partly offset.
- @Wombley: the exhaust fan is clearly louder than the recirculation fan at any speed.
For this low-temp printing scenario, the production version has changed the on-screen fan-speed step from 25% increments to 10%, so you can fine-tune the balance between noise and cooling.
Top Cover Visibility
Visibility with the tinted design
The Top Cover uses the same smoke-gray light tint as the U1's glass door. Before the beta we'd debated "fully transparent vs. lightly tinted" internally at length — and testers gave us our answer:
@fatboy1271: "I thought I'd want a fully transparent cover for maximum visibility. But the more I look at it, the more I appreciate the lightly tinted design. It kind of matches the look and light feel of the glass door. And it doesn't really hurt visibility. So now I'm not sure — maybe both work!" … "The smoke-gray finish is a better choice than a fully clear panel, and it matches the U1 glass door nicely."
@Alan5596: "In both normal and dimmed lighting, there didn't seem to be any real issue. Though because of LED glare, it's a little harder to see from the printer's left side."
Photos from beta test version (Pre-production version):
A surface-finish issue, and the production fix
@Wombley flagged this during testing:
"I do see a scuffed and foggy finish in the walls of the front right corner of the cover. It appears to be some kind of large surface scratching from removal from the mold?"
He was right. Pre-production covers could show fairly visible mold marks on the surface. We've addressed this by polishing the mold for the production run, giving the cover a cleaner, clearer finish.
Below are two versions shot by our community team, in the same position under the same lighting (no color editing):
Magnetic Door Reliability
The magnetic access door is one of the most frequently used parts of the cover — day-to-day maintenance runs through it. During the beta we asked testers to use it as heavily as they could. Most praised its reliability, opening and reattaching it many times without issue:
-
@Cheeky_b52: "Opened and closed the cover 80+ times over 7 days, with no lost magnets or failures."
-
@Rüdiger Neuweg: "Consistently strong and reliable."
-
@fatboy1271: "I've removed and reinstalled the cover window repeatedly and never once hit a latch failure, weakened magnetic hold, or alignment problem."
-
@Alan5596: "No problems across the print tests and 20 rounds of testing."
That said, a few users did report the magnetic hold being less reliable, and we reproduced the issue in some of our own factory testing. For the production version, we've improved the magnet-to-metal-plate bonding process (better adhesive application / spot welding) for a firmer fit and better long-term stability.
Sealing strips and the installation experience
Testers generally found overall installation smooth, but the glass-door seal was the weakest link in the manual and several people misread and misplaced it on their first attempt.
Our fix: we've rewritten the sealing section of the manual, with clearer, more detailed illustrations targeting exactly the parts that tripped people up.
Top Cover user manual: Top Cover User Guides | Snapmaker Wiki
PTFE tubes may occasionally contact cover parts, causing light scuffing
Notes:
- Two corrections to the original post. First, we'd marked this issue as "Done" and offered a "we'll release printable accessory models" solution. That label was wrong: the solution hadn't been properly validated, and marking an unverified idea as "complete" was a mistake in how we wrote the post.
- Second, and more importantly — please do not use any model that bundles the PTFE tubes tightly together, including the approach we previously mentioned. Physically constraining the tubes adds drag to toolhead motion, which affects positioning accuracy and, in turn, print quality. If you already installed something like this based on the first post, we recommend removing it.
With the current structural design, the four PTFE tubes (mainly tubes 1 and 4) make contact with the filter box, exhaust assembly, and cable clips as the toolhead moves. This can't be fully eliminated, and we're not going to pretend otherwise.
Our internal assessment of the real-world impact:
-
Durability: not affected. PTFE is highly wear-resistant and won't wear down to the point of needing replacement in normal use. We confirmed it in internal aging tests.
-
Cosmetics: marks will appear. Scuffing shows up mainly on the cover surfaces and the tube cable clips (where rigid parts meet).
-
Noise: slight but audible. Mainly from the tubes tapping against the clips.
The first production run has no hardware change for this. We see room to improve the experience and are validating mitigations (e.g. a soft cushioning pad at the contact points, better guidance on clip placement), but testing isn't finished. We won't promise a specific solution or timeline until we have a solid, verified result and we'll share through official channels when we do.
XY Driver Temperature
The thermal chain
Some testers noted the XY driver chips run warm under heavy load (around 100°C) and worried this might be linked to the MCU shutdown errors a few other users had reported. Here's some added context.
The XY driver chips are power components; running around 100°C under heavy load is a designed operating point - chip makers build them for exactly this kind of duty, with clear margin below the rated ceiling. The U1's XY motors use the TMC2240 driver, with a normal operating range of −40 to 125°C.
On top of that, the recently released firmware 1.5.0 and later improves data read/write handling for the "Timer too close" error, strengthening system stability and reducing rare-case anomalies. Some earlier cases occurred on older firmware and can't be conclusively tied to temperature. If you still hit this error on the latest firmware, please contact official technical support with your logs and we'll look at each case individually.
Operating conditions
- Within the recommended environment (ambient 0–30°C, no self-added chamber heating): the chips operate within a safe range.
- Above 30°C ambient, or with self-added chamber-heating components: this is outside the range we've validated by design. In such cases, we'd suggest evaluating an auxiliary cooling fan.
Reserved Cutout
We've added a Ø10 mm round cutout to reserve a cable route for users with hardware-mod needs (e.g. LED strip upgrades, an external camera, or other mods). It's sealed with foam adhesive by default, so it won't affect everyday use.
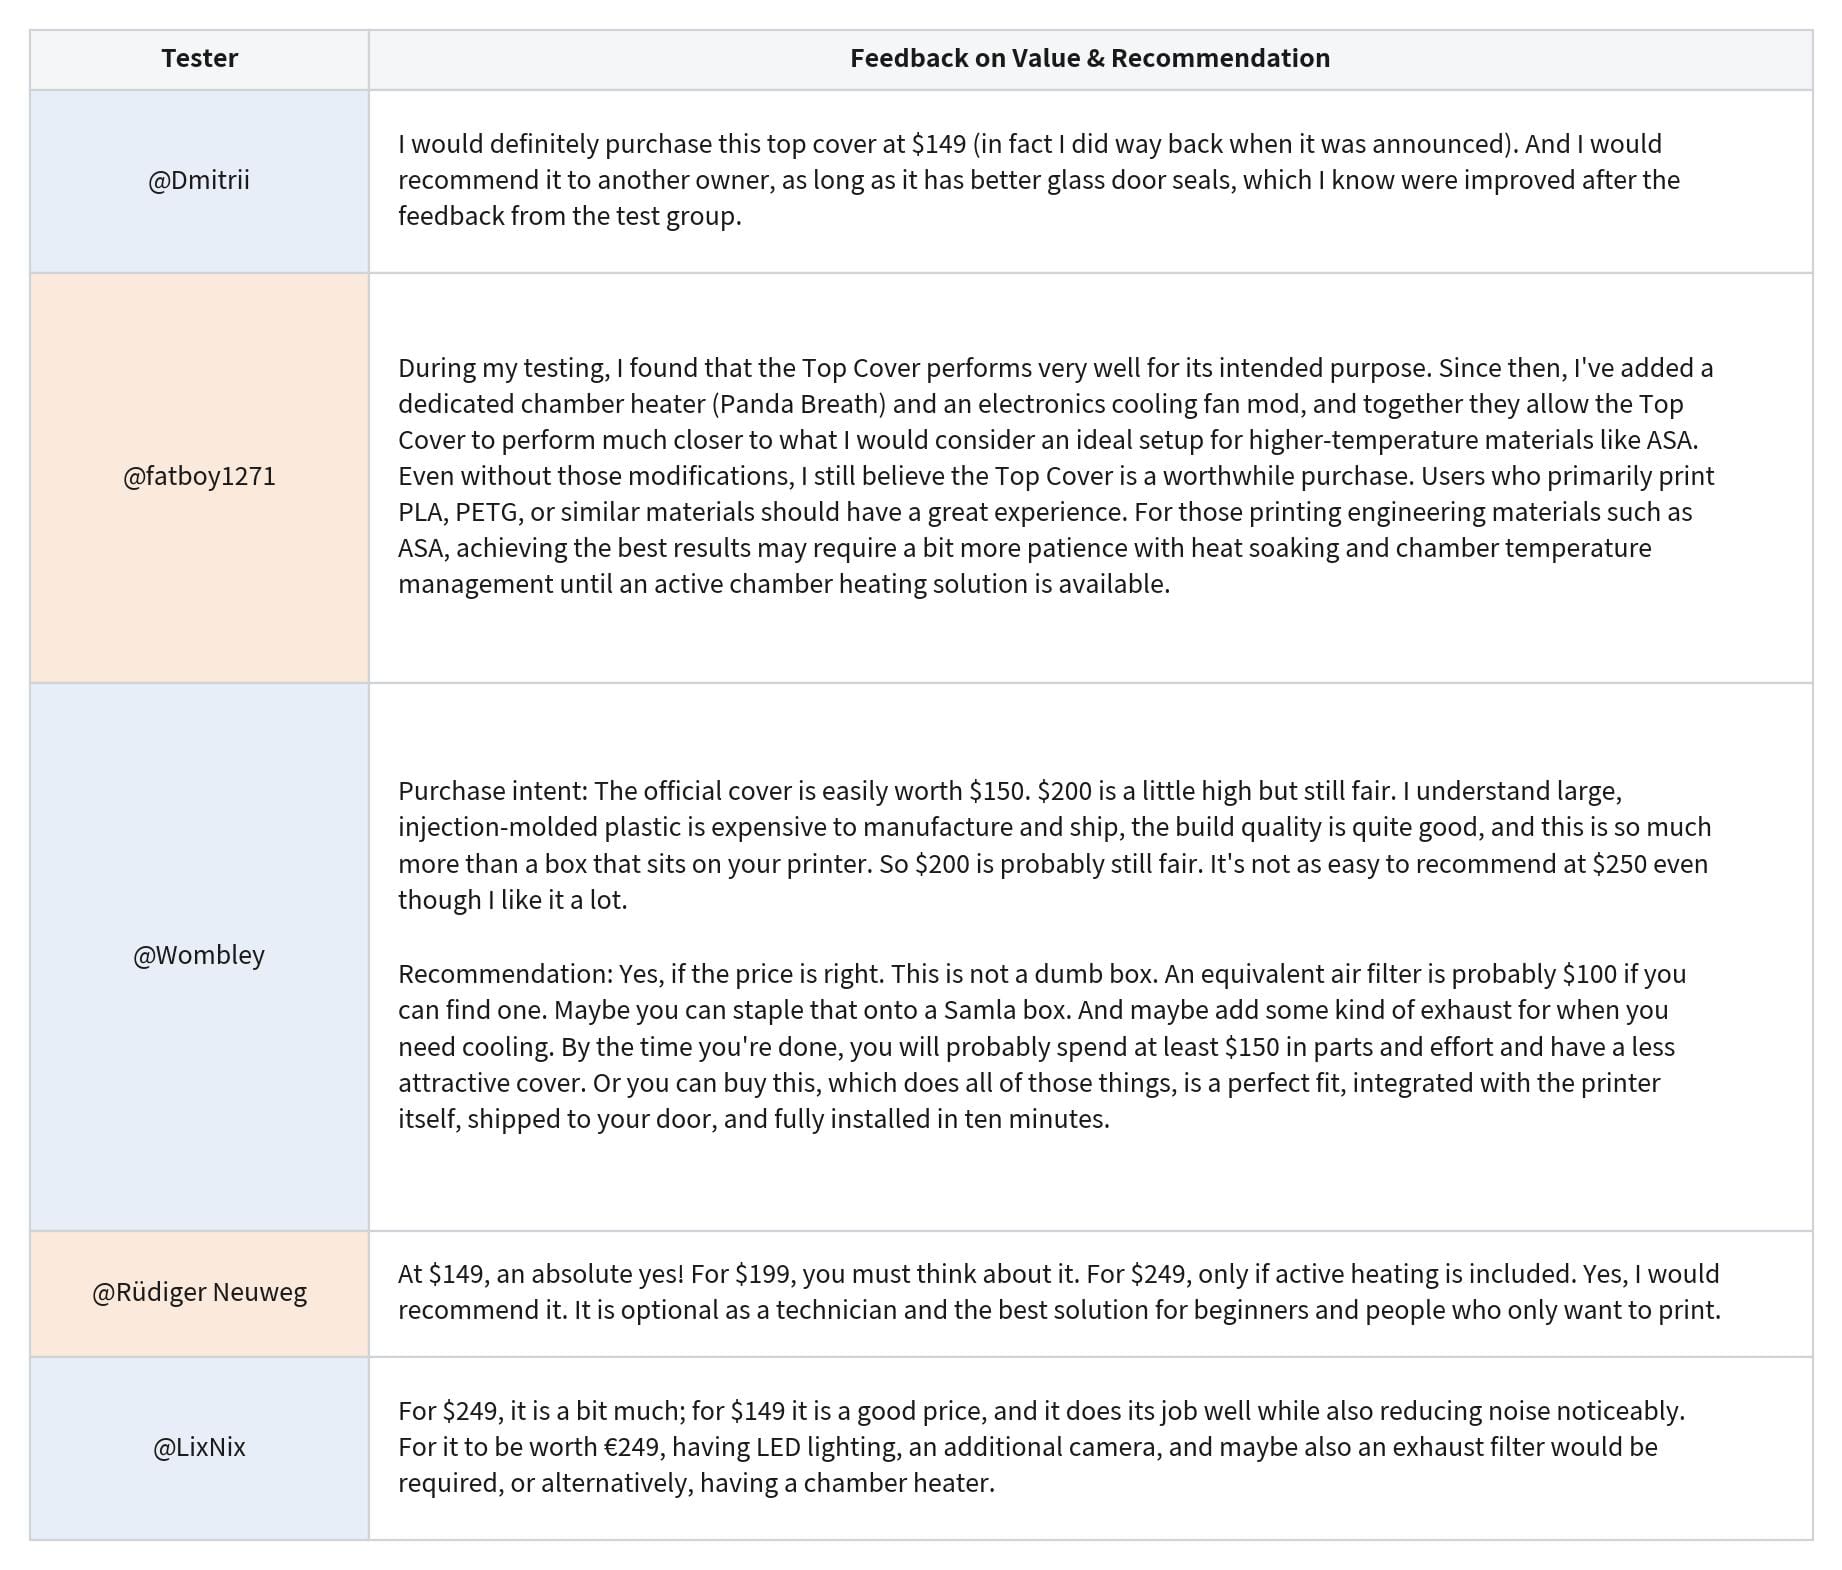
What Testers Who'd Used Other Covers Told Us
Three testers compared the official Top Cover with third-party or DIY solutions they'd used. These are their own subjective impressions, so please take them as reference. The short version: what testers valued most about the official cover was its integrated filtration, the automatic switch between internal and external cooling, and how well everything comes together as one package. They also shared a few wishes for improvement, mostly around easier maintenance and more expansion options like cable pass-throughs, accessory mounting, and USB power. We've responded to those at the relevant points above.
Overall Satisfaction
About the Production Batches
The Top Cover is currently being produced and shipped in batches. Orders will be fulfilled and shipped in sequence according to the applicable shipping schedule. Please refer to the wiki for the latest shipment schedule and estimated delivery timeline. Everything we've marked as the "production version" in this post is already baked into the cover you'll unbox. As for the features still marked "under evaluation," we're actively working on them, and we'll share with you through our official channels the moment any of them land in a future release.
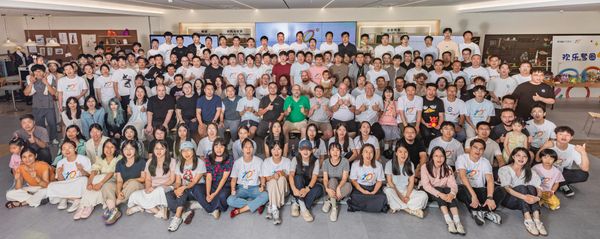
Built With You — Thank You
A huge thank you to all of our testers:
Alan5596, Argo, 竹子, 大胖肥猫, Cheeky_b52, Dmitrii Savin, Dylan, Eran Binyamin Zeitoun, fatboy1271, LixNix, Marlowe, Rüdiger Neuweg, SimonZhi, Wombley, unlucio, wildtang3nt, EricNelson, 沈浩然.
You caught the blind spots we'd missed and threw yourselves into testing every kind of scenario. Every data set and every note has gone into making the Top Cover production version better.
And thank you, for building something wonderful with us.