Lithophane 3D Print Ideas: Photo Lamps, Ornaments & Creative Projects

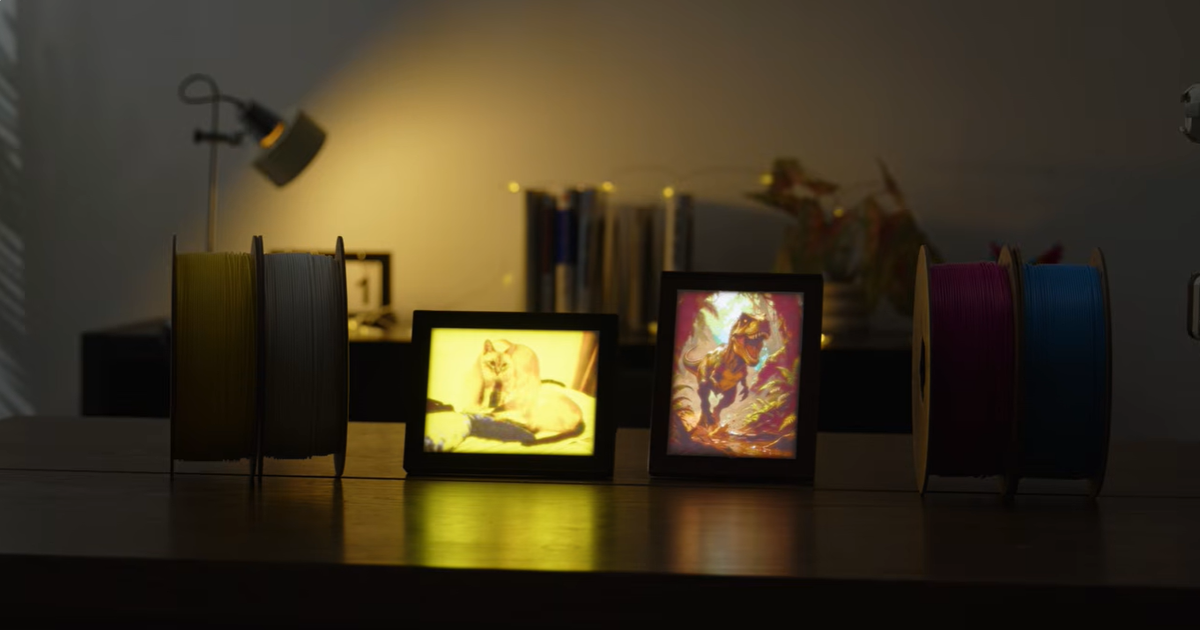
A favorite photo can become something you switch on every evening. With a lithophane 3D print, a family portrait, pet photo, or vacation snapshot becomes a textured panel that reveals its image when light passes through it.
That transformation opens up plenty of creative possibilities: a bedside photo lamp, a colorful framed landscape, a lantern filled with family memories, or a Christmas ornament that lights up on the tree. Traditional monochrome lithophanes emphasize light and shadow, while CMYK color lithophanes bring another dimension to photo-based projects.
Start with a picture you love, then choose a format that suits where it will live. Here are seven ideas to help you turn that picture into a finished piece.
What Is a Lithophane 3D Print?
A lithophane uses variations in thickness to create an image. Thinner areas let more light through and appear brighter; thicker areas transmit less light and appear darker. Together, they reveal the picture when illuminated from behind.
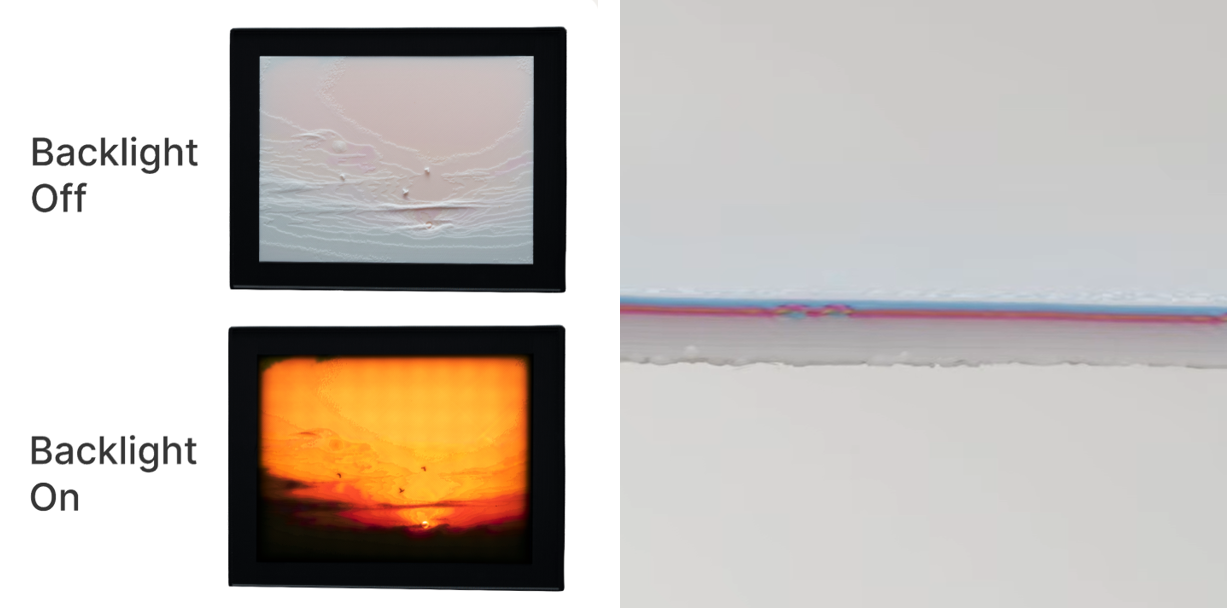
Without backlighting, the print can look like a pale relief with raised and recessed details. Switch on the light, and those details become recognizable faces, scenery, and shadows.
A traditional 3D printed lithophane usually uses white filament to produce a monochrome image. A CMYK lithophane uses layered colors to create a colorful backlit picture. For our color workflow, the SnapSpeed PLA CMYK Lithophane Filament Bundle is designed specifically for lithophanes and flat layered-color models.
Think about the photograph before choosing between them. An old family portrait may suit monochrome beautifully, while a sunset or colorful celebration offers a reason to explore CMYK.
Seven Lithophane Ideas Worth Making
1. A Backlit Family Photo Frame
Imagine a wedding portrait on a side table: with the light off, it looks like a softly textured relief. Switch on the backlight, and the couple's faces emerge, with bright highlights on a veil and deeper shadows in the folds of a suit. A familiar photograph becomes a display you can enjoy in a different way each evening.
A flat framed panel is a practical first project. Choose a candid family moment or a photo of grandparents with their grandchildren, keeping faces prominent after cropping. A plain border lets the illuminated picture take center stage.
Monochrome gives the portrait a timeless quality. For a CMYK version, choose a picture where color holds part of the memory: wedding flowers, festive clothing, or a beloved room. A colorful backlit frame can preserve those visual associations while giving the photograph the texture of a printed object.
2. A Pet Portrait Night Light
Picture a cat sitting in a window, its ears outlined against a bright background, or a dog looking straight at the camera with its head tilted. Turn that close-up into a lithophane, and the expression becomes the focal point of a small bedside light.
In monochrome, light and shadow can bring out the contrast between a pale muzzle and darker fur. A color version offers another way to capture distinctive markings, provided the panel and lighting are designed for that workflow.
Crop away distracting furniture and leave space around ears and whiskers. One large subject will usually read more clearly on a small panel than a full-room photograph. Keep a name on the base or frame, where it adds a personal touch without covering the portrait. The result can be a cheerful shelf accent by day and a glowing reminder of your companion after dark.
3. A Travel Memory Light Box
A row of seaside houses, a mountain reflected in a lake, or a sunset from a favorite trip can become the window-like centerpiece of a travel memory light box. When backlit, bright skies and dark outlines give the scene depth, inviting you to look at details that might otherwise stay buried in your camera roll.
Monochrome works well when the scene depends on silhouettes and contrast. CMYK is especially appealing when color is part of what you remember: orange skies, painted buildings, or autumn leaves. Choose one strong composition rather than filling a small panel with a collage.
Print the location or travel date on the border. Several matching frames can become a small gallery of places you have visited, with each light box holding a different scene. Select the backlight before designing the housing so the picture and illumination fit together.
4. A Photo Lantern With Multiple Panels
A photo lantern can tell a story as you move around it. One side might reveal a wedding portrait, the next a first home, and another a family holiday. The light at the center turns separate memories into one object, with each panel offering a different view.
Matching monochrome panels can give the lantern a cohesive, album-like appearance. Use similar crops and keep the main subjects at comparable sizes so no single side feels crowded. A housing with removable panels also lets the collection change as new memories are added.
Choose a lantern design with a suitable LED arrangement, then generate the lithophanes to match its panel dimensions. A decorative roof or simple geometric frame can complete the silhouette without distracting from the pictures. For broader lighting inspiration, explore our 3D printed lamp ideas.
5. Personalized Christmas Photo Ornaments
Imagine switching on the Christmas tree and seeing a child's face appear inside a small hanging ornament. Nearby, another reveals a pet portrait, while a third holds a wedding photograph. A lithophane Christmas ornament makes the tree a collection of family moments as well as a festive display.
A flat photo panel inside a circular or decorative hanging frame is one approach. In daylight, its textured surface hints at the image; with a suitable LED behind it, the portrait becomes much easier to see. Add the year to the frame to mark a baby's first Christmas, a first holiday in a new home, or the year a pet joined the family.
For a different effect, try a spherical lithophane Christmas bauble. The picture wraps around a curved surface, revealing different details as you turn it. A wider image or carefully arranged set of photographs can suit this format, but use a generator designed for spherical ornaments and preview the crop before printing. Keep important faces away from distorted edges or attachment points.
White lithophane panels pair naturally with colored frames or bauble fittings: red, green, gold-toned, or another shade that matches your tree. This creates festive contrast while leaving the photograph readable. If you want a CMYK Christmas project, a flat backlit holiday portrait is another option for a mantel or gift display; curved color ornaments need their own compatible workflow.
Plan the light and hanging attachment together. Choose a model intended for the LED you will use, check its fit, and keep the finished ornament light enough for the branch. For a gift, include the matching light or clear instructions so the recipient can enjoy the illuminated effect.
You could print one ornament each year and gradually build a family collection, or make a small set for grandparents using photographs of their grandchildren. Find complementary decorations in our Christmas ornament ideas.
6. An Anniversary or Memorial Keepsake
An anniversary lithophane might begin with a photograph from a first date or wedding day. On a shelf, a small frame holds the textured image; illuminated in the evening, it reveals the smiles and familiar setting again. A short date on the base gives the piece context without competing with the photograph.
For an older family portrait, monochrome can echo the character of the original print. A simple frame and gentle backlighting create a quiet remembrance piece. CMYK offers another direction when distinctive colors are important to the memory, such as a favorite garden or a particular outfit.
Let the photograph set the tone. Choose a modest border, keep any dedication brief, and include an explanation of how to illuminate the panel if you are giving it as a gift.
7. An Illustrated Panel or Seasonal Art Display
Your own artwork can become an illuminated scene, too. Picture a winter village with pale rooftops against a dark sky, or a moon rising behind a mountain silhouette. The differences in printed thickness turn those light and dark areas into the composition when the panel is backlit.
Bold shapes can make an effective starting point. Preview how the artwork translates before printing, especially where delicate lines or small details carry the design. A monochrome panel emphasizes contrast; a compatible CMYK design can introduce color into the illuminated artwork.
A frame with replaceable panels can stay on display throughout the year. Slide in a snowy Christmas scene for December, flowers for spring, and a coastal illustration for summer. The housing stays familiar while the image changes with the season. Use artwork you created or have permission to reproduce.
Choose the Photo, Filament, and Lighting Together
The picture and its display should be planned as one project.
Start by cropping to the final shape. Check whether the subject is still clear at the intended size, and avoid relying on tiny background details to tell the story. Preview the generated model before printing.
For a traditional monochrome lithophane, white PLA is a common starting point. Use the model creator's recommendations for the image panel; choose decorative frame colors separately.
For CMYK projects, our bundle combines four filaments to create backlit color effects. Final colors can differ from the original photograph, so treat the result as illuminated artwork rather than a color-exact reproduction. The bundle is not intended for Full Spectrum color mixing.
Use lighting hardware suitable for the design, following its clearance and ventilation requirements. Keep printed parts away from excessive heat, and use LEDs rather than flame-based lighting.
Which Lithophane Generator Should You Use?
The best lithophane generator is the one that fits your chosen project and printing workflow. For a first photo panel, look for clear image previews, easy cropping, and control over dimensions and thickness. For a Christmas bauble or photo lantern, check that the tool supports the shape and panel size you need before uploading your picture.
ItsLitho offers image adjustments and model previews that help you see how a crop or contrast change affects the design. Lithophane Maker provides dedicated tools for formats such as flat panels, lamps, and four-photo light boxes. Choose according to the object you want to make rather than treating one tool as the universal winner.
For our CMYK filament bundle, start with Lithophane Maker and follow the linked Snapmaker guide through generation and slicing. If you use another generator, follow the parameter settings specified in that guide. A tool labeled “color lithophane” may use a different method, such as a printed color image behind a white panel; that output is not automatically interchangeable with a multi-filament CMYK model.
A generator alone cannot guarantee the sharpest result. Preview the downloaded file in your slicer, check that the subject is clear at the final size, and consider image quality, filament, printing settings, and backlighting together. For an unfamiliar setup, a small test panel can help you judge contrast before printing the full project.
Lithophane Workflow at a Glance
Most lithophane projects follow three stages: turn an image into a model, print the image panel, and pair it with a suitable display and light source.
- Generate the model. Upload your photo or artwork to a lithophane generator. Choose a flat, curved, or spherical format that fits the project, preview the image, and download the files.
- Slice and print. Import the model into your slicer and select settings appropriate to the filament and design. A monochrome panel uses one filament; a color lithophane needs a compatible multi-part model and color assignments.
- Assemble and illuminate. Fit the print into its frame, lamp, or ornament housing, add the specified lighting components, and check how the image looks when backlit.
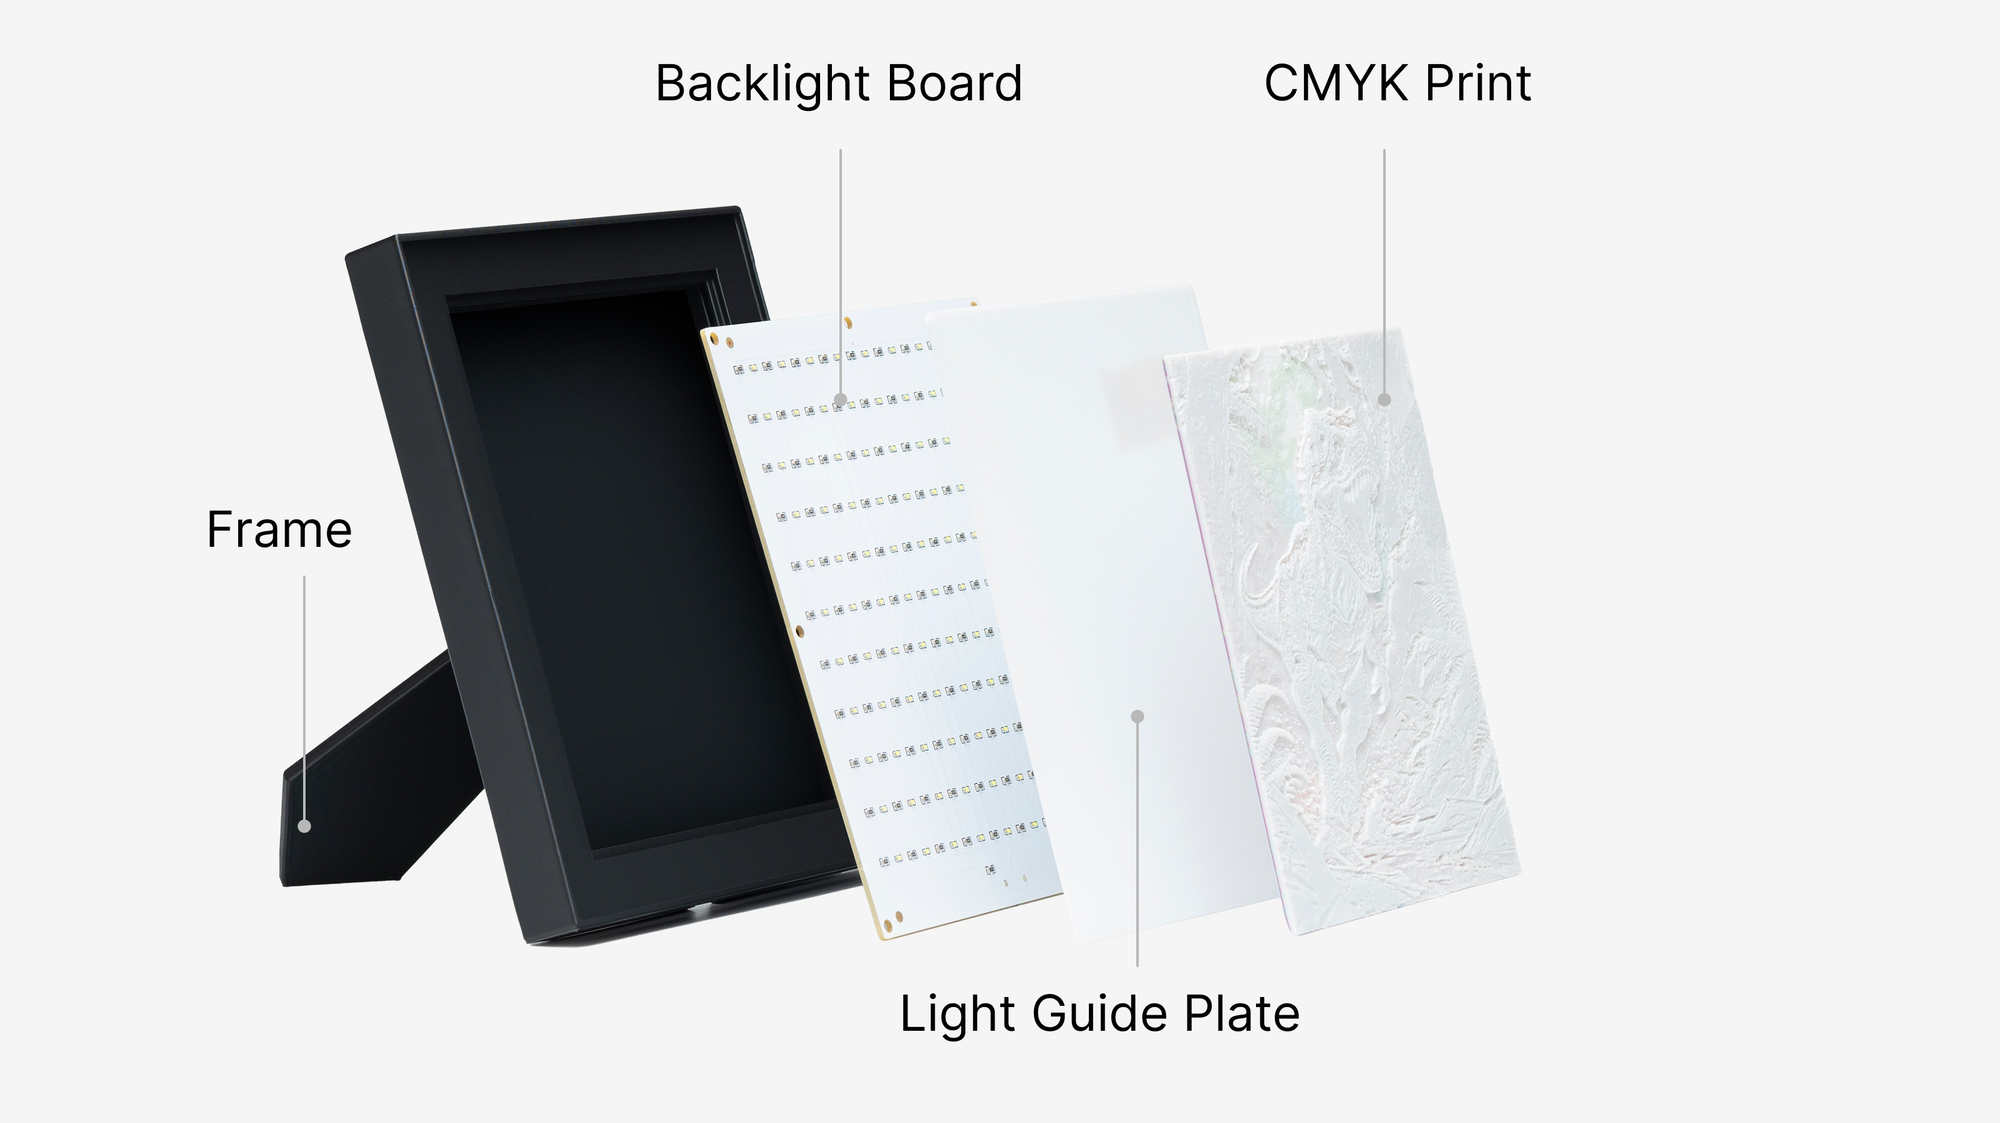
For the color option, our CMYK lithophane printing guide explains the specific workflow: import all five STL files into Snapmaker Orca as one multi-part object, match each part to its corresponding filament color, and print. Then assemble the frame, backlight, light guide plate, and lithophane print in order.
The CMYK filament bundle does not include the frame, light guide plate, backlight, or power supply. Frame and light guide plate print files are available through the guide; lighting hardware must be sourced separately. For this color workflow, a 0.2 mm hot end is recommended for finer detail; a 0.4 mm hot end can also be used.
Start with one framed photograph before adapting the idea to a custom lamp or ornament. For more gift inspiration, browse our 3D printed Christmas gifts.
FAQ About Lithophane 3D Prints
Can you make a lithophane from any photo?
Many photographs can be converted, but the finished print depends on the crop, detail, contrast, size, and lighting. Preview the model and favor a clearly recognizable subject.
Can lithophanes be printed in color?
Yes. CMYK color lithophanes use layered filaments to produce a colorful image under backlighting. They require a suitable color-generation workflow and printing setup.
Do lithophanes need a light source?
Backlighting reveals the image most clearly. Plan the light source along with the print, especially for lamps and ornaments.
What is a good first lithophane project?
A flat framed photo is a useful starting point. It lets you explore image selection, printing, and backlighting before working with curved panels or more elaborate housings.
What makes a good lithophane Christmas ornament?
Choose a photo with one clearly visible face, pet, or main subject, then match it to a flat hanging frame or a spherical bauble design. Plan the LED and attachment before printing, and add the year to the frame for a personal keepsake. A child's first Christmas portrait or a family pet photo makes a simple starting point; include a suitable light if the ornament is a gift.
How is a lithophane different from a HueForge print?
A traditional lithophane reveals an image through differences in thickness when light passes through it. A typical HueForge filament painting uses layered filament colors to create artwork viewed under ambient or front lighting, making it suitable for a wall display without a dedicated backlight. However, HueForge also supports backlit color lithophanes. The distinction is the chosen workflow and viewing effect, rather than a strict divide between the two. Choose a lithophane workflow for an illuminated photo project, or filament painting for an image intended primarily for front-lit display.
How does 3D printing compare with casting or CNC machining a lithophane?
All three methods can create variations in a translucent material's thickness so a picture appears when backlit. FDM 3D printing builds the panel layer by layer from filament, making it convenient to change the photo, size, or shape without making a mold. Traditional porcelain lithophanes use a carved master and mold to form the relief, followed by ceramic firing. CNC machining removes material from a suitable translucent sheet, such as white solid-surface material. Printing detail, mold quality, or cutter size can each affect the result; no method is automatically best for every image. For the personalized projects here, filament printing offers a direct route from a digital photograph to a custom piece.
How does a Snapmaker CMYK lithophane differ from a regular lithophane?
A regular monochrome lithophane usually uses white filament, with thickness controlling the light and dark areas of the image. Snapmaker's CMYK workflow uses four filaments and a compatible multi-part model to add layered color effects under backlighting. Both rely on transmitted light, but the color version also requires the correct generation parameters and filament assignments. Choose monochrome for a classic portrait or simple ornament; choose CMYK when colors are important to the photograph. Final colors can differ from the original image, and the CMYK bundle is not recommended for Full Spectrum color-mixing prints.