What is Ironing in 3D Printing? A Complete Guide for Smoother Finishes
You finish a print and take a close look at the top. The surface is rough with small lines and bumps. You want it to look flat and smooth, but you do not want to sand it down or use strong chemicals.
Ironing in 3D printing gives you that option. The nozzle makes one more pass over the last top layers. It melts the plastic just a little and presses it flat. Sometimes a small amount of filament also comes out to fill tiny gaps.
Snapmaker Luban has an ironing switch you can turn on before you print. Most Snapmaker printers use a 0.4 mm nozzle, which is a good size for these settings. In this guide, you will learn what ironing is in 3D printing, how it works, how it compares to sanding and other methods, what settings to use in Luban, and when to use it.
Understanding the Ironing in 3D Printing
Wondering what ironing is in 3D printing? Well, it is when the nozzle passes over the top layer again after it is done. The nozzle stays at the same height. It uses heat and light pressure to smooth the surface. A little filament flow may also fill small gaps.
Ironing in 3D printing is a nozzle pass over the final top layers that remelts plastic and smooths the surface.
The nozzle does not print new layers. It only remelts what is already there. The nozzle moves slowly and in tight lines across the surface. It may use low flow or even no flow for a glaze.
Ironing works best on flat and level top faces. It does not work well on walls, slopes, or domes. If your print has a lid, plate, or any flat area that shows, ironing can make it look much better.
3D Printing Ironing Key Parameters
Here are the key settings to try:
- Ironing flow: 10–15% of normal flow. Use 10% for PLA. Go up to 15% for PETG or ABS.
- Ironing speed: 10–20 mm/s. Slower speed makes a glossier surface but takes longer.
- Line spacing: 0.15–0.25 mm. Tighter spacing gives a smoother finish.
- Nozzle temperature: Keep the same as your normal top layer.
- For PLA, 200–210°C.
- For PETG, 230–240°C.
- For ABS, 240–250°C.
- Top layers before ironing: At least 6 top layers at 0.2 mm height. That is 1.2 mm of solid top thickness. This gives enough base for ironing to work.
Ironing vs. Other Smoothing Methods in 3D Printing
Ironing is different from sanding or chemical smoothing. It happens during the print, not after.
- Sanding: You remove plastic with sandpaper. It takes time and much grit. It can round off sharp corners and change shapes.
- Chemical smoothing: You use solvents like acetone or other strong liquids. It works only on some plastics. It can make fumes and needs safety steps. It can also blur details.
- Ironing: It is built into the print process. The slicer makes the toolpath for you. It keeps edges sharp. It adds 10–30% to print time but needs no extra tools.
In Snapmaker Luban, you can turn on ironing in the print profile. You do not need extra parts. Snapmaker’s rigid linear modules also help. They keep the motion steady so the ironing pass stays even across the whole bed.
How Ironing Works in 3D Printing
3D printing ironing has two stages. First, the printer makes normal top layers. Then, it makes an ironing pass at the same height.
- The top layers finish as usual. The surface has ridges from the infill pattern.
- The slicer triggers ironing. The nozzle moves over the top again at a slow speed.
- The nozzle heat softens the ridges. The flat nozzle tip presses them down. A little bit of flow may fill small valleys. The surface starts to level out.
- Cooling sets the new surface. PLA needs full fan speed. ABS requires a moderate fan to prevent warping.
Factors That Impact 3D Printing Ironing Results
Several things affect the result:
- Material: PLA is the easiest. PETG can make strings, so keep the flow low. ABS needs controlled cooling to prevent warping.
- Nozzle size: 0.4 mm is a good default. Larger nozzles may leave faint grooves unless you set tighter line spacing.
- Bed leveling and Z-offset: The bed must be level. The nozzle must be at the right height. If it is too low, it can scrape the part. If it is too high, it will not press the lines flat.
When all these factors are set right, you get a top surface that looks glossy and smooth.
Why Incorporate Ironing Into Your Workflow
3D printing ironing is about quality, with very little extra effort
Aesthetics & function
You get smooth flat tops on lids, nameplates, and display parts. It makes pieces easier to stack and can give better seal contact for flat joints. It also reduces the lines from the top infill without changing part size.
Time and practicality
You add 10–30% to print time. But it often saves more time than sanding or finishing later.
Snapmaker’s rigid motion system also helps keep ironing lines steady and clean across the whole surface.
Conclusion
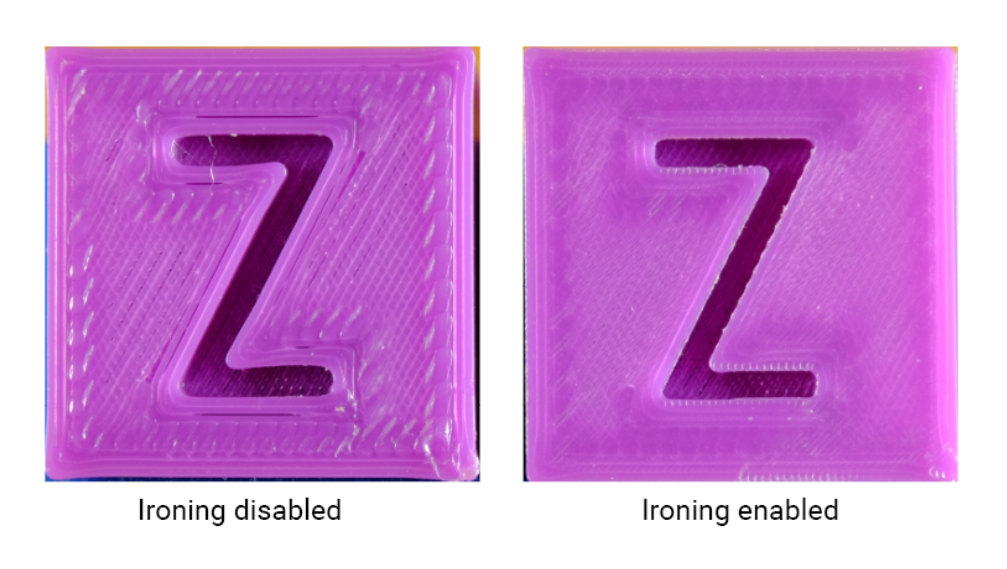
By now, you have a better idea of what ironing does for 3D printing. It’s a simple way to improve top surfaces. The nozzle makes a slow, heated pass over the final top layers. It re-melts and flattens the plastic so your part looks smoother and more uniform.
With Snapmaker Luban, you can turn on ironing with one toggle. Combined with the steady motion system and the standard 0.4 mm nozzle, it gives reliable results.
Try it on your next project. Print two pieces, one with ironing and one without, and compare the surfaces side by side. You will see the change right away.