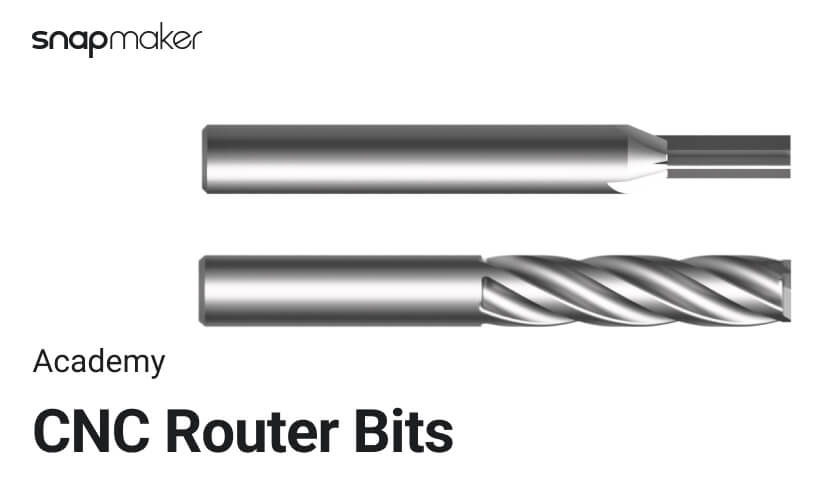
CNC Router Bits: Basics Terms and Common Types
Explore the fundamentals of CNC router bits, including key terms, types, and selection criteria. Learn about different bit geometries, cutting mechanics, and common applications to optimize your CNC machining projects.
Hey there, Maker!
Welcome to the CNC series of Snapmaker Academy. The previous five episodes focus on the CAD and CAM processes. Now, it's time to dive into practical machining.
We already understood that CNC machining works by removing material from a solid workpiece to achieve the desired geometry. The toolpath (or G-code) instructs the cutting tool (aka bit) on how to move, while the cutting tool engages with the workpiece to produce the outcome.
Just like you wouldn't use a dagger to chop ribs, various cutting tools are designed to cut out different geometries. Choosing the right cutting tool is critical to your project's efficiency and even success. Therefore, this article aims to introduce the basics of cuttings tools and walk you through some of the most commonly used router bits.
First, let's get to know the major features used to categorize a cutting tool.
Basic Terminologies
Flutes/Teeth
Teeth refer to the cutting edges, and flutes are the grooves formed between teeth. As the bit rotates, teeth are responsible for cutting materials off, while flutes help evacuate the chips (namely removed materials) from the workpiece. Though not to be taken as the same thing, these two terms are usually interchangeable since they are always identical in number.

Number of Flutes
The number of flutes on your router bit impacts the work speed and the surface finish of your product. Having more flutes offers two main advantages. First, it adds to the strength of the bit, which means the bit can be fed into the workpiece faster and work on harder material. Secondly, bits with more flutes tend to give a better surface finish.
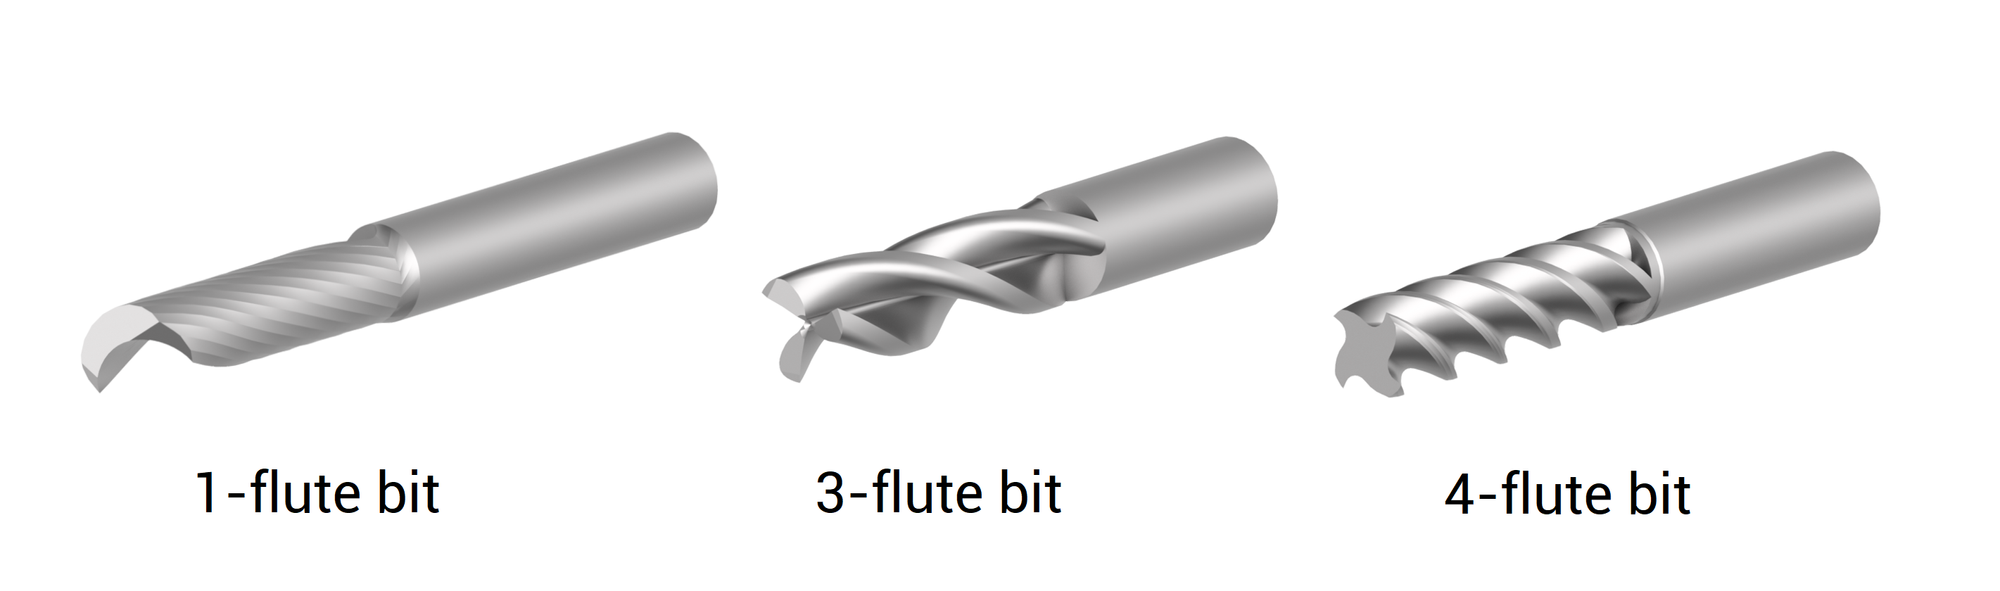
Bits of different numbers of flutes
However, this doesn't mean you should try to go for as many teeth as you can. To explain this, we need to introduce a new concept: chip clearance. Flutes serve as the passage for chips to evacuate, and chip clearance is the amount of space that a single flute takes up. When the number of flutes increases, chip clearance (i.e., the passage) gets smaller, hence the more difficult for the chips to be evacuated. Yet, if you can't get the chips out in time, the heat produced during cutting will build up, eventually destroy the bit and even lead to burning. This is especially the case for materials like aluminum which produces large and sticky chips. That's why you should try to find the balance when deciding the number of flutes.
Type of Flutes
There are two common types of flutes: straight and spiral.
- A straight flute is parallel to the shank of the bit, striking the surface of the material perpendicular to the rotation direction. Straight bits are stronger than spiral bits and can be used at higher speeds. On the other hand, they produce less smooth surface finish on the workpiece since such design brings more chatter. They are commonly used for slotting and cutting straight contours.
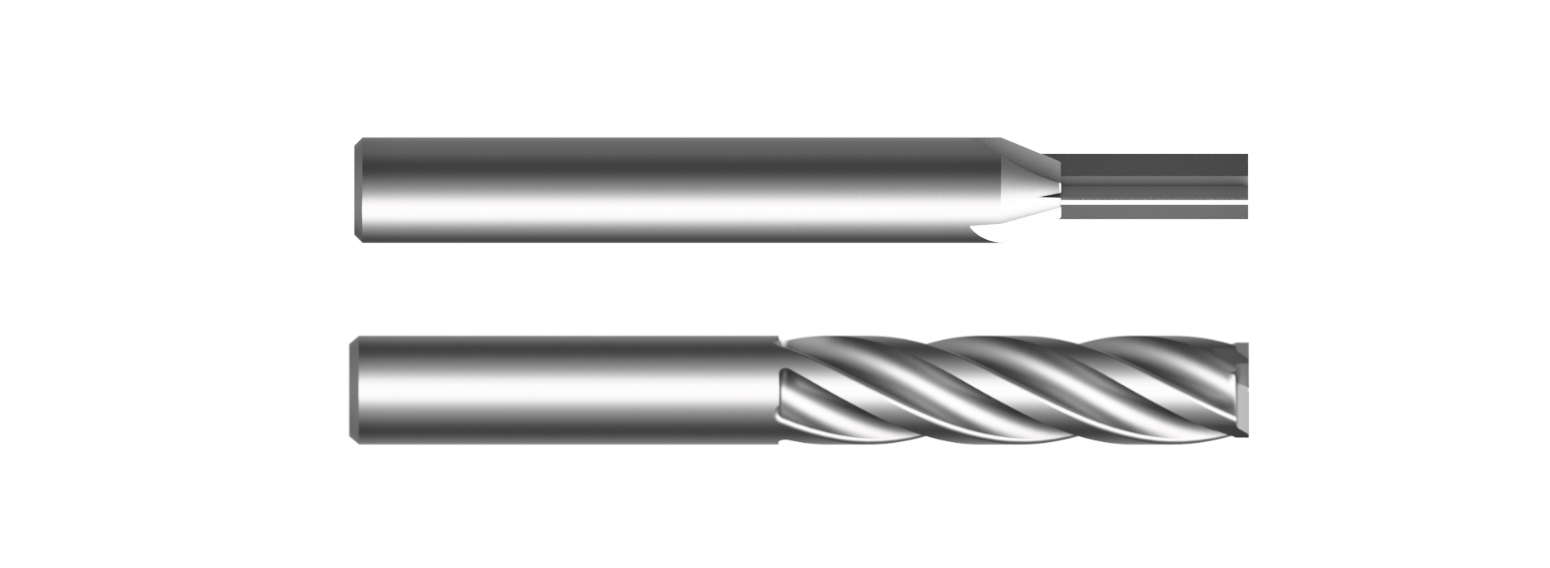
Straight flutes vs. Spiral flutes
- A spiral flute goes along the shank of the bit spirally, staying in constant contact with the material surface. Such design allows less chatter and leaves the finished surface smoother, making these kinds of bits ideal for trimming surfaces. However, spiral bits are weaker when held against straight ones and cannot cut too deep into the material or work at very high speeds.
Geometries
Shape of Tip
Router bits come in a variety of tips, each creating different shapes of cuts as they engage with the material. Some of the most common types you will find are flat, ball-nose, and chamfer.
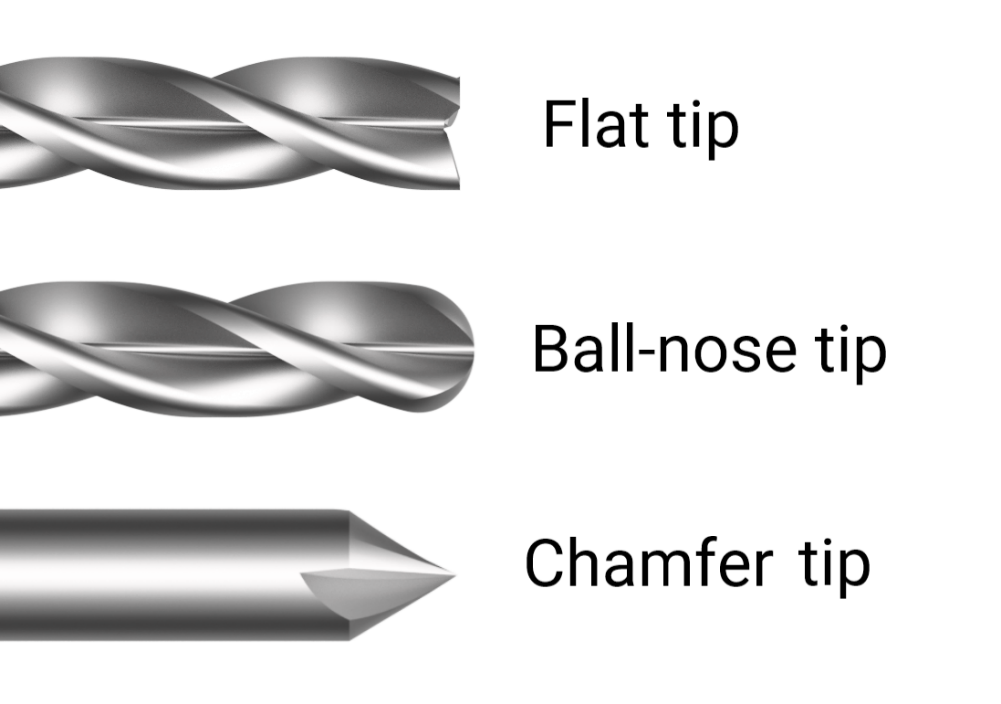
- A flat (or square) tip got a nearly 90-degree angle between its circumference and the end surface.
- A ball-nose tip has a sphere-shaped end, as its name suggests.
- A chamfer tip is a sharp conical tip. Chamfer bits are also called V-bits for their tips looking like the letter "V".
Upcut vs. Downcut
Spiral flutes can be further divided into two categories: upcut and downcut. The differences between the two types of spirals are crucial because they determine the direction in which chips are evacuated.
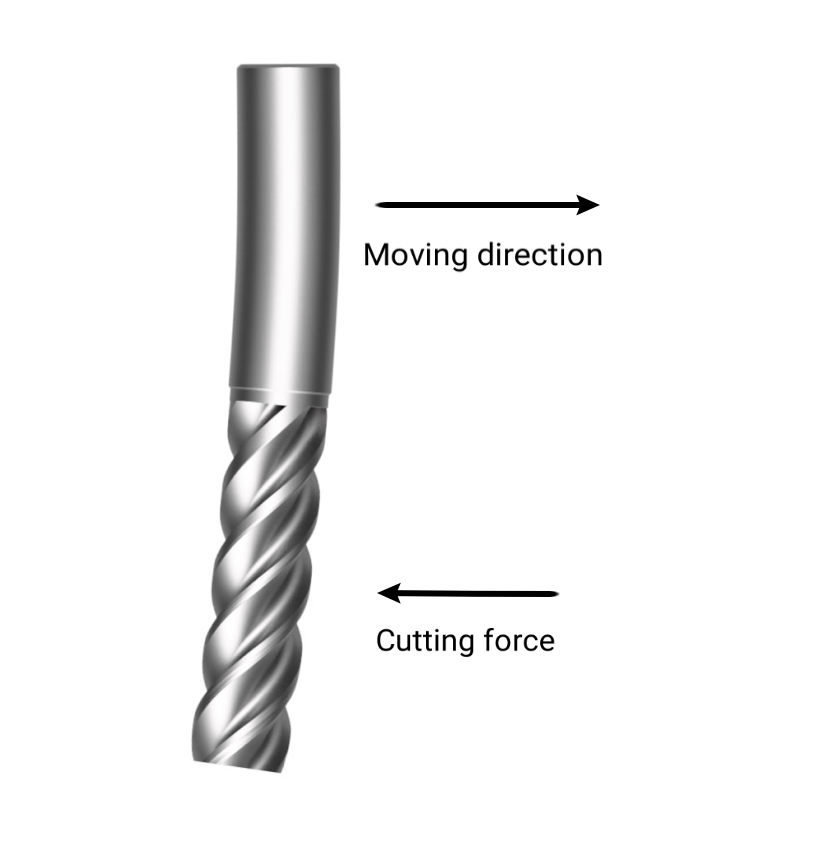
The spiral flutes of an upcut bit wrap around the body of the bit clockwise, pulling chips away from the workpiece being cut. An upcut bit tends to leave a rough surface finish on the top of the workpiece and a smooth surface on the bottom.
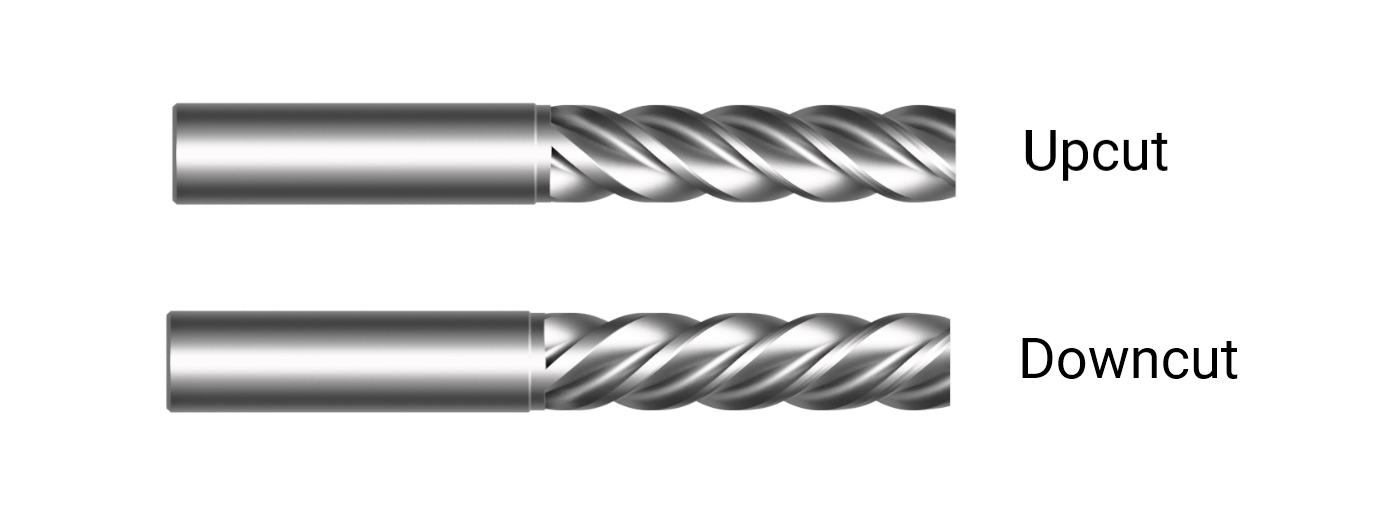
A spiral downcut bit, however, pushes chips down as it's cutting, with the flutes wrapping around the bit counterclockwise. Conversely, a downcut bit leaves a cleaner cut on top but a fuzzy surface at the bottom.
It's worth noting that you should always use an upcut bit for plunging operations unless you know what you're doing, especially for thicker materials. The reason is when a downcut bit plunges straight down, the chips have nowhere to go but to grind against each other as the bit spins, which is going to create friction and even start a fire.
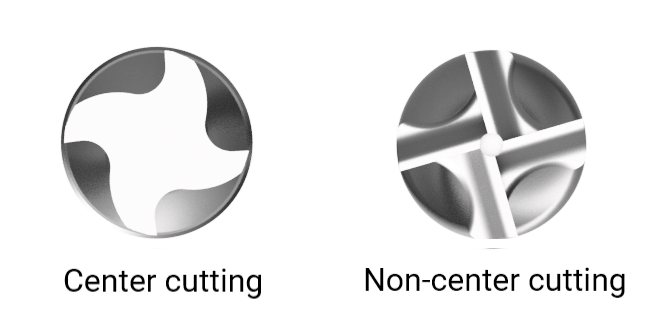
Center Cutting vs. Non-center Cutting
Router bits are either center cutting or non-center cutting. The cutting edges of a center cutting bit go all the way into the center, whereas those of a non-center cutting bit leave a hole in the center. Center cutting bits can plunge straight down into the material, while non-center cutting bits cannot.
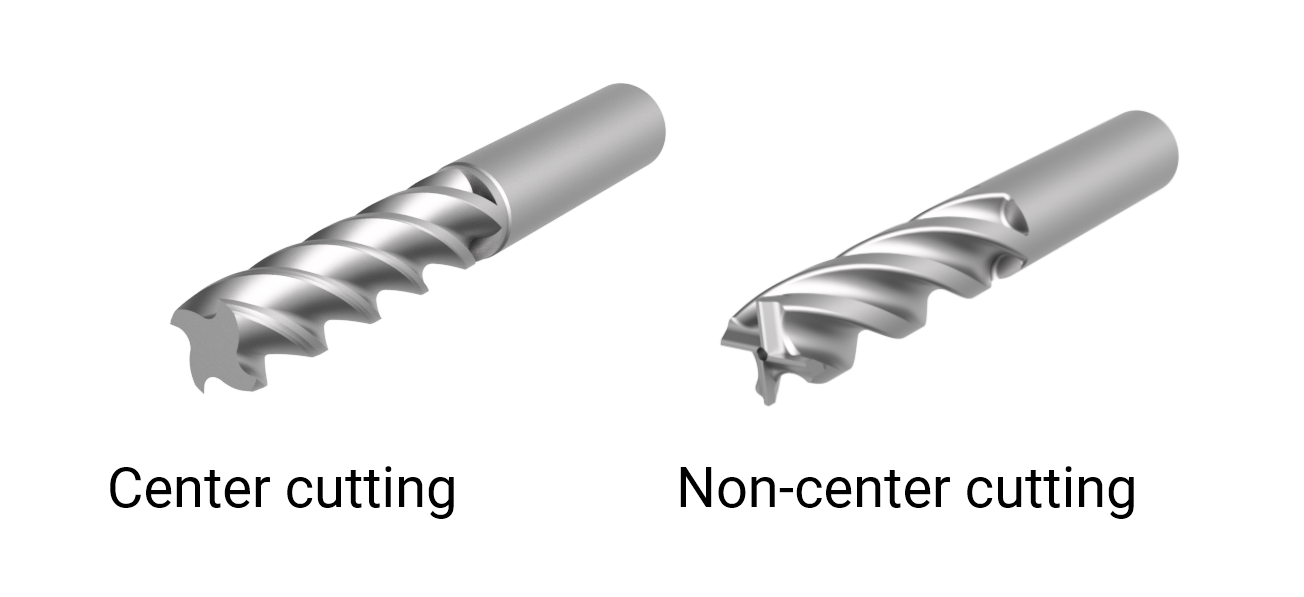
If a non-center bit were to plunge into the material, the material engaging with the hole in the cutting edges remains uncut, which can break the bit and lead to burning. To use these bits, you need to drill a pilot hole or use ramp plunge moves. Perhaps the only good reason to buy non-center bits is they are cheaper.
Size
Basically, size determines what you can do with any given router bit. Large ones are good at cutting a lot of material, but it comes at the cost of details. Smaller bits provide higher resolution in detail, with a trade-off in strength and machining efficiency.
Overall Length
The overall length is the distance between one end of a bit to the other. Longer bits are able to reach down deeper into the material. Now, you might believe that having longer bits sounds like a safe bet since they offer more choices. Unfortunately, that's not the case.
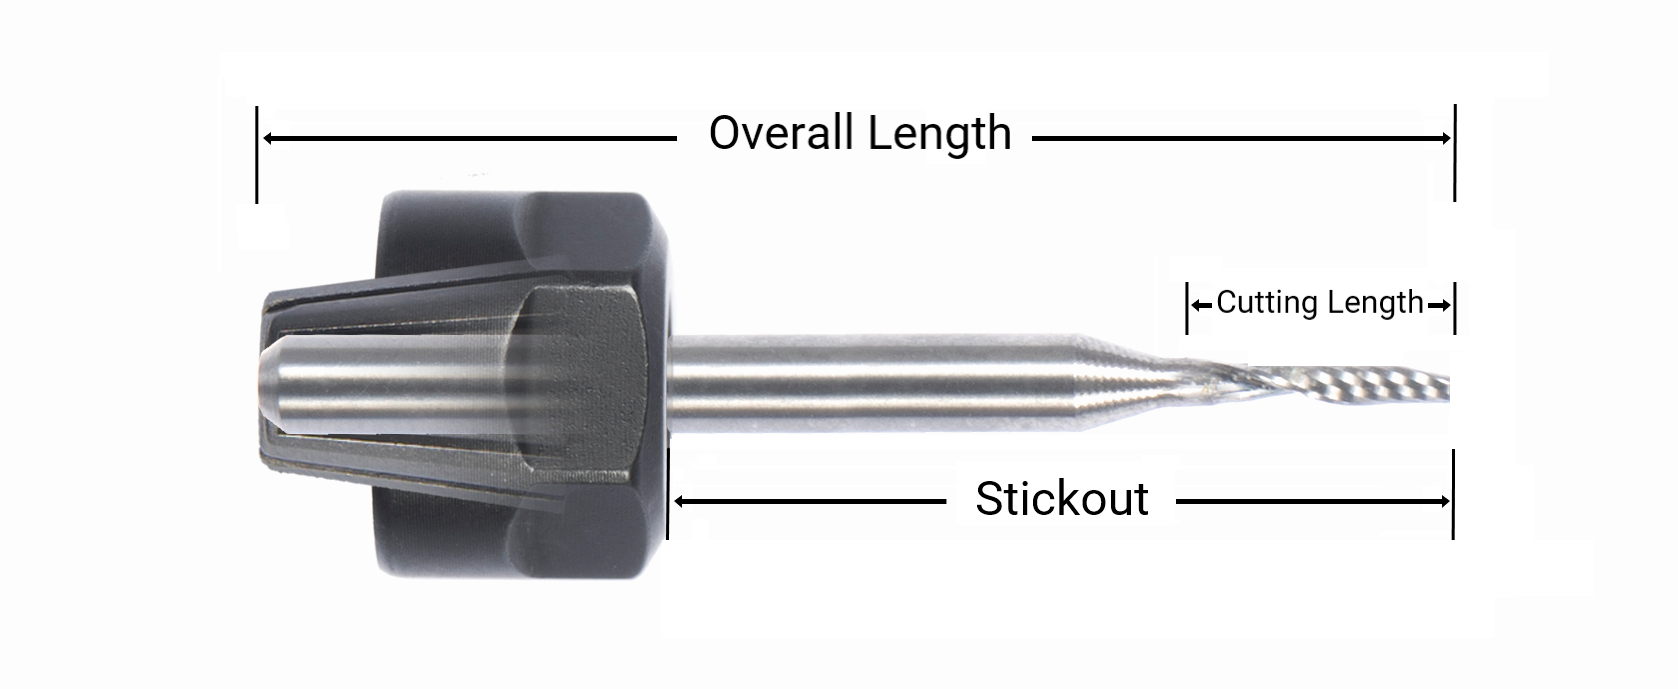
This brings us to a concept called "stickout". Stickout refers to the distance from the end of the collet (i.e., tool holder) to the bit's tip. It's this part of the bit that works without support. The more stickout, the less rigid a tool is. If it sticks out too far, the bit is prone to be bent by the cutting force.
Cutting Length
As we can see, cutting edges (or flutes) cover only a portion of the bit. The cutting length (also called "flute length") of a bit determines how deep it can cut into the material. Note that the cutting depth should never exceed the flute length of your bit. Otherwise, chips won't be pulled out properly, and your bit could be damaged by the heat accumulated.
Shank Diameter
The shank diameter is the width of the non-cutting end of the tool. This is the diameter that will go into your collet. Common shank sizes are 3.175 mm (1/8 inch) and 6.35 mm (1/4 inch).
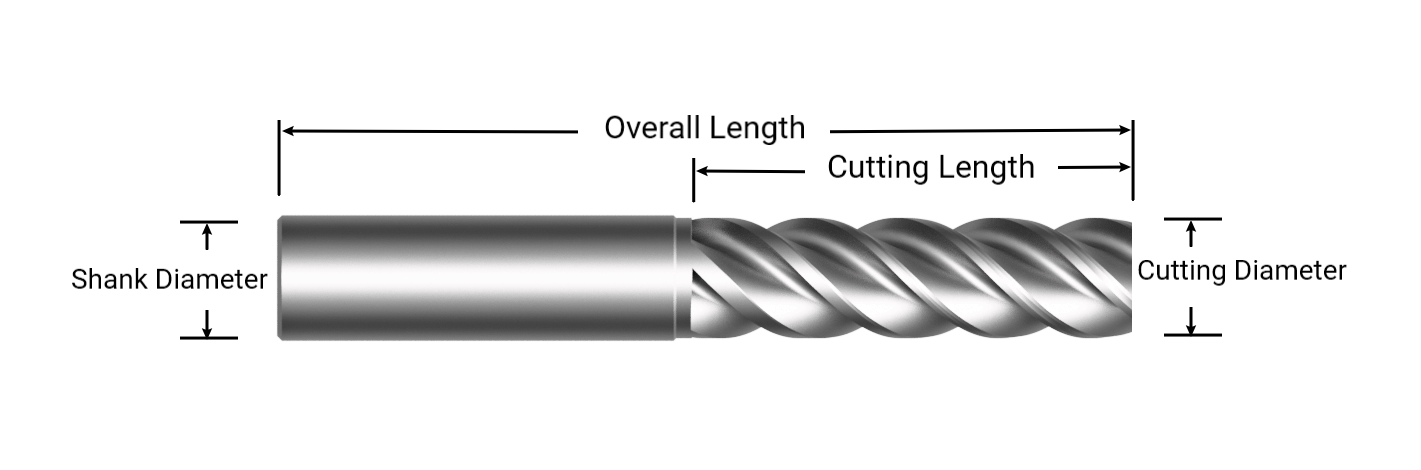
Cutting Diameter
This is the diameter of the cutting end of your router bit. It is often the first thing to look for when choosing a tool for your job, as it determines the resolution of cutting.
When cutting, the cutting edge will leave a circular profile in every internal corner, with a radius equal to half its diameter. Also, it is impossible to cut out features that are smaller than the cutting diameter because bits are cylinders (except for V-bits). Say, you can never have a slot that is 2 mm wide using a typical bit with a cutting diameter of 3.175 mm.
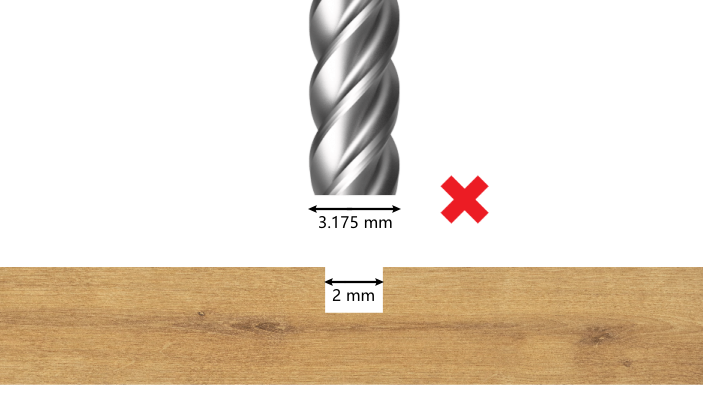
On the other hand, a bigger cutting diameter makes your bit more rigid, allowing deeper cuts. Besides, bits with a larger cutter diameter can remove more material per unit of time, which means you can do the same job faster.
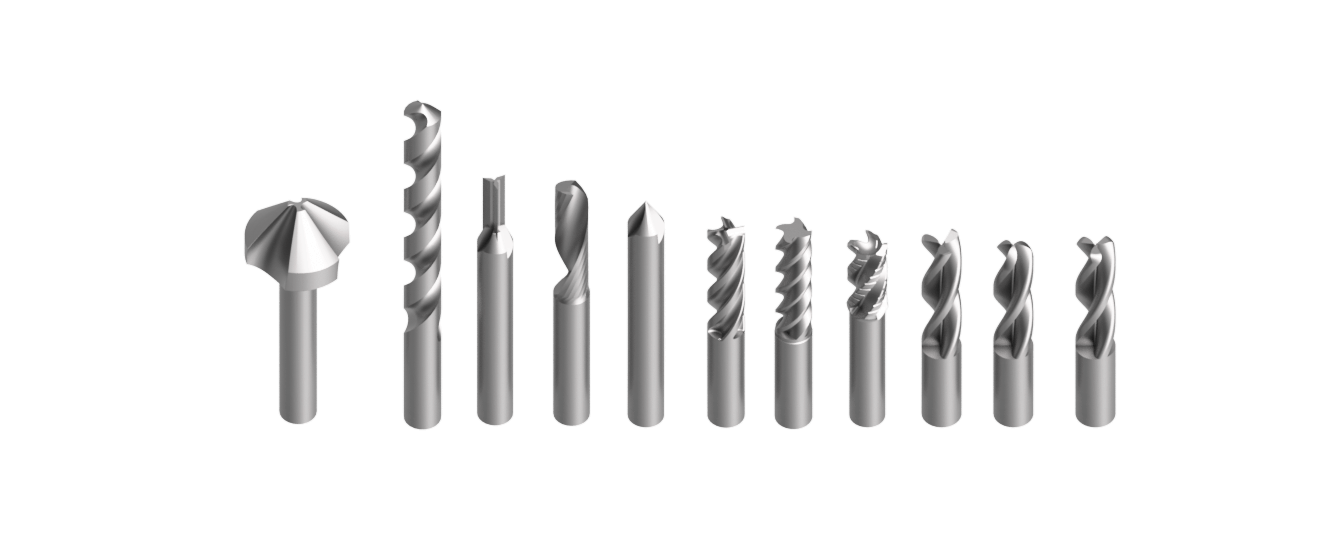
Common Router Bits
There are literally tens of thousands of tool types and variations available for CNC machines. Covering every type and use is beyond the scope of this article. We will introduce the most commonly used router bits.
Before diving in, we need to clarify the differences between milling bits and drill bits. Milling bits, including end mills, face mills, and v-bits, are designed to cut with their cutting edges as they move laterally through the material. By contrast, drill bits are intended to be used for drilling holes, plunging straight down into the material.
End Mill
End mills are designed to cut with their cutting edges on the circumference of the bit, but they do have cutting edges on the end surface too. Though center-cutting end mills are capable of plunging straight down, such operations could be demanding for them and should be avoided if possible.
Flat End Mill
With a nearly 90-degree angle between its circumference and end surface, a flat end mill is going to create neat square corners at the bottom and a flat surface anywhere it passes over the top of. They are great for removing large amounts of material, widely used for everything from roughing to cutting pockets and 2D contours.

Flat end mill
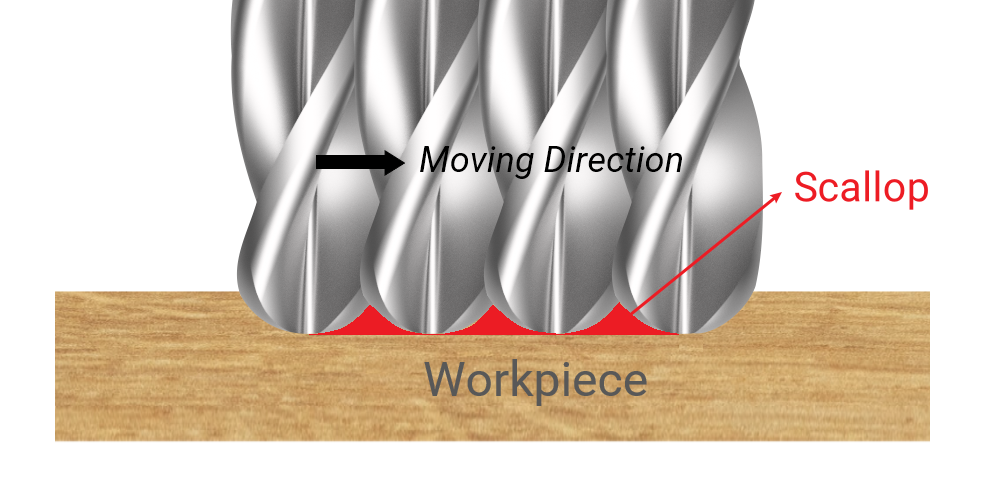
Ball-nose End Mill
The circumference and the end surface of a ball-nose end mill form a rounded corner. The radius of that round corner equals the cutting radius (i.e., half of the cutting diameter). These mills excel at creating curvature or detail-rich 3D shapes like relief.

Ball-nose end mill
Since their tips are round, cutting out a perfectly flat surface is challenging for these bits because they will leave scallops on the workpiece.
Bull-nose End Mill
You can see bull-nose end mills as a transition between flat and ball-nose ones. The radius of its round corner is smaller than the cutting radius. Since they combine a flat bottom with round corners, they can create flat-bottomed pockets with rounded corners at once without changing tools.

Bull-nose end mill
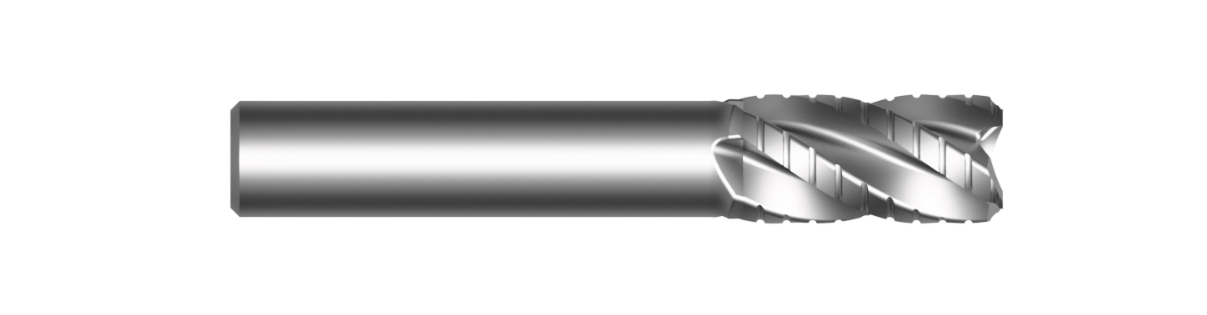
Roughing End Mill
Roughing end mills have many serrations on the cutting edges to quickly break up chips, which is great for efficiently removing a large amount of material. The thing with roughing end mills is that they will leave a poor surface finish with corncob-looking tracks on your workpiece, and that's why they are often referred to as corncob end mills. Hence, roughing end mills are for roughing only.
Roughing end mill
Face Mill
Face mills are designed to cut with their cutting edges on the end surface of the bit. They often come with multiple cutting edges that are replaceable, which allows removing more materials at higher speeds. These kinds of mills need powerful spindles to push them. These mills are mostly used for creating a large and smooth flat face on the surface of a plate or bar workpiece.

Face mill
V-bit
V-bit, also known as chamfer mills, are used for chamfering, deburring edges, and letter engraving. They are not so good at cutting profiles or carving out pockets since they'll leave a sloped surface on the workpiece.
V-bits are available in many sizes and angles, although 90, 60, and 30 degrees are most common. A smaller angle often comes with a smaller cutting diameter, supporting shallower cuts while retaining more details. A bigger angle allows wider cutting diameter and deeper cuts.
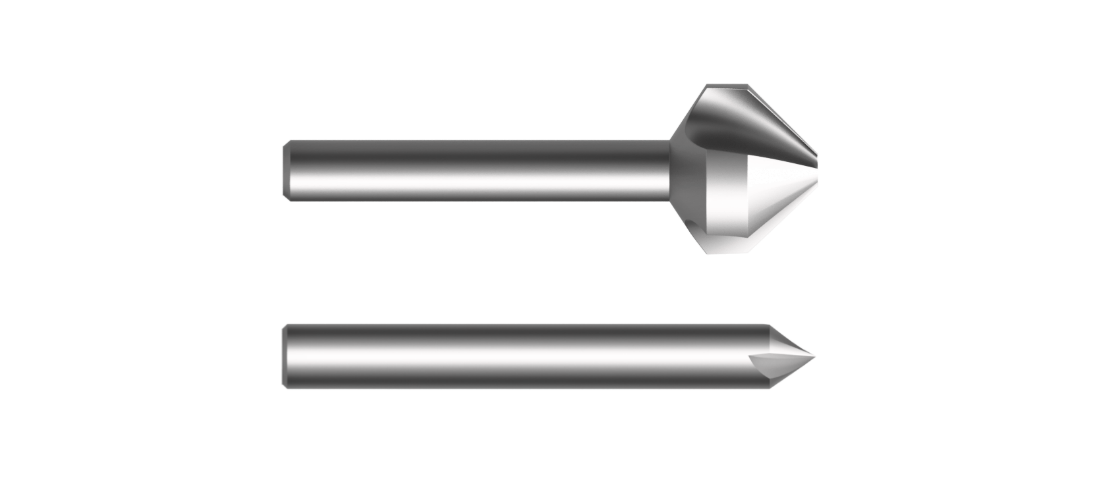
V-bits in different sizes
Drill Bit
Drill bits are designed to bore straight down into the material with their pointed tip. Unlike milling bits, their flutes only function as the passage for chips to be pulled out. They are often used for pre-drilling holes for screws.
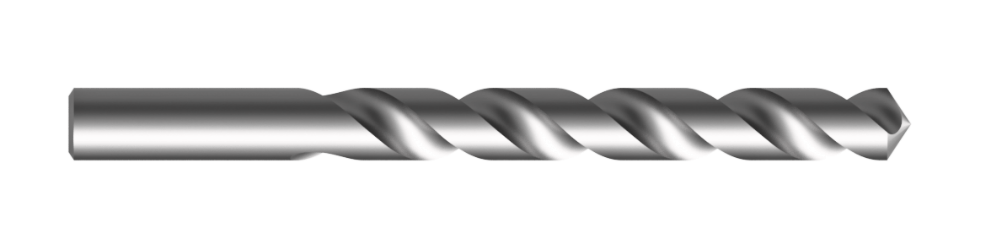
Drill bit
Summary & Next Up
This article introduces some of the most commonly used router bits on top of explaining the basic terminologies used to describe cutting tools. And that is the foundation for us to look into setting parameters for cutting jobs in the future. We hope it could be helpful for you!
In the next episode, we are going to introduce some of the most common features of a model that you might encounter and then exemplify how to choose the right router bits for a CNC project. Please stay tuned!