What Your Benchy Tells You: A Guide to Diagnosing 3D Printer Issues
3D Benchy is the most widely printed 3D object that is a hallmark for testing your 3D printer’s capabilities. It’s a powerful diagnostic tool, not just an ordinary 3D print. Do you struggle with imperfect 3D Benchy prints? Well, the outcome of your 3D Benchy helps you determine the 3D printer’s performance.
In this guide, you’ll learn how to read a 3D Benchy by exploring more of its design, common flaws and the ideal benchy troubleshooting pathways.
Why Benchy? Understanding the Benchmark
What Is a Benchy: Genius Design
A 3D Benchy is not just a randomly shaped object. In fact, it’s meticulously designed to test the limitations and capabilities of a 3D printer. This allows you to identify common flaws and diagnose issues. Here are a few key parts that are tested via Benchy.
- Overhangs (Bow, Arches): The steep curve of the bow and the small arches beneath the deck test the printer's cooling effectiveness and its ability to print angled sections without support material.
- Bridges (Cabin Roof): The flat roof of the cabin requires the printer to print straight lines over empty space – a specific challenge known as bridging.
- Hull Surfaces: The smooth, curving sides of the hull are excellent at revealing issues with extrusion consistency, layer line uniformity, and motion system stability (like ringing or ghosting artifacts).
- Fine Details (Chimney, Wheel, Text): The small chimney, the steering wheel inside the cabin, and the text on the stern test the printer's resolution, its ability to handle retraction between movements (preventing stringing), and its overall precision for small elements.
- Cylindrical Shapes (Chimney): The chimney specifically tests the printer’s ability to create smooth, truly round objects and how well it handles the layer seam.
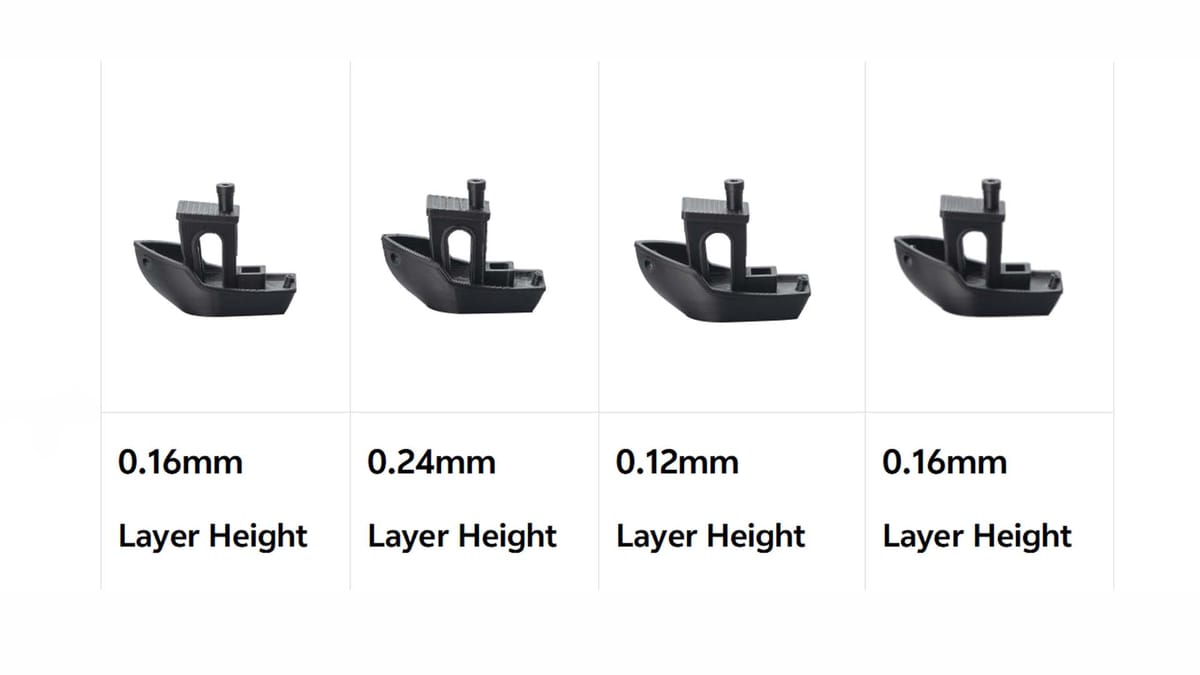
- Dimensional Accuracy: The design has specific target measurements (overall length 60mm, width 31mm, height 48mm). Checking these with calipers allows for a direct test of the printer's calibration.
- Flat Horizontal Surfaces (Deck): The deck and other top surfaces test first layer adhesion and the quality and solidity of the final top layers.
More Than Just a Test: The Benchy Phenomenon
The 3DBenchy's adoption is nearly universal; it's often one of the very first things someone with a new 3D printer will print. Its iconic status is undeniable – the Benchy isn't just printed for testing; it's remixed into countless creative forms, used in print quality challenges, and generally celebrated throughout the making community. Think Benchy races, artistic interpretations, and holiday-themed versions!
Highlighting its role, you'll see everything from impressively large-scale prints pushing 3D printer limits down to tiny resin versions – the Benchy is a truly recognizable symbol of 3D printing itself.
Further cementing its place as a fundamental community tool, the creators dedicated the original 3DBenchy digital 3D model files to the Public Domain on April 9, 2025. This ensures everyone is free to copy, modify, distribute, and use the design for any purpose, personal or commercial, without restriction, making it accessible to all.
Troubleshooting: Reading Your Benchy's Signals
Here’s how to examine the specific features to detect flaws.
Analyzing the Hull:
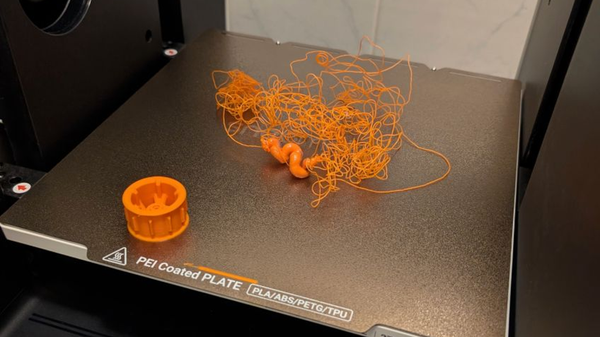
What to Look For: Are the vertical surfaces smooth and uniform, or can you detect subtle, repeating wavy patterns (often indicating Z-wobble)? Are there distinct "echoes" or ripples following sharp corners or details (ringing/ghosting, often related to speed or steel strip tension)? Examine the layer lines – are they evenly stacked and consistently thick, or do some layers look squashed, thicker, or even slightly separated (suggesting poor layer adhesion or extrusion inconsistencies)? Also, look for patchy, scale-like patterns ("fish scales") which might point towards vibrations or a loose component.
Examining Overhangs (Bow & Arches):
What to Look For: Pay close attention to the steep curve of the bow and the small arches. Do the layers droop downwards significantly, appearing melted or messy instead of forming a clean curve? Are the very bottom edges of these overhangs curling upwards sharply? Describe the look of poor layer bonding where layers barely connect on these steep angles. These signs typically point to insufficient part cooling, printing at too high a temperature, or printing these features too quickly.
Inspecting Bridges (Cabin Roof):
What to Look For: Flip the Benchy over or look inside the cabin at the underside of the roof. A good bridge will have mostly straight, parallel strands that are neatly fused together. A poor bridge will show strands sagging noticeably in the middle, perhaps looking disconnected, looped, or generally messy.
Checking Fine Details (Chimney, Wheel, Stern Text):
What to Look For: Look for stringing: thin, wispy strands of plastic stretching between separate parts, like from the chimney to the cabin roof. Check for blobs or zits: small, distinct bumps or pimples on the surface, often where the printer starts or stops extruding a perimeter. Can you clearly read the text on the stern? Is the tiny steering wheel inside the cabin a well-defined circle with spokes, or is it indistinct? Issues here test retraction settings and the printer's ability to execute fine movements accurately.
Evaluating Cylinders (Chimney Shape & Hole):
What to Look For: Is the chimney consistently round along its height, or does it look slightly oval, especially when viewed from the top? Examine the surface – is it smooth, or does it have irregularities? Is there a very prominent vertical line or seam where each layer starts and stops? An oval shape points towards motion system accuracy issues, while surface flaws can relate to cooling or extrusion.
Measuring Dimensional Accuracy:
What to Look For: Use digital calipers for this. Explain the key target dimensions: overall Length should be 60mm, beam (Width) 31mm, and Height 48mm. If your measurements are consistently off by a noticeable margin (e.g., always 59mm long instead of 60mm), it's a direct indicator that printer calibration is needed. Also, check if the top hole of the chimney is truly circular, not oval.
Assessing Flat Surfaces (Deck, Top Layers):
What to Look For: First, check the very bottom layer – did the print adhere well to the build plate, or did corners lift or warp during printing? Then, examine the top surfaces like the deck and cabin roof. Are they smooth, solid, and uniform? Or can you see gaps between the lines of the top layer? Describe "pillowing" – where the top surface seems slightly bulged or puffy instead of flat, or visible scarring lines where the nozzle may have dragged across the already printed top surface.
Your Benchy Diagnosis: Where to Find the Fix
This guide helps identify problems and common flaws. Fixing these issues requires specific actions, which you can find on Snapmaker wiki and blog.
- Seeing significant stringing, messy overhangs, or blobs? Your next step is researching guides on print temperature tuning (using temperature towers), retraction calibration (distance, speed, wipe settings), and optimizing part cooling.
- If your Benchy's dimensional accuracy is off, or the chimney is oval, search for guides specific to your 3D printer on calibrating X, Y, and Z steps/mm.
- Issues like visible layer lines, ghosting/ringing, or inconsistent hull surfaces? Look for our 3D Printing Ghosting Troubleshooting covering mechanical checks (steel strip tension, frame rigidity, Z-axis alignment) and extrusion calibration (E-steps, flow rate/multiplier).
- Poor bridges or gappy/rough top surfaces? Focus on guides explaining slicer bridge settings (speed, flow, fan), the number of top layers, infill percentage, and top layer patterns/flow.
Conclusion
3D Benchy is a standardized guide to testing your 3D printer’s capabilities and features. It’s highly accessible and allows you to diagnose print issues. Understanding its design turns it into a powerful diagnostic tool. Print your own 3D Benchy, observe its design by using this guide as a reference and seek solutions to fix the issue.