What Can the Snapmaker 1064nm Infrared Laser Module Actually Do? - User Testing Findings
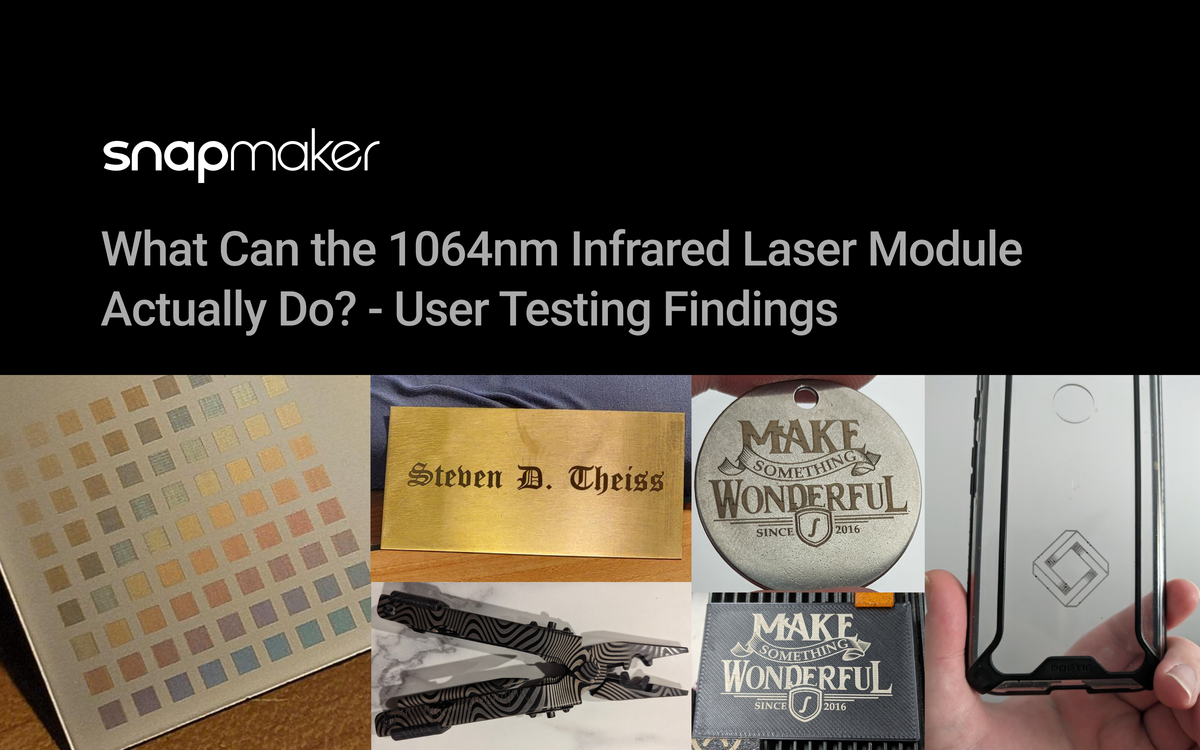
Hi Makers!
Yes, it’s true! Snapmaker is thrilled to introduce our first-ever infrared laser module—the 1064nm Infrared Laser Module. This blog is prepared just for you, ahead of receiving or even considering this module. Special thanks go to the five dedicated users Steven Theiss, Dave Jurgensen, October Grey, Florian Gor, and Linh Tran who took time from April 23, 2024 to May 22, 2024 to participate in this test and share their invaluable insights. Before diving into the specifics of the module, let's briefly introduce our testers.
Participants and Machines in Use
| User | Machine | Modules | How long have you been using laser modules? | What materials do you commonly use for engraving? | Usage Frequency |
|---|---|---|---|---|---|
| Steven | A350 Ray | 1.6W 40W | 1 Year | Stainless304, anodized Al, Wood, Black Acrylic | Almost Daily |
| Linh | A350 Ray | 40W | 3 Years | Wood, Metal, Glass, Plastic, Leather | Frequently |
| Dave | A350 Ray | 1.6W 10W 40W Rotary Module | 3 Years | Multiple Woods, Glass, Steel, Plastic | Almost Daily |
| Florian | Artisan | 10W 40W Rotary Module | 2 Years | Wood, Granite, Slate, Stone, Leather, Stainless Steel | Almost Daily |
| October | A350 F350 | 1.6W 10W Rotary Module | 3 Years | Wood, Stainless Steel, Slate, Ceramic, Anodized Aluminum | Weekly |
Without further ado, let's take a look at the user's experience from receiving the module to completing their engraving project.
First Look at 1064nm Infrared Laser Module
Dave: The Laser arrived fast, and the packaging was in great condition. Both the Courier packaging, and the Snapmaker box and contents.
Steven: As usual, Snapmaker packaged the 2W IR module very well, with secure foam padding. Hard to imagine what it would take to damage one in shipping. The module is maybe 2/3 the size of the 40W laser.
Initial Setup Process and Feedback
| Procedures | Steps | User Experience and Feedback |
|---|---|---|
| Firmware & Software Preparation | Updating the firmware. | Updated without issue. |
| Preparing the software. | Install without issue. | |
| Assembly & Installation | Assembling the module. | Florian: Quick Plate for mounting on the Artisan was unfortunately not included. So I had to unscrew the plate from the 40W module and attach it to the 2W module. P.S. We listened to our test users' feedback, one Adjustable Quick Swap Toolhead Plate for Artisan will be included with the 1064nm Infrared Laser Module, so there is no need to purchase it separately. |
| Connecting the machine to Luban. | Easy. | |
| Fixing laser materials. | Easy. Much less heat being dumped into steel pieces means they don't really need to be clamped. | |
| Preparing and transferring theG-code file | Enter laser G-code generator, and import the model. | No issues - works usually well. |
| Click A-B Position in the top toolbar. | October: Oh, a new and neat feature! | |
| Move the toolhead to the desired point A on the material, click Set A Position; then move the toolhead to the desired point B, click Set B Position. Points A and B together form a rectangle, which will be the future work area. | Steven: It's going to take some time to get used to this new alignment process. Using the control panel to move the laser is hard because my computer faces away from my Ray.By end of beta test period, this procedure was straightforward. Dave: Great to have this feature! I'm so used to not using it, I've got a feeling I'll forget about it often though. However, there will be times where this is going to be much nicer to use, light when doing large batches - so very excited for that! VERY excited.... | |
| Move the model into the AB area, and adjust the size if necessary. | Dave: Highlighted area definately helps define location. | |
| Set the toolpath parameters, and generate the G-code file. | Easy. | |
| Adjust the laser height and start your laser work. | Dave: Oh, adjust the laser height afterwards? This actually is fantastic! Dealing with the very low profile of the 40W, I'm so happy to have this workflow |
Please note that:
For Snapmaker 2.0, when using the 1064nm Infrared Laser Module with Snapmaker 2.0, you do not need to purchase the Quick Swap Toolhead Plate, regardless of having a Quick Swap Kit or not.
For Artisan, one Adjustable Quick Swap Toolhead Plate will be included with the 1064nm Infrared Laser Module, so there is no need to purchase it separately.
Testing the 1064nm Infrared Laser Module
Now, Let's Engrave Something! We're sure everyone is curious about how the 1064nm Infrared Laser performs on metal and plastic.
P.S. In the following text, the 1064nm infrared laser module also refers to the 2W IR module.
Comparison Results between Snapmaker 2W Infrared Laser and 10W/40W Blue Laser Processing
We will share comparison test results for stainless steel, PLA, and black slate.
Metal Engraving
Testing Plan: Engrave the official metal tags provided and compare the differences in results between the 2W IR and the 10W/40W blue light laser processing.
Test Material: Stainless steel.
Steven:
2W IR engraving is much cleaner and uniformly black. 40W engraving needed much more energy dumped into steel and had noticeable warping, unlike 2W IR engraving.
2W IR gives substantially cleaner engraving, with much better line resolution due to small spot size.
Dave:
Florian:
October:
Linh:
Plastic Engraving
Florian:
Testing Plan: Vector engraving in different strengths for comparison between 2W IR and 40W (half diode).
Test Material: Printed black-red silk PLA.
October:
Testing Plan: Engrave with the exact same settings to show difference between 2W IR and 10W Blue laser.
Test Material: 50mm x 75mm Printed PLA Card.
Settings:
Interval: 0.08 mm
Working Speed: 6000 mm/min
Power: 50%
Black Slate Engraving
Steven:
Testing Plan: Engrave with the exact same black slate to show difference between 2W IR and 40W.
Test Material: Black Slate.
Settings:
Interval: 0.05 mm
Working Speed: 2000 mm/min
Power: 20% - 80%

The image engraving on black slate tiles (above) shows that the 2W IR laser can attain a fine gradation of different grey levels on the slate, unlike the 40W laser which seems to have a very binary effect on the slate of either not affecting it or being a uniform white color independent of laser power. The fine gradation of the IR laser allows much higher quality images to be generated on the slate.
More Test Materials
What else can the 1064nm Infrared Laser Module do?
Apart from the comparison tests mentioned above, test users are also exploring what materials the 1064nm Infrared Laser Module can conquer (aluminum, brass, ceramic, phone cases, leather, cups).
Aluminum
Steven:

The greyscale images on aluminum can only be attained using the 2W IR laser, as the 40W laser has very little effect on aluminum. As with the case of black slate, a nice gradation of grey levels can be obtained on the aluminum, resulting in high quality images.

The image was generated by dot-filled engraving on black-anodized aluminum, using an inverted image (negative) that has the brightest regions of the image corresponding to the highest laser powers.
Linh:
October:
Brass
Steven:

The brass engraving above has nice contrast and very sharply defined edges. Attempting to use the 40W laser on brass resluted in significant warpage and unacceptable contrast.
On the more positive side, I was able to use the 2W IR laser to drill a 1mm hole in a 0.5mm piece of brass in about 40 mins without any distortion of the surrounding brass. The 40W laser mostly just dumps heat into brass, doing no real engraving but still warping the brass noticeably.
Ceramic
October:
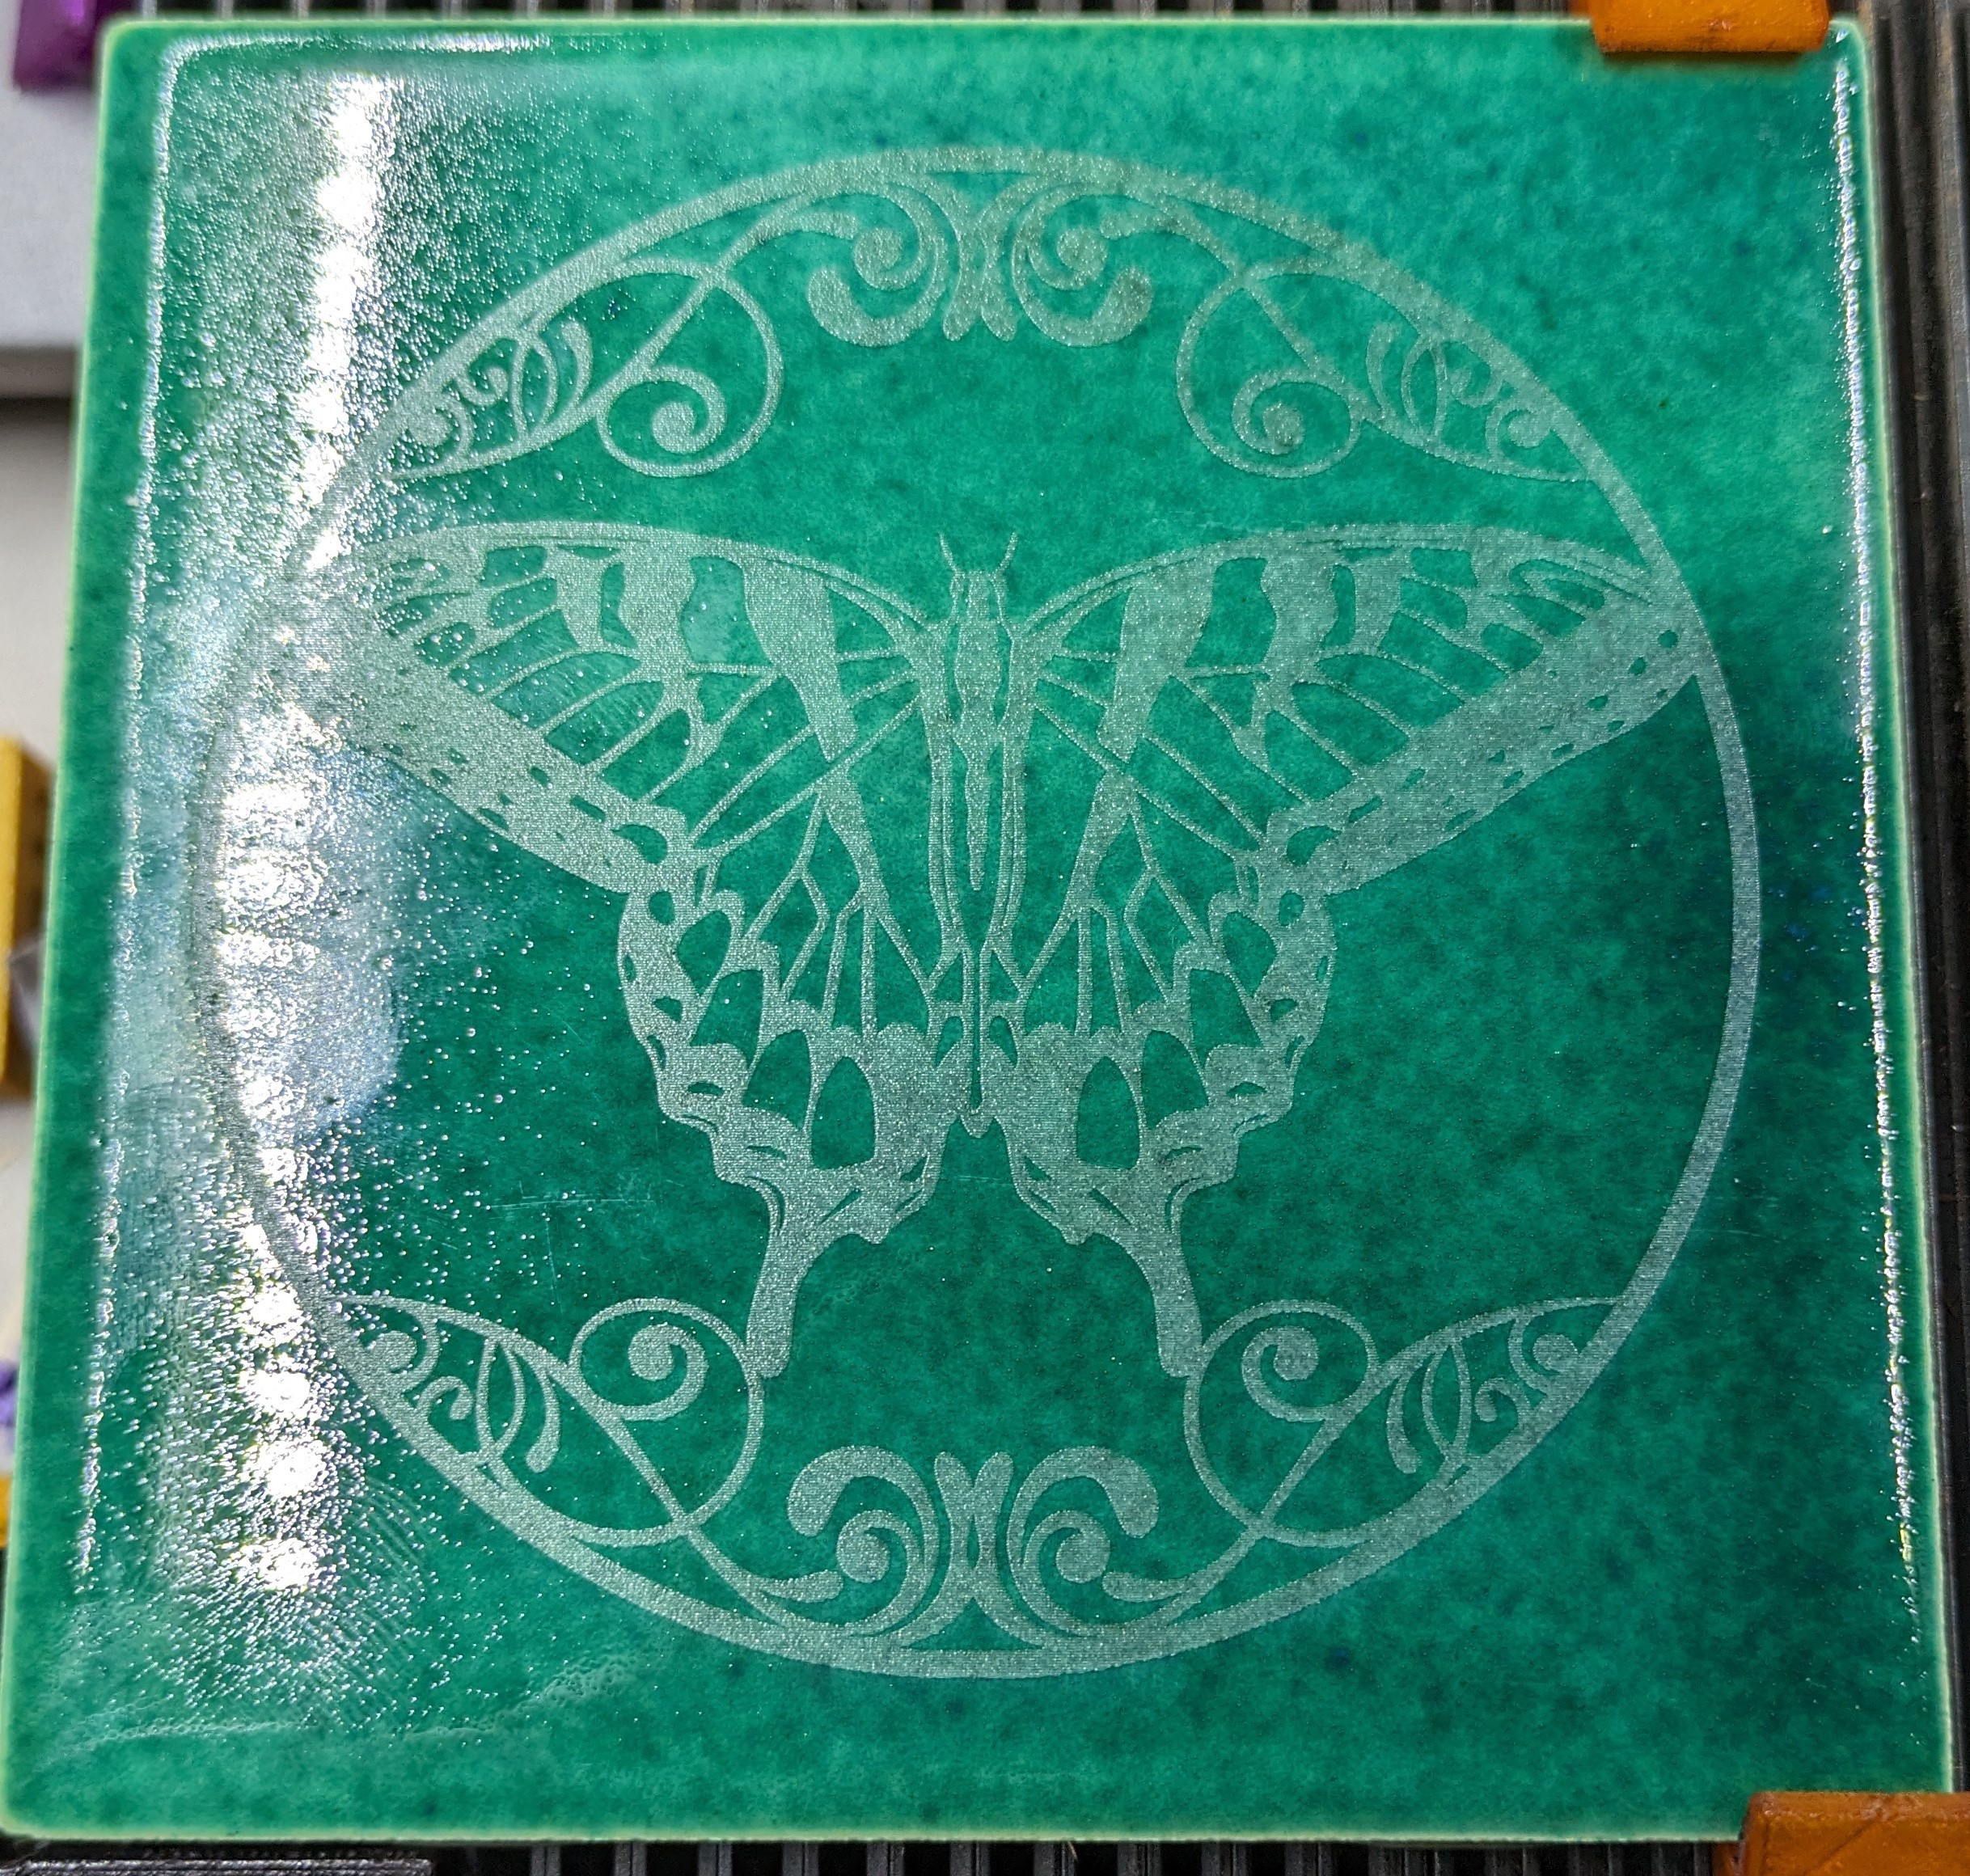
Florian:
In addition, materials that can be engraved with a 1064nm infrared laser module can also find applications in daily life, such as:
Phone Cases
October & Florian:
Leather
Florian & Dave:
Cups
Florian & Dave:
Snapmaker 1064nm Infrared Laser Module Review: Is It Good?
Advantages
From the comparative tests and the material engraving results, it's evident that 1064nm Infrared Laser Module offers several advantages:
- Enhanced Details: The 2W IR laser module produces higher details on various metal and plastic materials, leading to clearer and more distinct engraving outcomes. Compared to blue light lasers, 2W IR achieves better engraving results on materials such as 5052 aluminum, PCB, PLA, white and black acrylic, anodized aluminum, and silicone. You can see the specific effects in the video below.
- Reduced Heat Impact: Unlike blue lasers, the 2W IR has a minimal thermal effect on materials. This characteristic helps in reducing material deformation and burn, preserving the integrity of your projects.
Findings & Other Insights
DoF Testing
October:
The fact that Snapmaker's IR has a much wider depth of focus, more collimated beam. While this decreases the energy dumped into the metal, it gives a lot more leeway in terms of focus. I did a test myself where I changed the focus height by 1mm in either direction and it didn't seem to change the result, so the Snapmaker 2W IR has a DoF of ~5mm at least.
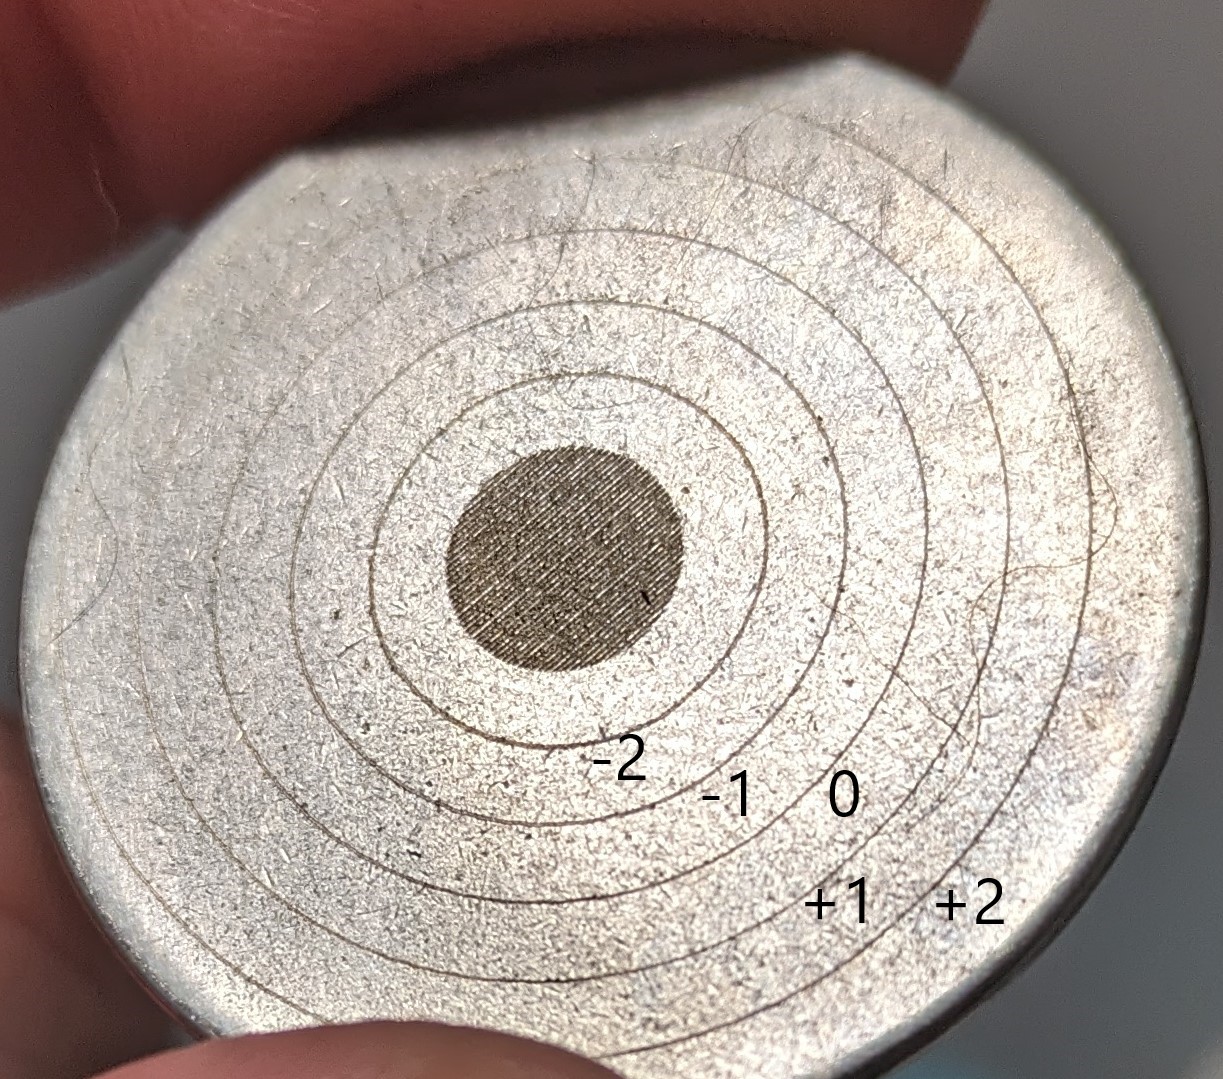
0 being in focus, and the -/+ are down/up in focus by 1mm. You can see the beam widen lightly at -/+2 as DoF changes.
Steven:
On the whole, if I had to choose between the tight DOF and the long DOF, I'd probably choose the long DOF because of the added flexibility it gives in artistic projects. You can always get more energy by going slower, but you can't really do much to adjust for irregular shapes. Probably make a different choice if I were using this for a commercial project where throughput was critical.
One of the key lessons for technology R&D, was always to buy the tool with the most flexibility, since you never really knew what you were going to be doing with a tool in the years to come.
Snapmaker's internal tests confirmed that engraving within a 3mm focal depth range is problem-free, effectively ±1.5mm from the focal point. This extended DoF means the laser can maintain precise focus over a broad range, which is crucial for:
- Improved Engraving Accuracy: Even if the material surface isn't perfectly flat, the laser maintains high engraving precision, minimizing the blur or uneven effects caused by focal deviations.
- Less Frequent Adjustments: Users benefit from not having to frequently adjust the laser focus, which saves time and enhances operational efficiency.
Practical Applications
For example, Dave conducted tests: The quality of the engrave was not hindered when the height changed. The center of the utility knife has a piercing tool that raises the workarea by 5mm, and the engraving is still sharp! In the photo, and even looking at it in person, it gives an illusion that the tool is flat on that surface! It has given me a interesting design idea that I am excited to laser on it. Patterns like camo, illusion patterns, and geometric patterns all would look fantastic on this.
Similar items like this earphone case and mouse can also be easily engraved:
Color Engraving Capabilities
Steven:
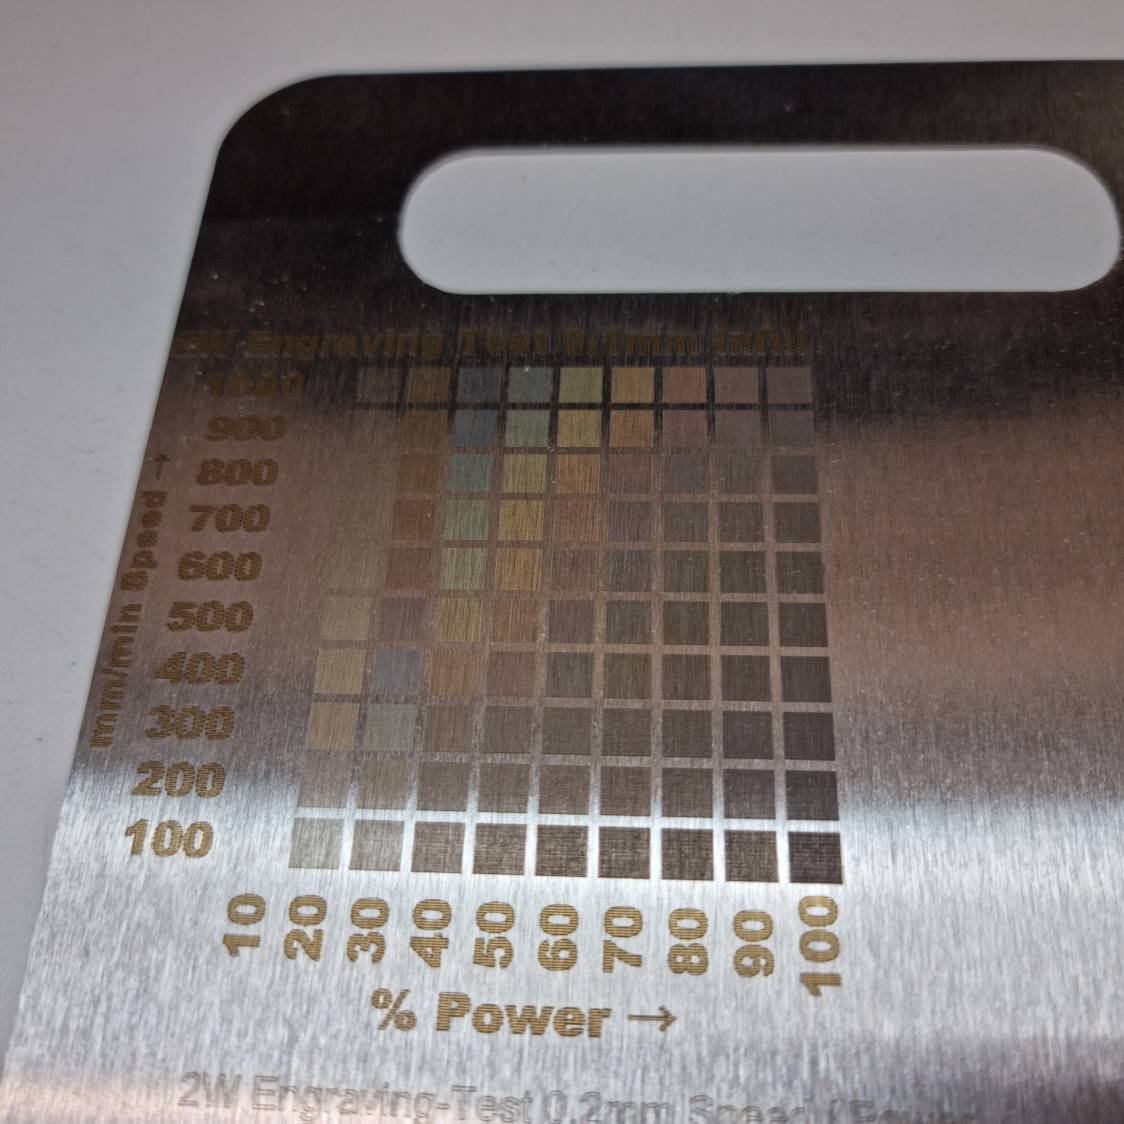
I made many attempts to generate laser color on stainless steel, titanium, tantalum, and niobium sheets using the 2W IR laser. The image above is the best result I obtained. It is on stainless 304. The color seen is very strongly dependent on the viewing angle, and mostly just looks brown when viewed from straight on. I'm not sure why the 40W laser is able to produce better colors on this same steel, but part of the reason may be due to the small spot size of the IR laser in comparison to the 40W. My color experiments suggest that the degree of beam overlap between adjacent raster lines has a strong effect on generated color, which makes sense since the thickness of the metal oxide optical interference layer depends strongly on the integrated amount of laser power that any given area sees. A much tighter beam spot size requires much more closely spaced lines to get appreciable beam overlap, and the 30micron IR spot thus requires line interval spacings around 30microns or less. This is approaching the smallest interval spacings the laser gantry can move, so there isn't much room to maneuver when trying for different colors. Additionally these small spacings result in VERY long times being needed to fill an area when compared to the 40W laser. My conclusion at this point is that the 2W IR laser module is not practical for full color laser marking on stainless steel.

October:
I did a speed test and I can get a good darkness 500mm/min and slower. All are 100% power, 0.05mm interval. Speeds are from upper left to lower right; 3000, 2500, 2000, 1500, 1000, 500, 400, 300, 200. Seems 1000-1500mm/min is a good sweet compromise of speed/darkness.
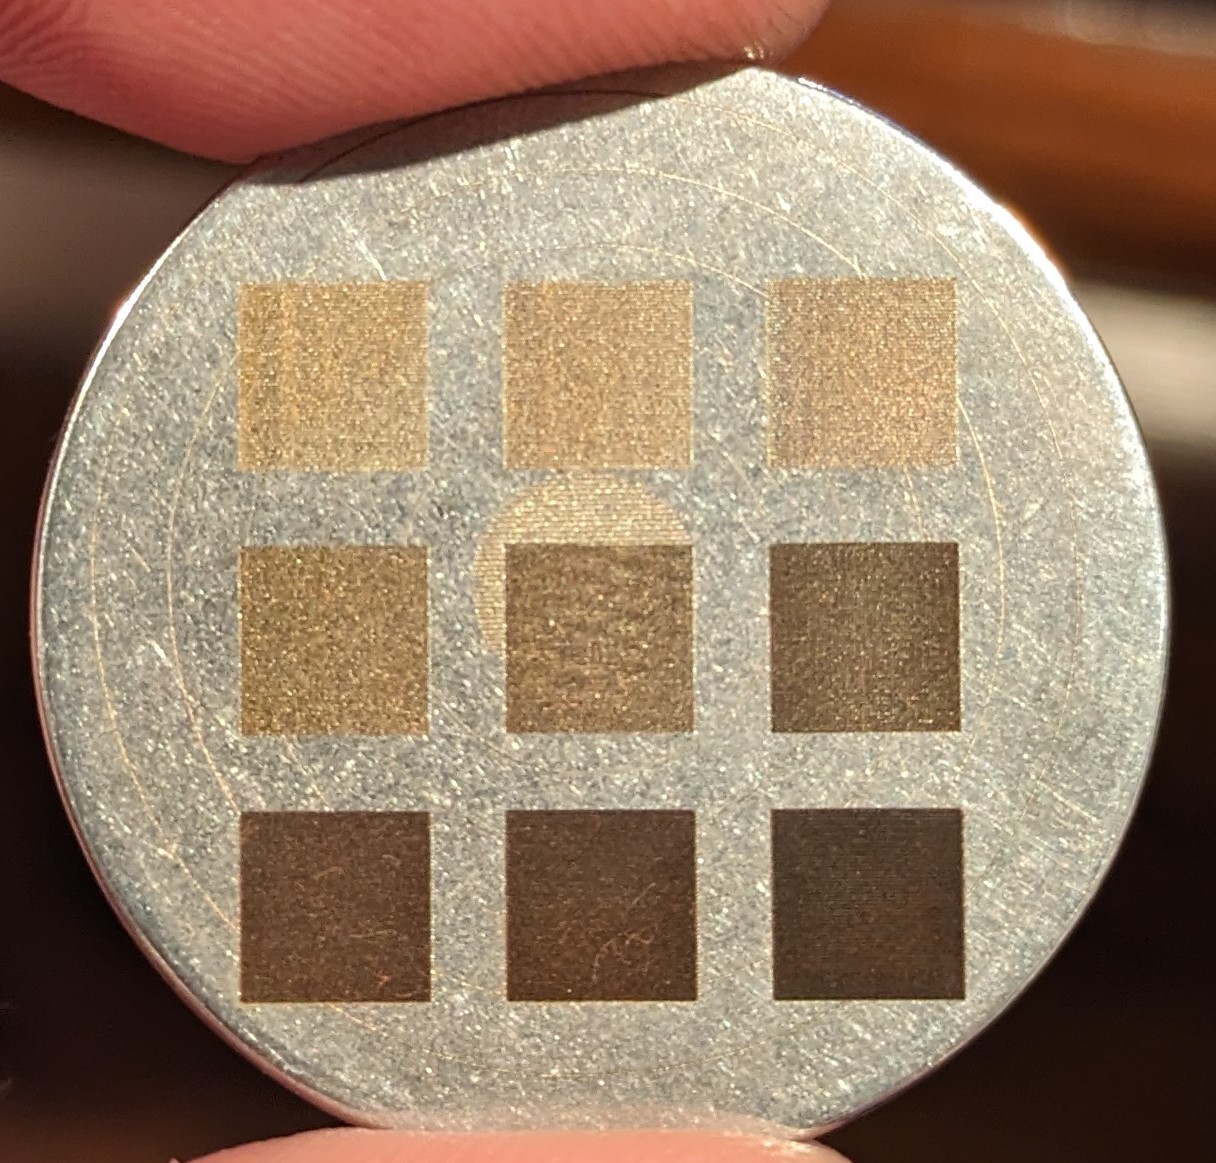
Florian:
It is difficult to photograph and the effect is not as strong as with the 10W or 40W but it works. The 2W IR module can also do color lasers.
Limitations in Material Compatibility
While the 1064nm infrared laser module excels in many aspects, it is important to note its limitations with certain materials. According to user tests from Dave and October, the module does not produce visible marks on several types of acrylic:
Additional thoughts:
Dave:
2W Module: This is very much a specialist laser. It does not have a lot it can engrave on. And for those it can engrave on, there are a few that it excels at by a lot over the Blue Lasers. And the long focal length gives it a unique ability to do some incredible engraves on uneven surfaces. And for times when doing a highly detailed engrave on a small area, the 2W IR is perfect.
My go-to laser will still be my 40W (Ray) and 10W (A350), but there will be a number of times I'll be be very glad to have the 2W IR. For instances, we have a large number of Tradies (electricians, builders, tilers, etc) that have already reached out to get their tools engraved with their names.
Side note: And having the Quickswap means I'm actually happy to switch betweem lasers as I need each one. Previously, when I didn't have that option on the A350 (and hadn't purchased the quickswap upgrade) it would be too much time and effort to make the swap between laser modules.
Luban: So far, I'm never had to use Lightburn for anything. I'm aware of the power of Lightburn, and the flexibility. And there are things I wish Luban have, like better control over layers, and SVG manipulation. BUT, so far all my products are produced within Luban.
Steven:
Luban: In full greyscale (not dithered) toolpath creation, it would be nice to be able to set both a Minimum and Maximum laser power, instead of just Maximum power as it currrently is. For greyscale images on Aluminum (with the IR laser), the lowest you want the laser power to go is about 15-20%. So instead of having the power range from 100% to 0% over the range of black to white in the greyscale image, it works much better to have the power range from 100% to 20%. This option is available in Lightburn.
Learn More from Original Post:
October: 2W IR Q&A Introduction
Steven: 2W IR Findings
Dave: A fun use of the 2W IR Laser
Florian: 2W IR Unboxing
Florian: First impressions of 2W IR
Florian: 2W IR laser can color laser
We greatly value the feedback received through our user testing program, which has provided invaluable insights into the performance and usability of the 1064nm Infrared Laser Module. Stay tuned for more updates as we continue to enhance the Snapmaker user experience based on your valuable feedback.
The 1064nm Infrared Laser Module is available on the Snapmaker Online Store now! Learn more about it HERE.
You can also check out an independent review from 3DWithUs HERE.
Let's make Something Wonderful!

Sincerely,
The Snapmaker Team

