StarMaker | Transform Digital Dreams Into Physical Gifts Through 3D Printing
A few told me that looking at my printed gifts made their days a bit brighter. Hearing such words is really the best thing.
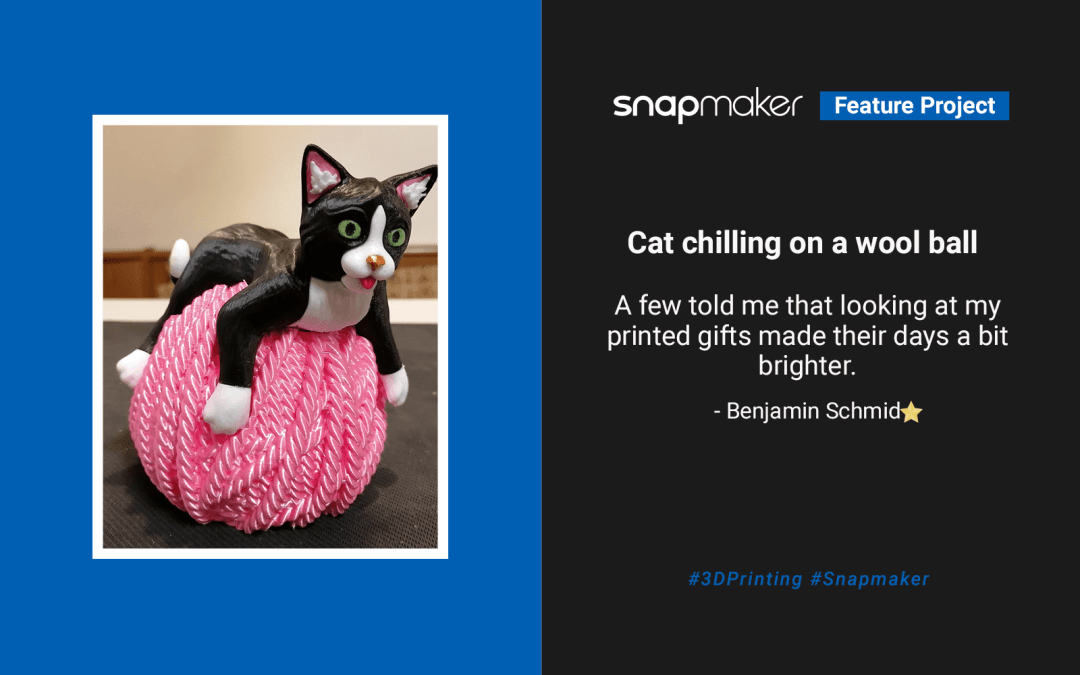
Project: Cat chilling on a wool ball
Designed and printed by: Benjamin Schmid
Benjamin's Etsy store: https://www.etsy.com/shop/DreamRefuge
Software used for the Design: ZBrush
3D printer: Snapmaker 2.0 A350
Supplies:
Eryone PLA+ Black
Eryone PLA+ White
Rambery Silk PinkGiantarm
TopZeal PLA Transparent-Green
Noulei PLA Silk Red
Silicone Glue
Total number of 3D printed parts: 25
Hello fellow Makers,
I'm Benjamin from Germany. I'm a quality assurance technician in an investment casting company at work. I have also operated since ten years two industrial wax printers from Solidscape for prototypes, so 3D printing is not something new for me. Privately I use Zbrush to design segmented figures for assembling and print those parts with the Snapmaker. I do this primarily for personal projects.
Since childhood, I have been a creative person who likes drawing stuff, modeling things with polymer clay, inventing board games. Then my first PC came to me, and my most used software became the Corel Graphic-Suite ( back in 1992, there even was a VHS-Tutorial Video for it :-o). I made many fractals with Ultrafractal and Xenodream, fantasy art with Poser and Vue d'Esprit, company logos, and advertising brochures for acquaintances with a mix of all those programs.
In 2007 I bought ZBrush and I wasn't very comfortable with it in the beginning since the UI was and is rather.. well.. different. Over the years it lived quite through a massive evolution regarding freedom of digital sculpting with less and less worrying about the correct work order and technical limitations. Eventually it became one of my favorite programs. And with the Snapmaker I'm now able to transform those digital dreams into physical gifts.
The Snapmaker is my first private printer, and it appealed to me because of its versatility with the additional laser and milling head. I use the print feature now, but what do I know what other creative ideas will emerge over time. My projects are seldom planned out much beforehand.
If I need some inspiration, I often ask a friend or acquaintance for their favorite color and/or animal, and I design something with this basic information, just for the sake of it. I find the greatest joy in making something for other people, which awakens positive feelings in them. A few told me that looking at my printed gifts made their days a bit brighter. Hearing such words is really the best thing. Mostly I have a loose concept in mind, and it fleshes out while I'm modeling. Sculpting unexpected things often makes me explore new tools and features of ZBrush.
I just had preset the color pink and the animal cat for this project.
Surprisingly the wool ball was the easiest part of this project. I used the curve and array features of ZBrush. I made a ring with a curve in the form of a twisted rope. I then multiplied this with the array function and changed the scale and rotation of the iterations.
The cat was born out of ZSpheres ( a simple method to draft the general form and pose ).
As soon as I was happy with the overall form, a mesh was generated from the draft, and I started sculpting.
After forming a rough form, the first things to do are a few facial features. It's an enormous guidance for the overall feel of the sculpture.
When the overall form was as good as finished ( details still missing ), I decided to cut the model for the different parts. I mask areas which can then be extracted as a new mesh. I then duplicated those new meshes and inflated them a small amount. Now I heavily use the Live Boolean functions to cut away those inflated meshes from the original model. So I get the cavities I need for the separated parts to fit in. I estimated the amount I inflated those meshes based on experience. Making segmented objects out of different filaments instead of painting them is a personal challenge.
The parts of the model then continued to be detailed until I was pleased with them.
Here are all parts of the project separated from each other.
The Live Boolean feature is a great help in ZBrush, which finds overlapping parts and faulty connections. You can subtract volumes from each other, move and scale those subtractions and see the results in real-time.
For the fitting between the cat and the wool ball, I used an inflated copy of the cat model for subtraction. The wool ball was then hollowed out with a scaled-down and smoothed copy of itself.
The printing of the parts was relatively effortless; just for a few of the more tricky parts, I'm still looking for the perfect print orientation.
Some parts were then glued together, whereas a few parts are fit and held without glue, like the eyes ( lucky guess regarding the fitting :-) ).
The finished cat snaps on the wool ball, so no glue is needed for this final connection. I hope it was an interesting read, and I wish us all many years of making loveable things with our Snapmaker. Love and Peace.
Benjamin
About StarMaker Program
StarMaker Program is a series of long-term plans aiming at stimulating the communication within our community as well as the connection between users and the Snapmaker team. Leading users who contribute to skills teaching, inspiration sharing, product feedback and community maintenance will be awarded star honor and other rewards.
https://blog.snapmaker.com/join-our-starmaker-program-and-get-repaid-for-your-contribution/
Previous Works
- StarMaker | Turning Wood into Art with Your Ideas
- StarMaker | My Miniature Dreams. A Bed for Royalty
- StarMaker | 3D Printing Allowed Creation for My Channel
- StarMaker | A Jump Rope Prosthetic for My Dear Niece
- StarMaker | Fusing Traditional Ceramic Processes with Modern Making Methods
- StarMaker | SpaceX Crew Dragon Capsule Model Build | Snapmaker

